Audi Q5: Radiator Grille/Front Trim
Overview - Radiator Grille
Overview - Radiator Grille, Audi Q5
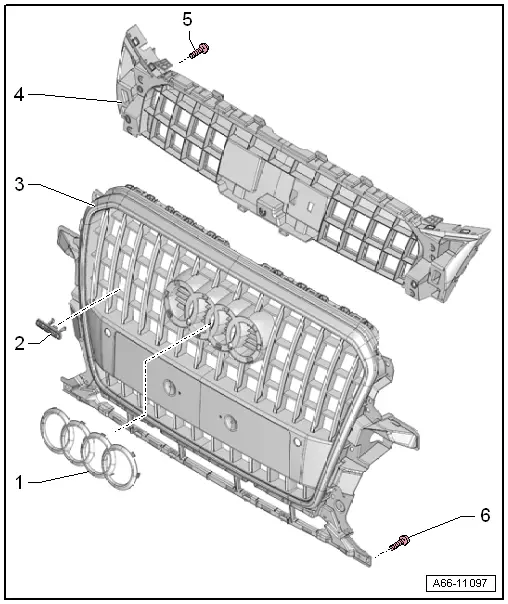
1 - Emblem
- Removing and Installing. Refer to → Chapter "Front Emblems, Removing and Installing, Brand Emblems".
2 - quattro Name Badge
- Equipment level
- Removing and installing. Refer to → Chapter "Front Emblems, Removing and Installing, quattro Name Badge".
3 - Radiator Grille
- There are different versions. Allocation. Refer to the Parts Catalog.
- Removing and installing. Refer to → Chapter "Radiator Grille, Removing and Installing".
4 - Reinforcement Brace
- for the radiator grille
- There are different versions. Allocation. Refer to the Parts Catalog.
- Removing and installing. Refer to → Chapter "Reinforcement Brace, Removing and Installing".
5 - Bolt
- 1.5 Nm
6 - Bolt
- 1.5 Nm
Overview - Radiator Grille, Audi Q5 S-Line and Audi SQ5
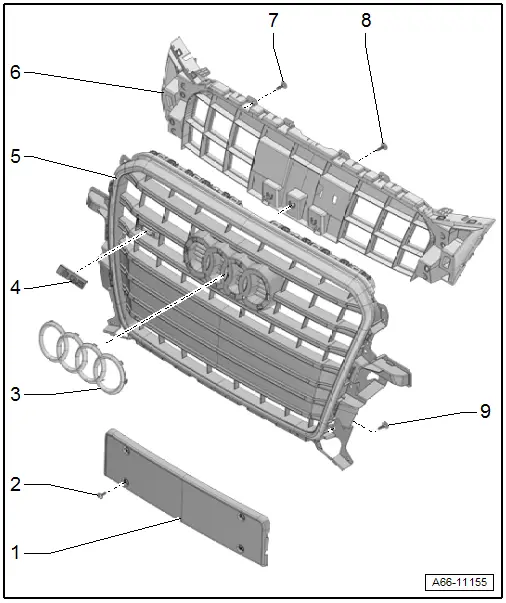
1 - License Plate Bracket
2 - Bolt
- 1.5 Nm
3 - Emblem
- Removing and Installing. Refer to → Chapter "Front Emblems, Removing and Installing, Brand Emblems".
4 - SQ5 Name Badge
- Equipment level
- Removing and installing. Refer to → Chapter "Front Emblems, Removing and Installing, SQ5 Name Badge".
5 - Radiator Grille
- There are different versions. Allocation. Refer to the Parts Catalog.
- Removing and installing. Refer to → Chapter "Radiator Grille, Removing and Installing".
6 - Reinforcement Brace
- for the radiator grille
- There are different versions. Allocation. Refer to the Parts Catalog.
- Removing and installing. Refer to → Chapter "Reinforcement Brace, Removing and Installing".
7 - Bolt
- 1.5 Nm
8 - Bolt
- 1.5 Nm
9 - Bolt
- 1.5 Nm
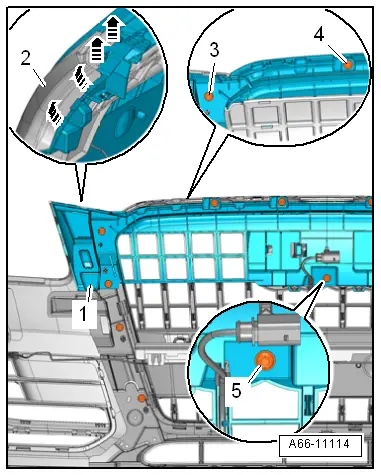
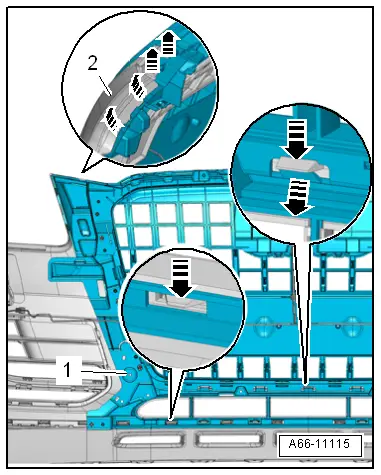
Reinforcement Brace, Removing and Installing
Removing
- Remove the front bumper cover. Refer to → Chapter "Bumper Cover, Removing and Installing".
- Free up the wiring harness, if equipped.
- Remove the bolts -3, 4 and 5-.
- Open the retainers -arrows- and remove the reinforcement brace -1- from the bumper cover -2-.
Installing
Install in reverse order of removal. Note the following:
- Install the front bumper cover. Refer to → Chapter "Bumper Cover, Removing and Installing".
Radiator Grille, Removing and Installing
Radiator Grille, Removing and Installing, Vehicles through MY 2012
1 - Radiator Grille
- Removing:
- Remove the front bumper cover. Refer to → Chapter "Bumper Cover, Removing and Installing".
- Remove the bolts on the left and right sides of the radiator grille.
- Disengage the radiator grille at the top and bottom -arrows- and lift it out.
2 - Bumper Cover
- Removed
3 - Bolt
- 2.5 Nm
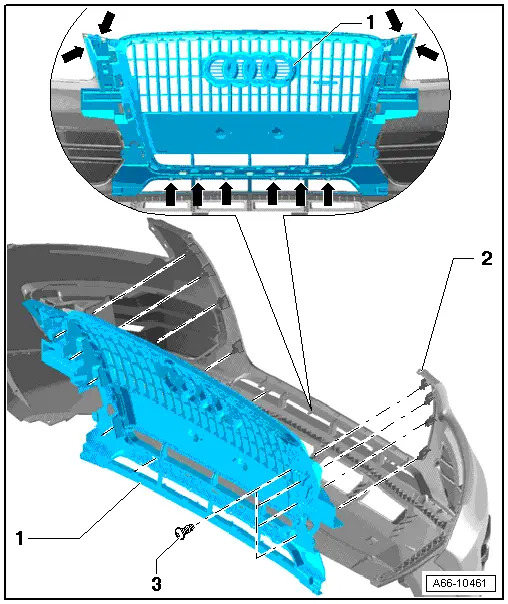
Radiator Grille, Removing and Installing, Vehicles from MY 2013, Audi Q5
Removing
- Remove the molded foam part. Refer to → Chapter "Attachments, Removing and Installing".
- Remove the bolts -arrows-.
- Free up the wiring harness -1-.
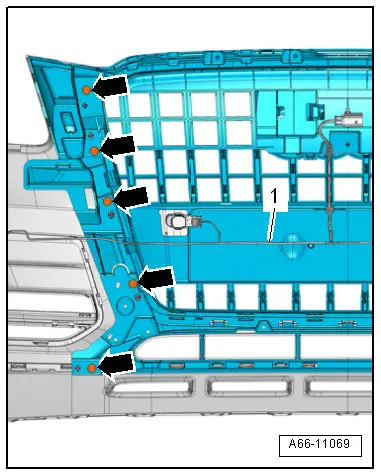
- Open the tabs and retainers -arrows-.
- Remove the radiator grille -1- from the bumper cover -2-.
- The following parts must be removed when replacing the radiator grille:
- Remove the reinforcement brace, refer to → Chapter "Reinforcement Brace, Removing and Installing".
Installing
Install in reverse order of removal. Note the following:
- Install the molded foam part. Refer to → Chapter "Attachments, Removing and Installing".
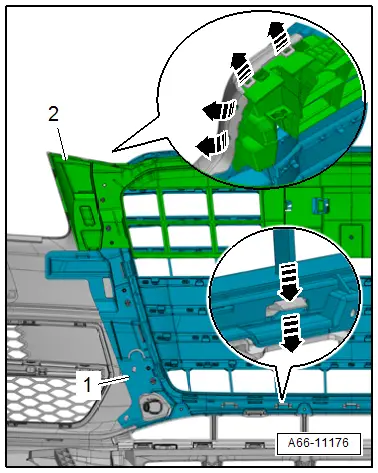
Radiator Grille, Removing and Installing, Audi Q5 S-Line and Audi SQ5
Removing
- Remove the molded foam part. Refer to → Chapter "Attachments, Removing and Installing".
- Free up the wiring harness -1-.
- Remove the bolts -arrows-.
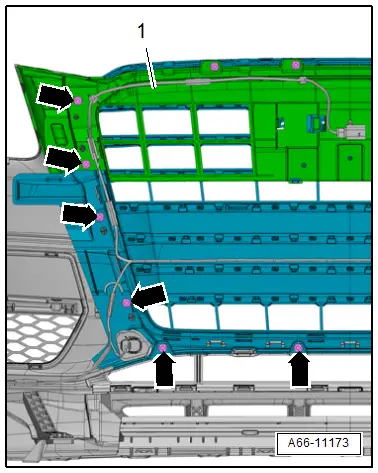
- Open the tabs and retainers -arrows-.
- Remove the radiator grille -1- from the bumper cover -2-.
- The following parts must be removed when replacing the radiator grille:
- Remove the reinforcement brace, refer to → Chapter "Reinforcement Brace, Removing and Installing".
Installing
Install in reverse order of removal. Note the following:
- Install the molded foam part. Refer to → Chapter "Attachments, Removing and Installing".
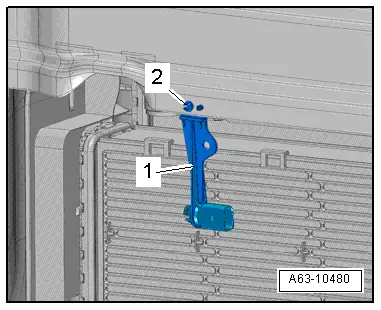
Outside Air Temperature Sensor -G17- Bracket, Removing and Installing
Removing
- Remove the front bumper cover. Refer to → Chapter "Bumper Cover, Removing and Installing".
- Remove the Outside Air Temperature Sensor -G17-. Refer to → Electrical Equipment; Rep. Gr.90; Instrument Cluster; Outside Air Temperature Sensor, Removing and Installing.
- Remove the expanding pin -2- and the bracket -1-.
Installing
Install in reverse order of removal. Note the following:
- Install the Outside Air Temperature Sensor -G17-. Refer to → Electrical Equipment; Rep. Gr.90; Instrument Cluster; Outside Air Temperature Sensor, Removing and Installing.
- Install the front bumper cover. Refer to → Chapter "Bumper Cover, Removing and Installing".
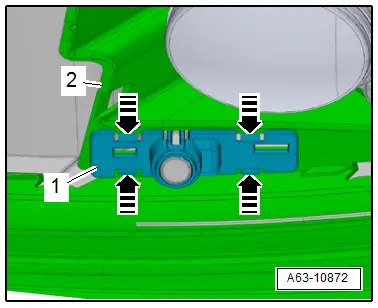
Parking Aid Sensor Mount, Removing and Installing
Removing
- Remove the air intake grille. Refer to → Chapter "Air Intake Grille, Removing and Installing, Audi Q5 S-Line and Audi SQ5".
- Release the retainers -arrows- and remove the mount -1- from the bumper cover -2-.
- Disconnect the connector.
- The following parts must be removed when replacing the mount:
- Remove the front parking aid sensor. Refer to → Electrical Equipment; Rep. Gr.94; Parking Aid; Front Parking Aid Sensor, Removing and Installing.
Installing
Install in reverse order of removal. Note the following:
- Install air intake grille. Refer to → Chapter "Air Intake Grille, Removing and Installing, Audi Q5 S-Line and Audi SQ5".
Spoiler
Overview - Spoiler
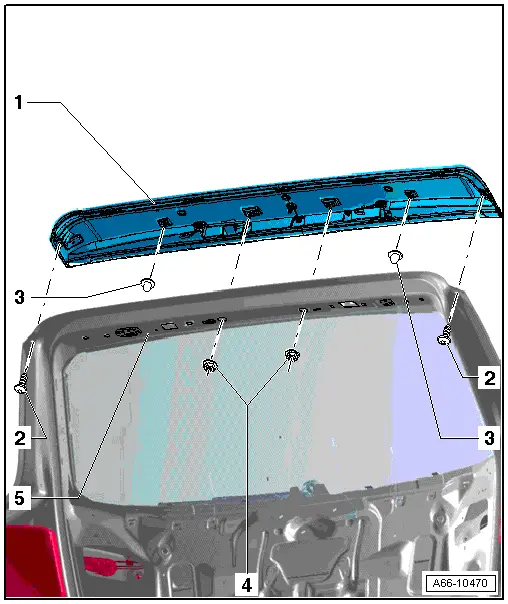
1 - Roof Spoiler
- Removing:
- Remove the rear lid trim panel. Refer to → Body Interior; Rep. Gr.70; Luggage Compartment Trim Panels; Upper Rear Lid Trim Panel, Removing and Installing
- Disconnect the antenna and brake lamp connectors.
- Remove the antenna amplifier.
- Remove the screws and nuts and then remove the roof spoiler from the rear lid.
2 - Bolt
- 2.5 Nm
3 - Clip
- Quantity: 4
4 - Nut
- Self-locking, replace after removing.
- 2.5 Nm
5 - Rear Lid

