Audi Q5: Front Wheel Cover, Replacing
Special tools and workshop equipment required
- Roller -3356-
- Wiring Harness Repair Set - Hot Air Blower -VAS 1978/14A-
- Cleaning Solution -D 009 401 04-
Wheel Cover, Removing and Installing, Version 1
- Special tools and equipment. Refer to → Chapter "Front Wheel Cover, Replacing".
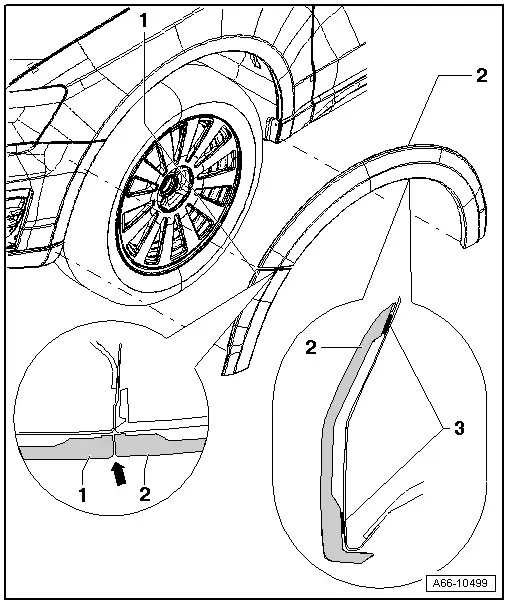
1 - Front Bumper Cover
- Removing:
- Warm the cover with a hot air gun and remove it.
- Installing:
- The bumper cover must be free of dust and grease.
- Warm the area where the adhesive will be applied to approximately 40 ºC (104 ºF) with a hot air blower.
- Peel off the protective film from adhesive tape.
- Push the bumper cover onto the fender cover as far as the stop -arrow- (zero gap) and press on it firmly with the Roller - 3356-.
2 - Fender Cover
- Removing:
- Warm the cover with a hot air gun and remove it.
- Installing:
- The fender must be free of dirt and grease in the adhesive area.
- Warm the area where the adhesive will be applied to approximately 40 ºC (104 ºF) with a hot air blower.
- Peel off the protective film from adhesive tape.
- Position the cover upward making sure it fits exactly to the contour of the fender and then press on it lightly.
- Peel off the protective film from the adhesive tape and press on the cover.
- Press the cover firmly and evenly over the entire surface with the Roller - 3356-.
3 - Adhesive Tape
- When installing, peel off the protective film sideways from the adhesive tape.
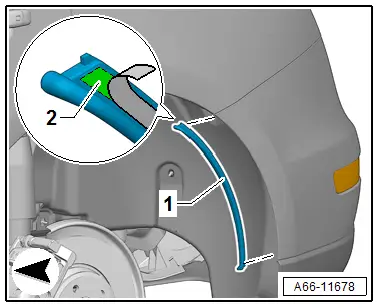
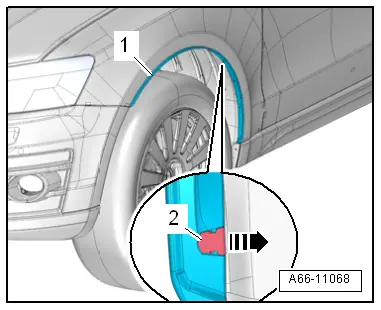
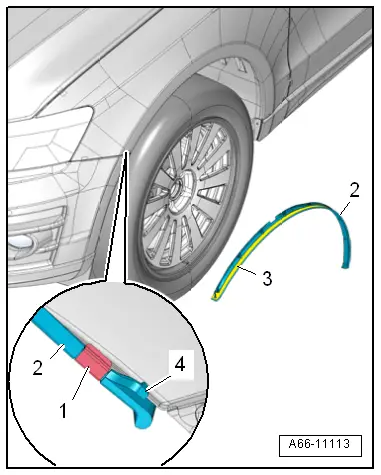
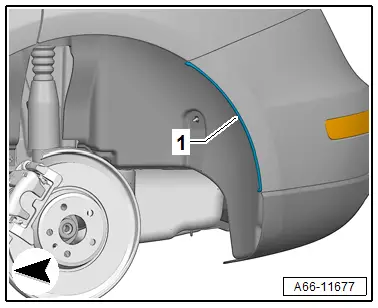
Front Wheel Cover, Removing and Installing, Version 2
- Special tools and equipment. Refer to → Chapter "Front Wheel Cover, Replacing".
Removing
- Open the clips -2- in direction of -arrow-.
- Warm the cover -1- with a hot air blower and remove it.
Installing
Install in reverse order of removal and note the following:
- The fender must be free of dirt and grease in the adhesive area.
- Warm the area where the adhesive will be applied to approximately 40 ºC (104 ºF) with a hot air blower.
- Remove the peel-off backing -3- from the tape.
- Place the cover -2- on the fender. Install the tab -4- behind the fender, as illustrated.
- Press the cover firmly and evenly over the entire surface with the Roller - 3356-.
- Secure the cover with the clips -1-.
Rear Wheel Cover, Replacing
Rear Wheel Cover, Removing and Installing, Version 1
- Special tools and equipment. Refer to → Chapter "Rear Wheel Cover, Replacing".
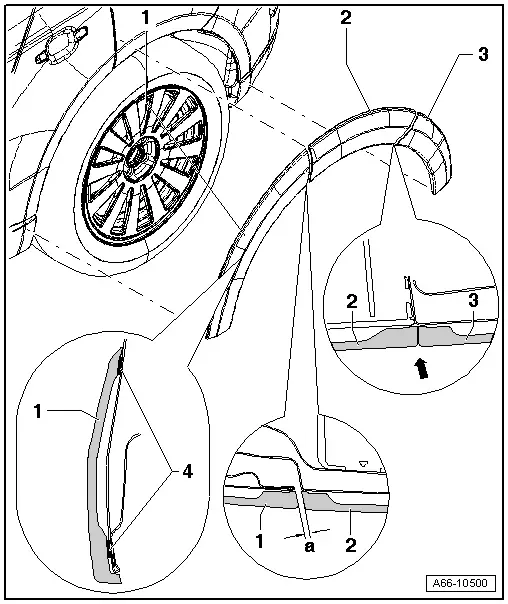
1 - Rear Door Gap Cover
- Removing:
- Warm the cover with a hot air gun and remove it.
- Installing:
- The rear door must be free of dust and grease.
- Warm the area where the adhesive will be applied to approximately 40 ºC (104 ºF) with a hot air blower.
- Peel off the protective film from adhesive tape.
- Position the rear door cover to the side panel cover at distance -a- , and push on it with the Roller - 3356-.
- Dimension -a- = 3.5 mm.
2 - Side Panel Cover
- Removing:
- Warm the cover with a hot air gun and remove it.
- Installing:
- The side panel must be free of dirt and grease in the adhesive area.
- Warm the area where the adhesive will be applied to approximately 40 ºC (104 ºF) with a hot air blower.
- Peel off the protective film from adhesive tape.
- Position the cover upward making sure it fits exactly to the contour on the side panel and then press on it lightly.
- Peel off the protective film from the adhesive tape and press on the cover.
- Press the cover firmly and evenly over the entire surface with the Roller - 3356-.
3 - Rear Bumper Cover
- Removing:
- Warm the cover with a hot air gun and remove it.
- Installing:
- The bumper cover must be free of dust and grease.
- Warm the area where the adhesive will be applied to approximately 40 ºC (104 ºF) with a hot air blower.
- Peel off the protective film from adhesive tape.
- Push the bumper cover onto the side panel cover as far as the stop -arrow- ( zero gap ) and press it on firmly with the Roller - 3356-.
4 - Adhesive Tape
Rear Wheel Cover, Removing and Installing, Version 2
- Special tools and equipment. Refer to → Chapter "Rear Wheel Cover, Replacing".
Removing
- Loosen the wheel cover -1- in the area of the bonding and push to the side.
- Warm and remove the wheel cover bonding -2- using a hot air gun.
Installing
Install in reverse order of removal and note the following:
- The bumper cover -1- in the area of the bonding must be free of dust and grease.
- Completely remove the adhesive residue and clean the adhesion area using Cleaning Solution -D 009 401 04-
- Warm the area where the adhesive will be applied to approximately 40 ºC (104 ºF) with a hot air blower.
- Remove the protective film from the adhesive tape.
- Position the cover -2- according to the contour, to do so push the stop toward the rear of the bumper cover.
- Press the cover firmly and evenly over the entire surface with the Roller - 3356-.