Audi Q5: Tie Rod, Removing and Installing, Hydraulic Power Steering Gear
Special tools and workshop equipment required
- Torque Wrench 1332 40-200Nm -VAG1332-
- Hose Clip Pliers -VAG1921-
- Torque Wrench Insert - Open Jaw -VAG1923-
- Locking Pliers -VAS6199-
- Puller - Ball Joint -T40010A-
- Torque Wrench 1332 Insert - Ring Wrench - 18mm -VAG1332/10-
- or Torque Wrench 1332 Insert - Ring Wrench - 21mm -VAG1332/7-
Removing
The tie rods can be removed and installed with the steering gear in the vehicle.
- Place the vehicle on a hoist.
- Remove the wheel.
- Remove the noise insulation. Refer to → Body Exterior; Rep. Gr.66; Noise Insulation.
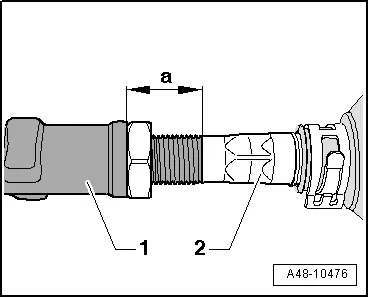
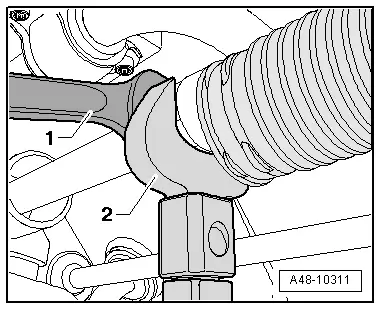
- Measure the dimension -a- between the tie rod head -1- and the left and right tie rod -2- and make a note of the value. Dimension -a- must be the same on the left and right sides after installing.
- If necessary, shorten the "longer" tie rod head (installed it deeper into the tie rod).
- Clean the power steering gear and subframe in the boot area.
 Caution
Dirt must not enter the power steering gear and boot when replacing the tie rod.
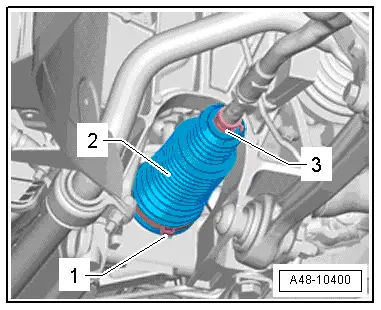
- Open the spring clamp -3- with the Hose Clip Pliers -VAG1921- and remove it.
- Remove the clamp -1- and remove the boot -2- from the power steering gear.
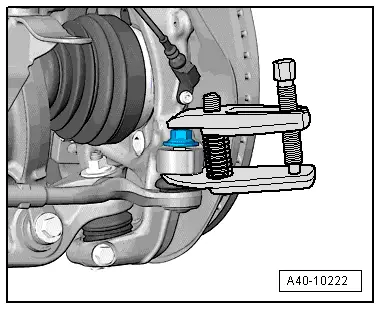
- Remove the nut -1- from the tie rod end joint pin -2- until it is flush with the joint pin threads. Counterhold when loosening if necessary.
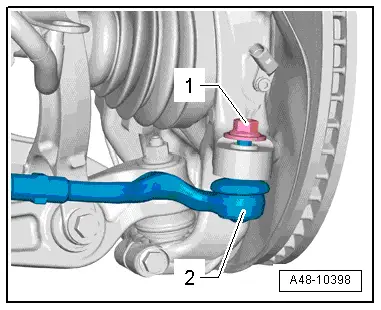
To protect thread, screw nut on pin a few turns.
- Remove the tie rod end from the wheel bearing housing using the Puller - Ball Joint -T40010A-. Remove the nut.
 Note
Note
Make sure that both puller lever arms are parallel to each other when using greatest force, adjust if necessary.
- Remove tie rod. Counterhold at the power steering gear coupling rod with an open end wrench -1-.
2 - Torque Wrench Insert - Open Jaw -VAG1923-

Installing
Install in reverse order of removal. Note the following:
- Attach the tie rod using the Torque Wrench Insert - Open Jaw -VAG1923--2-. Counterhold at the power steering gear coupling rod with an open end wrench -1-.
- Replace the spring clamp -3- and the clamp -1-.

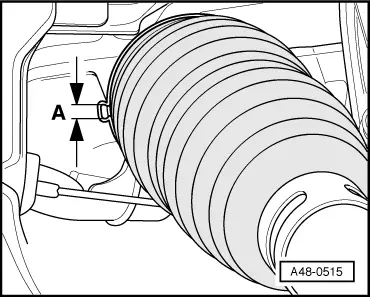
Clamping Sleeves, Installing:
Make sure that dimension -A- of 5.7 mm maximum is observed. Dimension -A- must never be greater than 5.7 mm, otherwise there may be problems with the seal.
- Insert a new clamping sleeve and tighten it with the Locking Pliers -VAS6199-.
- Align tie rod so that tie rod ball joint pints are in installation location.
- Insert the tie rod into the wheel bearing housing as far as the stop.
- Install the wheel and tighten. Refer to → Chapter "Wheel Bolt Tightening Specifications".
- An axle alignment may be required. Refer to → Chapter "Evaluating Need for Axle Alignment".