Audi Q5: Tie Rod End, Removing and Installing
Tie Rod End, Removing and Installing, Electromechanical Steering Gear
Special tools and workshop equipment required
- Torque Wrench 1331 5-50Nm -VAG1331-
- Torque Wrench 1332 40-200Nm -VAG1332-
- Torque Wrench 1332 Insert - Ring Wrench - 21mm -VAG1332/7-
- Puller - Ball Joint -T40010A-
Removing
- Remove the wheels.
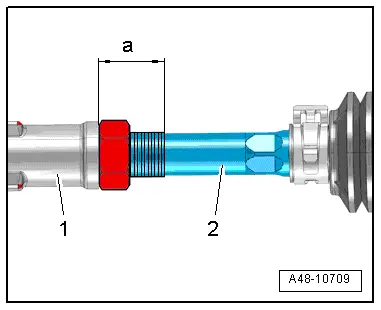
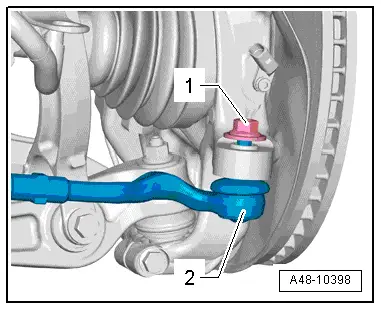
- Measure the dimension -a- between the tie rod head -1- and the left and right tie rod -2- and make a note of the value. Dimension -a- must be the same on the left and right sides after installing.
- If necessary, shorten the "longer" tie rod head (installed it deeper into the tie rod).

- Remove the nut -1- from the tie rod end joint pin -2- until it is flush with the joint pin threads. Counterhold when loosening.
 Note
Note
To protect thread, screw nut on pin a few turns.

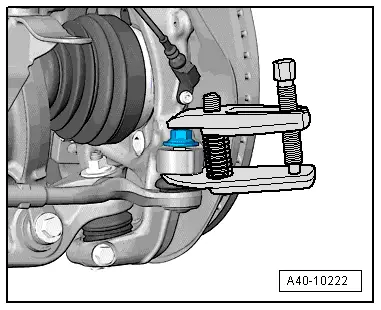
- Remove the tie rod end from the wheel bearing housing using the Puller - Ball Joint -T40010A-. Remove the nut.
 Note
Note
Make sure that both puller lever arms are parallel to each other when using greatest force, adjust if necessary.

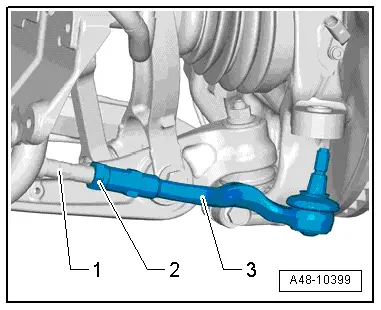
- Loosen the nut -2-. Counterhold the tie rod end -3-.
- Remove the tie rod end -3-.

Installing
Install in reverse order of removal. Note the following:
- Mount the tie rod head -1- on the tie rod -2- until dimension -a-, which was measured during removal, is reached.
- Align the tie rod head -1- so that the pin is in the installation position.
- Insert the tie rod end into the wheel bearing housing as far as the stop.
- Tighten the nut -1-. Counterhold when tightening.

- Tighten the nut -2-
- Mount the front wheel. Refer to → Chapter "Wheel Bolt Tightening Specifications".
- An axle alignment may be required. Refer to → Chapter "Evaluating Need for Axle Alignment".
The axle alignment must be performed on a VW/Audi approved alignment stand.
Tie Rod End, Removing and Installing, Hydraulic Power Steering Gear
Special tools and workshop equipment required
- Torque Wrench 1331 5-50Nm -VAG1331-
- Torque Wrench 1332 40-200Nm -VAG1332-
- Puller - Ball Joint -T40010A-
- Torque Wrench 1332 Insert - Ring Wrench - 18mm -VAG1332/10-
- or Torque Wrench 1332 Insert - Ring Wrench - 21mm -VAG1332/7-
Different tie rod ends were installed during production; the difference is the joint pin thread length. Refer to the Parts Catalog.
When replacing the tie rod end, make sure the length of the thread on the tie rod end is sufficient (there must be approximately 5 mm extra thread). If this is not the case, then install a new tie rod end with a longer thread pin, allocation. Refer to the Parts Catalog
Removing
- Place the vehicle on a hoist.
- Remove the wheel.
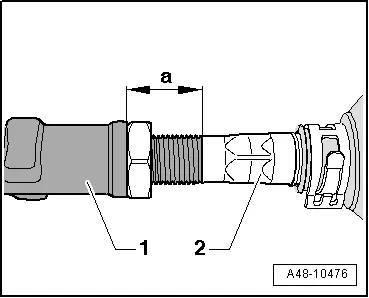
- Measure the dimension -a- between the tie rod head -1- and the left and right tie rod -2- and make a note of the value. Dimension -a- must be the same on the left and right sides after installing.
- If necessary, shorten the "longer" tie rod head (installed it deeper into the tie rod).

- Remove the nut -1- from the tie rod end joint pin -2- until it is flush with the joint pin threads. Counterhold when loosening if necessary.

To protect thread, screw nut on pin a few turns.
- Remove the tie rod end from the wheel bearing housing using the Puller - Ball Joint -T40010A-. Remove the nut.
 Note
Note
Make sure that both puller lever arms are parallel to each other when using greatest force, adjust if necessary.
- Loosen the nut -2-. Counterhold the tie rod end -3-.
- Remove the tie rod end -3-.

Installing
Install in reverse order of removal. Note the following:
- Mount the tie rod head -1- on the tie rod -2- until dimension -a-, which was measured during removal, is reached.
- Align the tie rod head -2- so that the pin is in the installation position.
- Insert the tie rod end into the wheel bearing housing as far as the stop.
- Tighten the nut -1-. Counterhold it when tightening if necessary.
- Tighten the nut -2-
- Install the wheel and tighten. Refer to → Chapter "Wheel Bolt Tightening Specifications".
- An axle alignment may be required. Refer to → Chapter "Evaluating Need for Axle Alignment".

Steering Gear, Adjusting
Special tools and workshop equipment required
- Torque Wrench 1331 5-50Nm -VAG1331-
 Note
Note
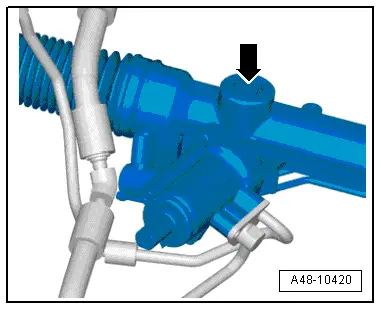
Two technicians are required for adjustments. Adjust with engine off.
- Remove the noise insulation. Refer to → Body Exterior; Rep. Gr.66; Noise Insulation.
- Bring the power steering gear into the center position. Refer to → Chapter "Steering, Centering, Hydraulic Power Steering Gear".
- Turning the steering wheel back and forth (approximately 30º off center axis) will produce a rattling noise if steering play is too large.
- The second mechanic must carefully screw the adjustment screw -arrow- until the knocking noise can no longer be heard inside the vehicle.
- Perform a road test.
- Make sure the steering returns to the center without sticking. Adjust the setting if necessary.
Servotronic Solenoid Valve -N119-, Removing and Installing
Special tools and workshop equipment required
- Torque Wrench 1332 40-200Nm -VAG1332-
- Steering Gear Grease
Removing
- Replacement is only possible when the steering gear is removed.
- Remove the steering gear. Refer to → Chapter "Steering Gear, Removing and Installing, Hydraulic Power Steering Gear".
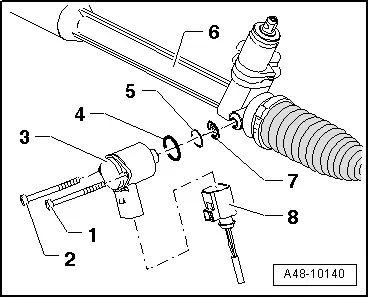
- Always the clean steering gear -6- in the solenoid valve -3- area.
- Make sure dirt cannot get into the steering gear -6-.
- Disconnect the connector -8-.
- Make sure dirt cannot get into the connector -8-.
- Remove the bolts -1- and -2-.
- Remove the solenoid valve -3- from the steering gear -6-.
- Remove the screen -7- from the steering gear -6- and clean steering gear if necessary.
Installing
Install in reverse order of removal. Note the following:
- Install a new screen -7-.
- Thinly coat the seal -4- and -5- with Steering Gear Grease and insert.
- Place the solenoid valve -3- in the steering gear -6- as far as the stop. Do not tilt solenoid valve when doing so.
 Caution
Always follow screw tightening sequence.
- Tighten screws -1- and -2- as follows:
1 - Tighten the bolt -1- to 0.5 Nm.
2 - Tighten the bolt -2- to 1.5 Nm.
3 - Tighten the bolt -1- to 3.0 Nm.
4 - Tighten the bolt -2- to 3.0 Nm.
- Install the steering gear. Refer to → Chapter "Steering Gear, Removing and Installing, Hydraulic Power Steering Gear".


