Audi Q5: Power Steering Fluid Level, Checking
- Do not run engine and turn front wheels to straight ahead position.
Fluid cold (approximately 20 ºC (68 ºF) ):
- Remove the cap.
- Wipe dipstick off with a clean cloth.
- Screw cap on hand-tight and unscrew again.
 Note
Note
The cap must be fully screwed in order to obtain an accurate fluid level reading.
- Check the oil level: the oil level must be in the -A- range.
Fluid at operating state temperature (approximately 80 ºC (176 ºF) ):
- Remove the cap.
- Wipe dipstick off with a clean cloth.
- Screw cap on hand-tight and unscrew again.
 Note
Note
The cap must be fully screwed in order to obtain an accurate fluid level reading.
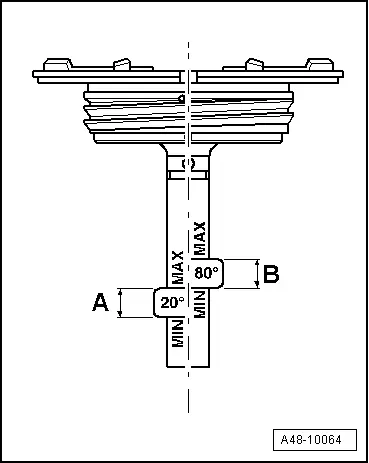
- Check the oil level: the oil level must be in the -B- range.
 Note
Note
- Fluid must be drawn off if the level is above the specified range.
- If oil level is below aforementioned area, then the hydraulic system must be checked for leaks. It is not enough to just add fluid.
- Do not use drained hydraulic oil.

Steering, Bleeding After Replacing
After steering system reconstruction, system must be bled differently depending on extent of reconstruction.
Bleed after replacing entire steering system or replacing steering gear:
- Fill the reservoir completely.
- Lift the vehicle just enough so that all the wheels are off the ground.
- Engine switched off
- Turn steering wheel from lock to lock 10 times, with engine switched off.
- Fill the reservoir completely.
- Briefly start engine (maximum two seconds).
Pump must not draw in any air. Steering wheel must not be turned under any circumstances.
Approximately 30 seconds wait between individual engine starts.
- Check the power steering fluid level and add if necessary.
- Repeat this process until oil level remains constant.
- Turn steering wheel from lock to lock 10 times, with engine switched off.
- Check the power steering fluid level and add if necessary.
- Start the engine.
- Turn steering wheel 10 times from stop to stop.
- Check the power steering fluid level and add if necessary.
Any air remaining in the steering system will dissipate by itself when driving over the next 10 to 20 km (6 to 12 miles).
Bleeding after replacing a component in the steering system, except for the steering gear:
- Check the power steering fluid level and add if necessary.
- Briefly start engine (maximum two seconds).
Pump must not draw in any air and steering wheel must not be turned under any circumstances.
Approximately 30 seconds wait between individual engine starts.
- Check the power steering fluid level and add if necessary.
- Repeat this process until oil level remains constant.
- Start the engine and allow it to run 2 3 minutes, do not turn the steering wheel.
Any air remaining in the steering system will dissipate by itself when driving over the next 10 to 20 km (6 to 12 miles).
Steering, Checking for Leaks
 Note
Note
Following installation operations and with no hydraulic fluid in the expansion tank, the steering system must be checked for leaks.
- Remove the noise insulation. Refer to → Body Exterior; Rep. Gr.66; Noise Insulation.
- Start the engine.
- Turn steering wheel in both directions to full lock and hold briefly.
This builds up the maximum possible pressure.
 Note
Note
To avoid damage to pump, steering wheel must not be held at stop longer than 10 seconds during this test.
In this position, the following components must be checked for leaks.
- Seal ring for steering pinion at the steering gear valve housing.
- All line connections.
- All wiring connections.
- Power Steering Pump
- Seal rings for steering rack.
This test can only be performed with bellows slid back.
- Open the spring-type hose clamp and boot hose clamp.
- Push back the boot.
If fluid is visible in steering gear housing and/or in bellows, steering gear must be replaced.

