Audi Q5: Brake Rotor, Replacing, Brake 1LA, 1LJ, 1ZB and 1ZT
Removing
- Remove the brake caliper. Refer to → Chapter "Brake Caliper, Brake 1LA/1LJ/1ZB/1ZT, Removing and Installing".
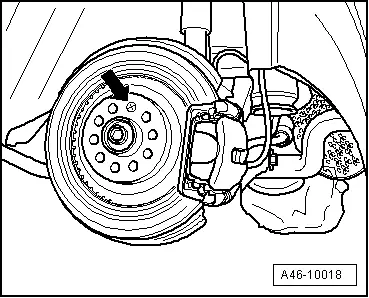
- Remove the bolt -arrow- on the brake rotor while holding the brake rotor firmly.
- Remove the brake rotor.
 Note
Note
When removing the brake rotor from the wheel hub, do not tilt the brake rotor.
Installing
 Note
Note
- Always replace brake rotors on both sides of the axle at the same time.
- Replace bolts. Refer to Parts Catalog.
Clean the brake rotor, wheel hub and contact surfaces before installing.
- Place the brake rotor on the hub.
 Note
Note
When positioning the brake rotor, do not tilt it on the wheel hub.

- Install the securing bolt -arrow- and tighten.
- Install the brake caliper. Refer to → Chapter "Brake Caliper, Brake 1LA/1LJ/1ZB/1ZT, Removing and Installing".
 WARNING
There is the risk of an accident.
- Before moving the vehicle, press the brake pedal firmly several times to seat the brake pads correctly in their operating position.
- Make sure the brakes are working correctly before driving the vehicle.
Brake Rotor, Brake 1LB/1LC/1LE/1LP, Replacing
Removing
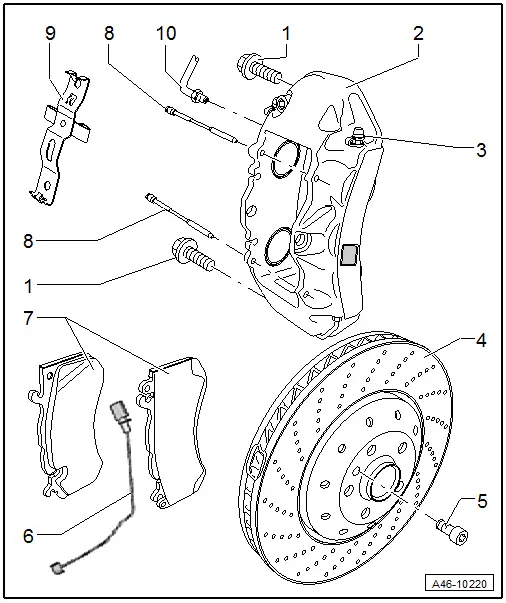
- Remove the brake caliper -2-. Refer to → Chapter "Brake Caliper, Brake 1LB/1LC/1LE/1LP, Removing and Installing".
- Remove the locking pin-5- on the brake rotor -4- while holding the brake rotor firmly.
- Remove the brake rotor from the wheel hub.
 Note
Note
When removing the brake rotor from the wheel hub, do not tilt the brake rotor.
Installing
 Note
Note
- Install on one axle on brake discs from the same manufacturer and with the same quality
- Always replace brake rotors on both sides of the axle at the same time.
- Use new bolts.
- Clean the contact surface on the wheel hub. Remove any corrosion.
- Place the brake rotor on the hub.
 Note
Note
When positioning the brake rotor, do not tilt it on the wheel hub.
- Install the securing bolt -5- and tighten.
- Install the brake caliper. Refer to → Chapter "Brake Caliper, Brake 1LB/1LC/1LE/1LP, Removing and Installing".
 WARNING
There is the risk of an accident.
- Before moving the vehicle, press the brake pedal firmly several times to seat the brake pads correctly in their operating position.
- Make sure the brakes are working correctly before driving the vehicle.

