Audi Q5: Subframe, Servicing, Rear Bonded Rubber Bushing for Rear Final Drive, AWD Vehicles
Special tools and workshop equipment required
- Subframe Bushing Tool Kit -3301-
- Bearing Installer - Control Arm -3346-
- Subframe Bushing Assembly Tool -T40185-
- Torque Wrench 1332 40-200Nm -VAG1332-
- Engine and Gearbox Jack -VAS6931-
Removing
- Remove the rear final drive. Refer to → Rep. Gr.39; Final Drive.
- Loosen the nuts on both rear muffler brackets but only as far as to where the thread begins.
- Place the Engine and Gearbox Jack -VAS6931- with Universal Transmission Support -VAG1359/2- under the subframe.
- Place a piece of wood under the subframe.
- Remove the rear subframe bolts.
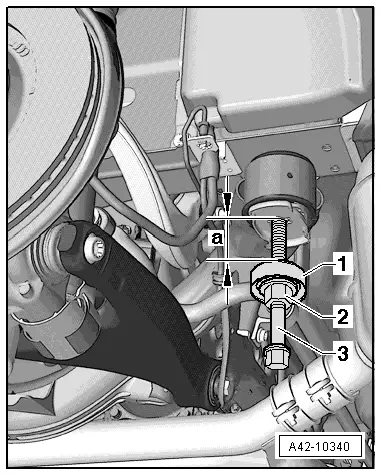
- Install the Bearing Installer - Component -3346/2- with the Subframe Bushing Tool Kit -3301- and Nut - Component -3346/3- approximately 1.5 cm into the vehicle body as illustrated.
1 - Subframe Bushing Tool Kit -3301-
2 - Nut - Component -3346/3-
3 - Bearing Installer - Component -3346/2-
 Note
Note
Turn the Nut - Component -3346/3- on the Bearing Installer - Component -3346/2- until dimension -a- 4 cm is reached.
- Lower the subframe just 4 cm.
- Attach the tools to the subframe as illustrated.
1 - Subframe Bushing Assembly Tool - Tube -T40185/1-. Side "A" must face the subframe.
2 - Subframe Bushing Tool Kit -3301-
3 - Bearing Installer - Control Arm - Nut -3346/3-
4 - Spindle -T40185/9-
5 - Subframe
6 - Bonded Rubber Bushing
7 - Rear Differential Assembly Tool - Pipe -T40185/7-. The "open" side faces up.
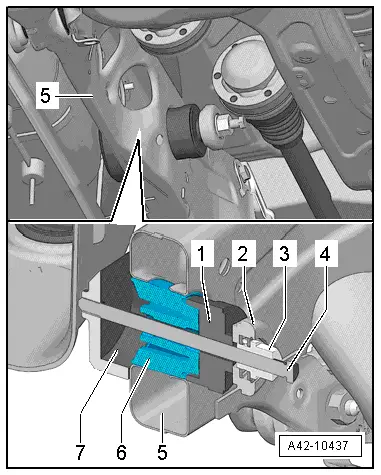
- Remove the bearing from the subframe while turning at the Control Arm Bearing Installer - Nut -3346/3- and counter-holding at the Rear Differential Assembly Tool - Spindle -T40185/9-.
Installing
Install in reverse order of removal. Note the following:
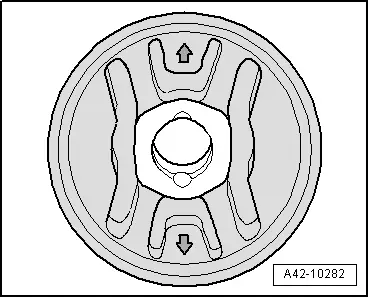
- Note the installation position for the rubber bonded bushing.
- The arrows on the back of the rubber bonded bushing must point up or down.
- Attach the tools and the bonded rubber bushing to the subframe as illustrated.
1 - Subframe Bushing Assembly Tool - Tube -T40185/2-. Side "A" must face the subframe.
2 - Subframe Bushing Tool Kit -3301-
3 - Bearing Installer - Control Arm - Nut -3346/3-
4 - Spindle -T40185/9-
5 - Subframe
6 - Bonded Rubber Bushing
7 - Rear Differential Assembly Tool - Thrust Plate -T40185/8-
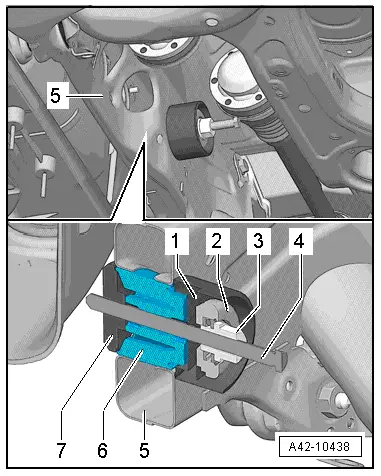
- Install the bearing all the way into the subframe while turning at the Nut - Component - 3346/3- and counter-holding at the Spindle -T40185/9-.
 Note
Note
If paint damage has occurred during bearing replacement, repair using corrosion protection, primer and black top coat.

