Audi Q5: Lower Transverse Link, Removing and Installing
Special tools and workshop equipment required
- Torque Wrench 1331 5-50Nm -VAG1331-
- Torque Wrench 1332 40-200Nm -VAG1332-
Removing
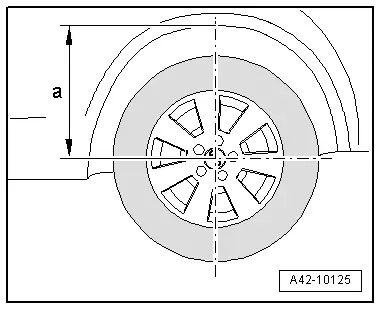
- Determine dimension -a- from the center of the wheel to the lower edge of the wheel housing before starting work while the vehicle is resting on its wheels.
- Place the vehicle on a hoist.
- Remove the wheel.
- Remove the coil spring. Refer to → Chapter "Spring, Removing and Installing".
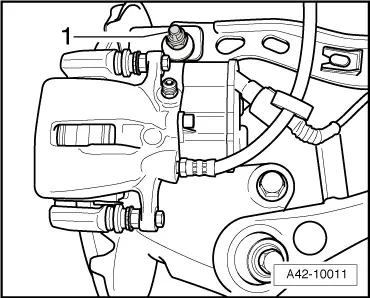
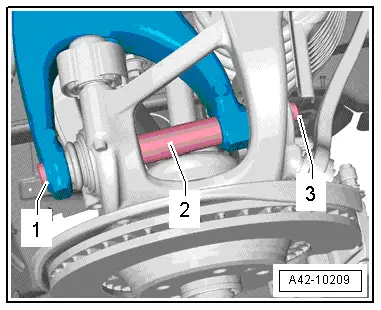
- On vehicles with a level control system sensor -1-, remove the bolt -2-.
- Remove the bolt -4-.
- Remove the nut -3-.
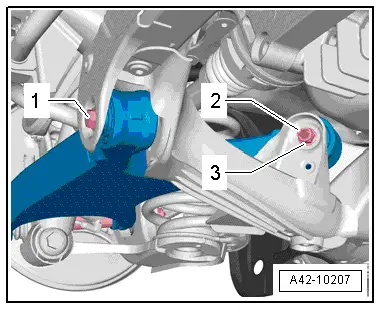
- Remove the bolt -1- and the spacer tube -2-.
![]() Note
Note
Axle alignment is necessary if the nut -3- is loosened or the bolt -1- is removed.
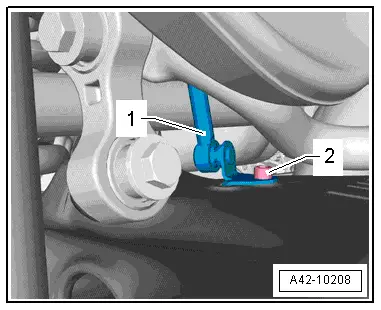
- Remove the bolt -1-.
- Remove the nut -3- and bolt -2-.
- Remove lower transverse link.
Installing
Install in reverse order of removal. Note the following:
![]() Note
Note
- Bonded rubber bushings have a limited range of motion. Only tighten suspension screws when vehicle is in curb weight or control position.
- Wheel bearing, lifting to curb weight position on vehicles with coil springs. Refer to → Chapter "Wheel Bearing in Curb Weight, Lifting Vehicles with Coil Spring".
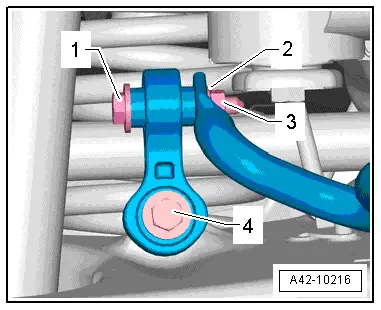
- Insert the lower control arm and install the bolt -1- loosely.
![]() Note
Note
To make sure there is enough clearance to tighten the bolt -2-, the aerodynamic trim panel and the wheel spoiler must be removed. Refer to → Body Exterior; Rep. Gr.66; Underbody Panel.
- Install the bolt -2- and install the nut -3- loosely.

- Insert the bolt -1- with the spacer tube -2- and install the nut -3- loosely.
![]() Caution
Caution
Do not tighten the threaded connection using the nut -3-.
- Tighten the bolt -1-.
- Tighten the rest of the threaded connections.
- Install the coil spring. Refer to → Chapter "Spring, Removing and Installing".
- Tighten the wheel. Refer to → Chapter "Wheel Bolt Tightening Specifications".
- An axle alignment may be required. Refer to → Chapter "Evaluating Need for Axle Alignment".
- On vehicles with automatic head lamp range control, perform headlamp basic setting. Refer to → Electrical Equipment; Rep. Gr.94; Headlamps; Headlamp, Adjusting.
- If the Level Control System Sensor was removed and installed on a vehicle with electronically controlled damping or if the linkage was loosened, the control position must be reprogrammed using the Vehicle Diagnostic Tester. Refer to → Chapter "Control Position, Programming".
- If the control position was reprogrammed on vehicles with lane assist, the Directional Stabilization Assistance Control Module -J759- must be calibrated again. Refer to → Chapter "Lane Assist, Calibrating".

Upper Transverse Link, Removing and Installing
Special tools and workshop equipment required
- Torque Wrench 1332 40-200Nm -VAG1332-
![]() Note
Note
Due to the inaccessibility of the inner threaded connection -1-, the upper control arm can only be removed when the subframe has been removed.

Removing
- Determine dimension -a- from the center of the wheel to the lower edge of the wheel housing before starting work while the vehicle is resting on its wheels.
- Place the vehicle on a hoist.
- Remove the wheels.
- Remove the subframe. Refer to → Chapter "Rear Axle, Removing and Installing".

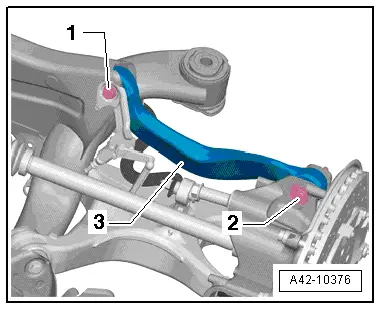
- Mark the position of the eccentric bolt -2- the wheel bearing housing, for example using a felt-tip pen.
- Separate connections -1- and -2-.
- Remove upper transverse link -3-.

Installing
![]() Note
Note
Replace the bolts and the self-locking nuts.
Installation position of the upper transverse link on the subframe
- Install the upper control arm -3- on the threaded connection -1- by hand.

- Lay a ruler or straight edge -1- flat against the upper control arm -arrows-.
- Position the upper control arm -2- so dimension a = 8 mm +- 1 mm between the straight edge -1- and the stamping burr on the upper control arm -2-.

- Tighten the upper control arm -3- on the subframe in this position.
- Screw wheel bearing housing on control arm and tighten new nut to 20 Nm. Note the installation position of the centering washer -2-.
- Install the subframe. Refer to → Chapter "Rear Axle, Removing and Installing".
- Loosen the threaded connection -1-.
- Lift the wheel bearing hub into curb weight position and tighten the threaded connection -1-. Refer to → Chapter "Wheel Bearing in Curb Weight, Lifting Vehicles with Coil Spring".
- Tighten the wheel. Refer to → Chapter "Wheel Bolt Tightening Specifications".
- An axle alignment may be required. Refer to → Chapter "Evaluating Need for Axle Alignment".