Audi Q5: Subframe, Servicing, Front Bonded Rubber Bushing for Rear Final Drive, AWD Vehicles
Special tools and workshop equipment required
- Torque Wrench 1332 40-200Nm -VAG1332-
- Hydraulic Press -VAS6178-
- Pneumatic/Hydraulic Foot Pump -VAS6179-
- Bearing Installer - Wheel Hub/Bearing Kit -T10205-
- Hydraulic Press - Ball Joint Assembly Tools -T10254-
- Rear Bushing Tool -T40033-
- Bearing Installer - Control Arm -3346-
- Press Piece - Front Final Drive Bushing -T40186-
Removing
- Place the vehicle on a hoist.
- Remove the coil springs. Refer to → Chapter "Spring, Removing and Installing".
 Note
Note
To replace the rubber bonded bushing, lower the front of the subframe. It is not necessary to remove the subframe.
Front bonded rubber bushing, replacing
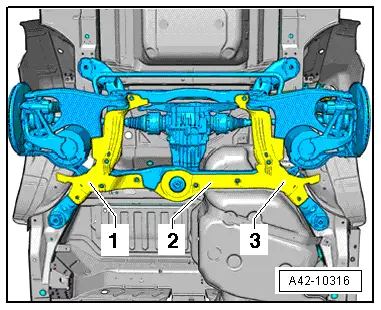
- Remove the covers -1- and -2-. Refer to → Body Exterior; Rep. Gr.66; Underbody Panel.
- Remove the wheel spoiler. Refer to → Body Exterior; Rep. Gr.66; Underbody Panel.

- Remove the stone protection plate -2-, where applicable.
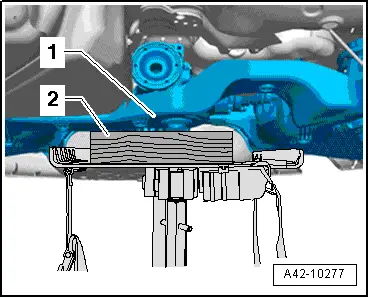
- Place Engine and Gearbox Jack -VAS6931- with Universal Transmission Support -VAG1359/2--1- under the subframe.
- Place a wood block -2- under the subframe -1-.
- Remove the left and right bolt -1-.
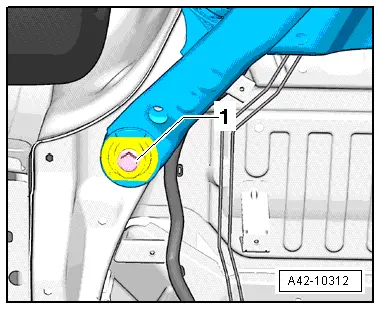
- Install the right and left bolts previously removed -1- into the body as illustrated.
 Note
Note
Install screw -1- only until dimension -a- 4 cm is reached.
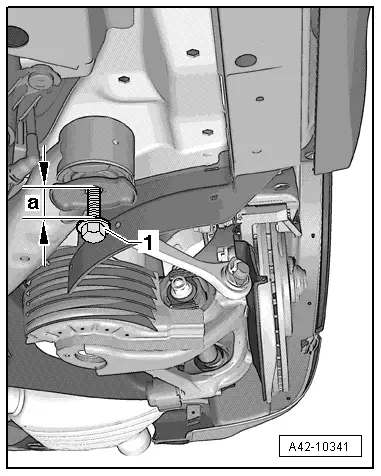
- Remove the bolt -2-.
- Lower the subframe 4 cm only.
- Push the final drive upward over the drive axle -1-. At the same time insert the Press Piece - Front Final Drive Bushing - Thrust Piece - T40186/1- and the Hydraulic Press - Ball Joint Assembly Tools - Spindle -T10254/5- with the Hydraulic Press - Ball Joint Assembly Tools- Nut -T10254/4-. (A second technician is needed).
4 - Hydraulic Press - Ball Joint Assembly Tools - Spindle -T10254/5- The spindle pins face downward.
5 - Hydraulic Press - Ball Joint Assembly Tools - Nut -T10254/4-
6 - Thrust Piece -T40186/1-
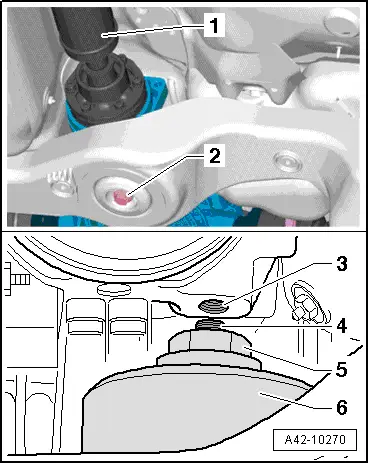
- When removing or installing the rubber bonded bushing, make sure the spindle -4- does not contact the threaded hole -3- in the final drive.
The hold drilled into the inner core of the bonded rubber bushing may prevent the Spindle -T10254/5- from sliding through. If this is the case, it must be drilled out.
 Note
Note
- Drill several times in steps using a different drill bit diameter each time.
- While drilling, make sure drill does not damage the threaded hole -3- in the final drive; if necessary place a suitable object in between.
 WARNING
Wear protective eyewear while drilling.
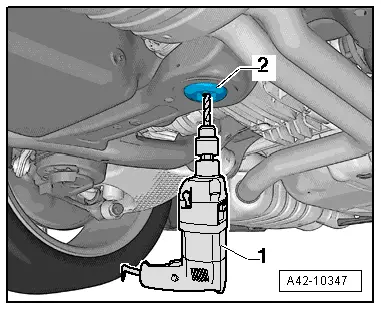
- Position the drill -1- on the bonded rubber bushing -2- as illustrated and drill the hole in several steps.
1. Step, 11 mm drill bit
2. Step, 11.5 mm drill bit
3. Step, 12 mm drill bit
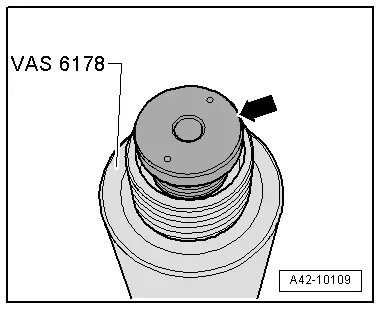
- If necessary, remove the Pressure Head -T10205/13- and in its place install the support with the "small" inner diameter -arrow- from the Hydraulic Press -VAS6178-.
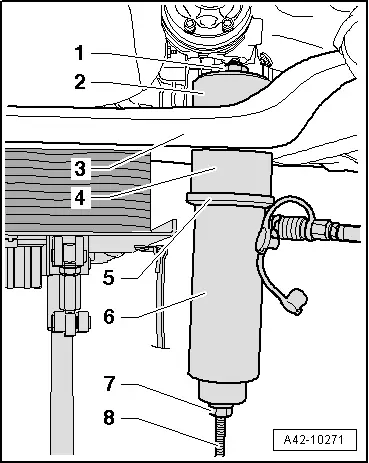
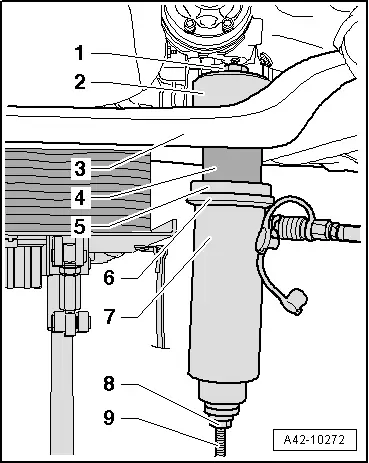
- Place the tools on the front bonded rubber bushing as shown in the illustration.
1 - Hydraulic Press - Ball Joint Assembly Tools - Nut -T10254/4-
2 - Thrust Piece -T40186/1-
3 - Subframe
4 - Rear Bushing Tool - Tube -T40033/3-
5 - Bearing Installer - Wheel Hub/Bearing Kit - 4 -T10205/4-
6 - Hydraulic Press -VAS6178-
7 - Hydraulic Press - Ball Joint Assembly Tools - Nut -T10254/4-
8 - Hydraulic Press - Ball Joint Assembly Tools - Spindle -T10254/5- The spindle pins face downward.
 WARNING
- Hold the Hydraulic Press -VAS6178- firmly while pressing out.
- Bonded rubber bushing loosens "abruptly". There is the risk of injuries by tools and bonded rubber bushing coming off!
Installing
Install in reverse order of removal. Note the following:
- Before installing the bonded rubber bushing, make sure the Hydraulic Press - Ball Joint Assembly Tools - Spindle -T10254/5- is able to fit through the hole in the inner core of the bushing. The hold drilled into the inner core of the bonded rubber bushing may prevent the Hydraulic Press - Ball Joint Assembly Tools - Spindle -T10254/5- from sliding through. If this is the case, it must be drilled out.
 WARNING
Wear protective eyewear while drilling.
- Gently preload the bonded rubber bushing -2- with cover horizontally in the vise clamp as illustrated -1-. Be sure not to damage the outer layer of the bonded rubber bushing.
- Position the drill -3- on the bonded rubber bushing -2- as illustrated and drill the hole in several steps.
1. Step, 11 mm drill bit
2. Step, 11.5 mm drill bit
3. Step, 12 mm drill bit

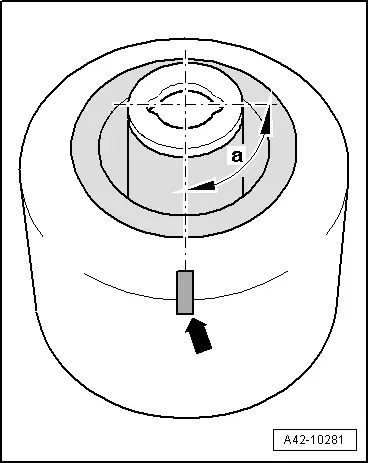
- Make a continuous marking -arrow- straight to the grooves.
a = 90º
 Note
Note
- Marking is needed to align bearing with subframe.
- When pulling in the bearing, the grooves are masked by the tool.
- Install the rubber bonded bushing with the marking -arrow- into the subframe so that the marking points exactly in the driving direction.
- Place the tools on the front bonded rubber bushing as shown in the illustration.
1 - Hydraulic Press - Ball Joint Assembly Tools - Nut -T10254/4-
2 - Press Piece - Carrier Mounting -T40033/7-
3 - Subframe
4 - Bonded Rubber Bushing
5 - Press Piece - Front Final Drive Bushing - Thrust Plate -T40186/3-
6 - Bearing Installer - Wheel Hub/Bearing Kit - 4 -T10205/4-
7 - Hydraulic Press -VAS6178-
8 - Hydraulic Press - Ball Joint Assembly Tools - Nut -T10254/5-
9 - Hydraulic Press - Ball Joint Assembly Tools - Spindle -T10254/4-. The spindle pins face downward.
- Pull bearing into subframe until stop.
- Check for paint damage on the subframe.
 Note
Note
If paint damage has occurred during bearing replacement, repair using corrosion protection, primer and black top coat.
Install in reverse order of removal.

