Audi Q5 Owners & Service Manuals

Audi Q5: Steering Column, Handling and Transporting

  WARNING

  • The correct handling of the steering column must always be observed.
  • Incorrect handling of steering column may cause damage to steering column and therefore lead to a safety risk.

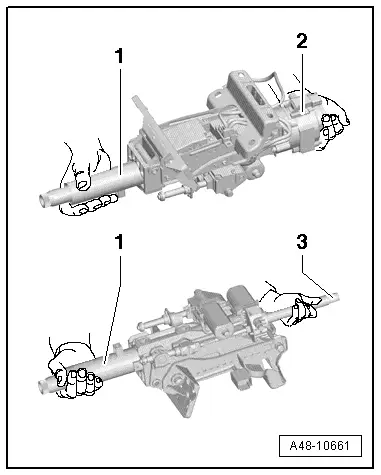
Correct handling and transport of steering column

  • Transport steering column with two hands
  • Hold the steering column at the top of the steering rod tube -1-, or depending on the version near the dynamic steering adjuster -2-, or at the bottom of the steering rod tube.
Audi Q5. A48-10661

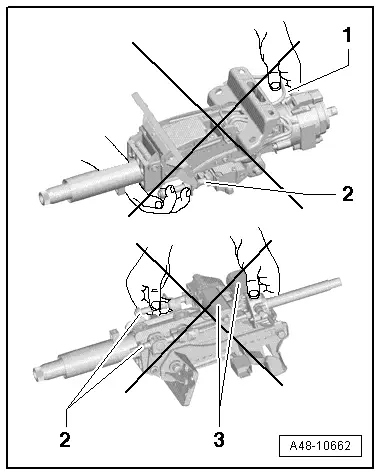
Incorrect handling of steering column

Transporting at the following components leads to pre-damage to steering column:

1 - Clamping Lever

2 - Weight Compensation Springs

3 - Deformation Element
Audi Q5. A48-10662

Steering Column, Checking for Damage

Visual check

- Check whether steering column parts show signs of damage.

Function Test

- Check whether steering column can be turned without catching or difficulty of movement.

- Check whether steering column can be easily adjusted laterally and vertically.

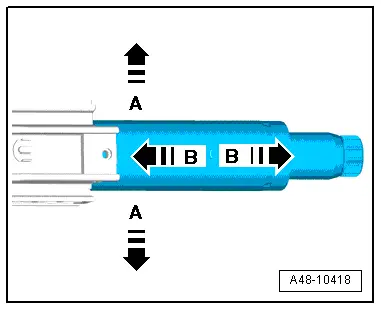
- Check if the tube clearly moves in the direction of -arrow A- or the direction of -arrow B-.

- If this is the case, the steering column must be replaced.
Audi Q5. A48-10418

    READ NEXT:

     Electronic Steering Column Lock Control Module -J764-, Removing and Installing

    Removing   WARNING Note the following before removing the steering column: Create a sketch showing the: routing of the electrical wiring harnesses securing of the electrical wiring harnesse

     Active Steering Safety Lock (Locking Magnet), Removing and Installing

    Special tools and workshop equipment required Torque Wrench 1783 - 2-10Nm -VAG1783- Vehicle Diagnostic Tester   WARNING Note the following before working on the steering column: Compone

     Overview - Steering Gear

    Overview - Steering Gear, Electromechanical Steering Gear 1 - Electromechanical Steering Gear with Tie Rods With Power Steering Control Module -J500- Removing and installing. Refer to â†

    SEE MORE:

     Brake Lines

    Separating Points Lines to hydraulic assembly - Tighten hex collar nuts -1- through -4- to 14 Nm. - Tighten hex collar nuts -5- and -6- to 14 Nm. Brake hose on brake caliper to front axle - Item -1- brake hose, ensure retaining tabs are seated correctly in bracket. - Item -2-

     Head restraints

    Front head restraints Fig. 68 Front seats head restraints: adjusting the height The head restraints on the front seats can be adjusted to provide safe support to head and neck at the optimum height. When optimally adjusted, the top of the restraint should be level with the top of the head. If that

    © 2019-2025 Copyright www.audiq5.net