Audi Q5: Active Steering Safety Lock (Locking Magnet), Removing and Installing
Special tools and workshop equipment required
- Torque Wrench 1783 - 2-10Nm -VAG1783-
- Vehicle Diagnostic Tester
 WARNING
Note the following before working on the steering column:
- Components of the steering are safety related!
- Only specially trained technician should work on the steering system for reasons of safety. Incorrect work could result in serious crashes.
- Route the electrical wiring harnesses exactly the way they were before removal.
- Secure the electrical wiring harnesses exactly the way they were before removal.
Removing
 Note
Note
When the active steering safety lock actuator is removed, do not turn the steering wheel or change the straight position or angle of the front wheels. Otherwise the position of the steering wheel may be incorrect after the work is completed. Follow all the rule for cleanliness when performing the following work.
- Turn the steering wheel into the straight-ahead position (the wheels on the front and rear axle must now line up) and lock the steering wheel lock in the straight-ahead position.
- Turn off the ignition and remove the key.
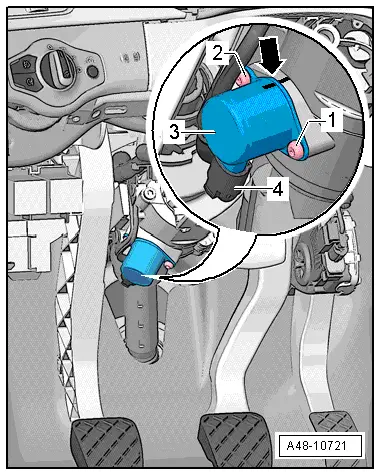
- Mark the installed position and the position of the active steering safety lock actuator (dynamic steering) -arrow- (needed for installation later).
- Disconnect the connector -4- from the active steering safety lock actuator (dynamic steering) -3-.
- Remove any paint still on the bolt heads -1 and 2-.
- Remove the bolts -1 and 2- and remove the active steering safety lock actuator (dynamic steering) -3- from the steering column.
- Use the socket provided in the repair kit for the new active steering safety lock actuator (dynamic steering) to remove the bolts -1 and 2-.
Installing
Install in reverse order of removal. Note the following:
- After replacing the active steering safety lock actuator (dynamic steering), update the software for the Active Steering Control Module -J792- by starting the appropriate program on the Vehicle Diagnostic Tester.
- If a new active steering safety lock actuator (dynamic steering) is installed, transfer the marking from the old one to the new one.
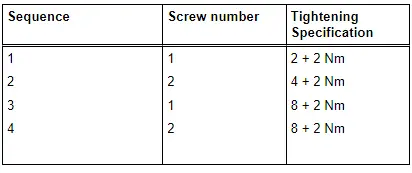
- Position the new active steering safety lock actuator (dynamic steering) as marked before removal and secure it as listed in the following table using the two new bolts -1 and 2- (use the socket provided in the repair kit).

- Connect the connector on the active steering safety lock actuator (dynamic steering).
- Erase the DTC memory.
- Perform an initializing drive - turn the vehicle 45Âş to the left/right from the straight-ahead position.
Function Test
Check the function of the steering during the road test and a fenced off area.
- Operating force
- Reset
- Play
- Noise
- Indicator lamp
- Read the DTC memory after the road test. There must be no faults in the DTC memory.

