Audi Q5: Overview - Steering Gear
Overview - Steering Gear, Electromechanical Steering Gear
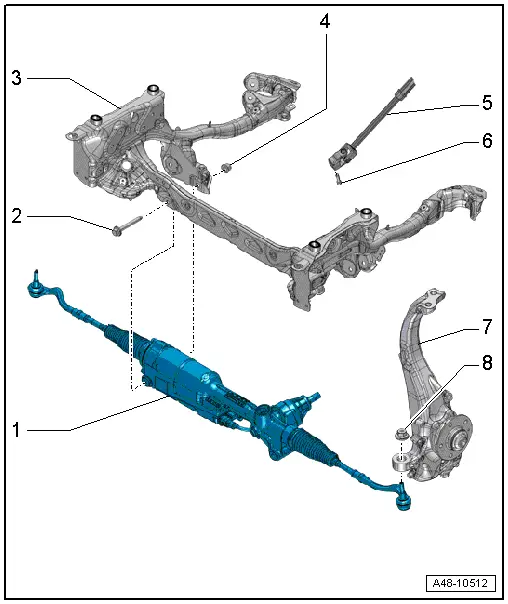
1 - Electromechanical Steering Gear with Tie Rods
- With Power Steering Control Module -J500-
- Removing and installing. Refer to → Chapter "Electromechanical Steering Gear, Steering Gear, Removing and Installing"
- Servicing. Refer to → Chapter "Steering Gear, Electromechanical Steering Gear, Servicing".
- There are different versions. Refer to the Parts Catalog.
A removable heat shield mat was installed on the steering gear at start of production. Be sure to install this mat if installing the old steering gear again.
A removable heat shield mat on the steering gear was replaced by a bonded heat shield mat as a running change. It is therefore not necessary to take the mat from the old steering gear and installing on a new steering gear.
A replacement steering gear comes with the bonded heat shield mat.
2 - Bolt
- 80 Nm +180º
- Always replace if removed
3 - Subframe
4 - Nut
- Pushed into the subframe
- Always replace if removed
5 - Steering Intermediate Shaft
6 - Bolt
- Tightening specification -item 4-
7 - Wheel Bearing Housing
8 - Nut
- 100 Nm
- Always replace if removed
Overview - Steering Gear, Hydraulic Power Steering Gear
Power steering gear is completely removed and installed with tie rods.
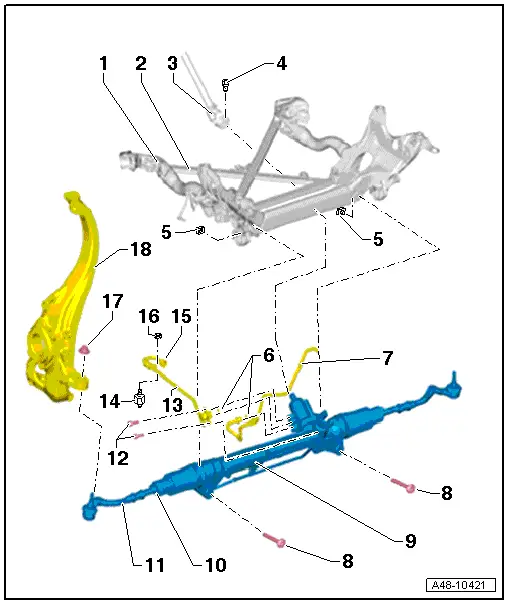
1 - Subframe
2 - Crossbrace
3 - Steering Intermediate Shaft
4 - Bolt
- 30 Nm +90º
- Always replace if removed
- The threaded hole for the bolt must always be cleaned, for example, with a thread cutter
5 - Nut
- Always replace if removed
6 - Seal
- Always replace if removed
7 - Return Line
 Caution
Insert the return line completely when installing.
- There are different versions. Refer to the Parts Catalog.
8 - Bolt
- 80 Nm +180º
- Always replace if removed
9 - Power Assisted Steering Gear with Tie Rods
- Removing and installing. Refer to → Chapter "Steering Gear, Removing and Installing, Hydraulic Power Steering Gear".
- Servicing. Refer to → Chapter "Steering Gear, Servicing, Hydraulic Power Steering Gear".
- Adjusting. Refer to → Chapter "Steering Gear, Adjusting".
- There are different versions. Refer to the Parts Catalog.
10 - Tie Rod
- Removing and installing. Refer to → Chapter "Tie Rod, Removing and Installing, Hydraulic Power Steering Gear"
11 - Tie Rod End
- There are different versions, with long or short thread on the joint pin; allocation. Refer to the Parts Catalog.
 WARNING
When replacing, make sure the length of the thread on the tie rod end is sufficient (there must be approximately 5 mm extra thread). If this is not the case, then install a tie rod end with a longer thread pin, allocation Parts Catalog.
- Removing and installing. Refer to → Chapter "Tie Rod End, Removing and Installing, Hydraulic Power Steering Gear"
12 - Bolt
- 20 Nm
13 - Pressure Line
- There are different versions, with and without a separating point. Refer to the Parts Catalog.
 Caution
Insert the pressure line completely when installing.
- There are different versions. Refer to the Parts Catalog.
14 - Rubber Bushing
- 6 Nm
15 - Union Nut
- 40 Nm
- A pressure line with a separating point does not have a union nut.
16 - Nut
- 6 Nm
17 - Nut
- There are different versions. Refer to the Parts Catalog for the allocation.
- Pay attention to the different nut versions and to the tightening specifications.
- Always replace if removed
18 - Wheel Bearing Housing
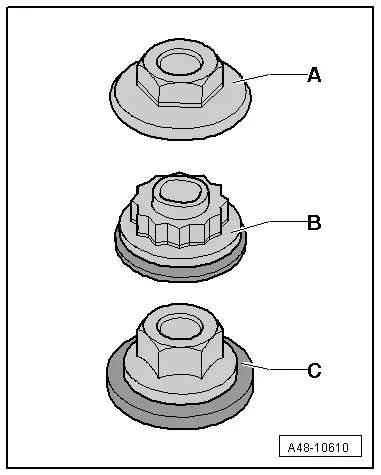
Nut versions for the tie rod ball joint bracket
- Hex collar nut -A-
Tightening specification: 20 Nm 90º.
- Twelve-point combination nut -B-
Tightening specification: 100 Nm
- Hex combi nut -C-
Tightening specifications: 110 Nm