Audi Q5: Rear Lid, Adjusting
Special tools and workshop equipment required
- Gauge - Gap Adjustment -3371-
Gap Dimensions
- All rear lid measurements are given in mm with a +- 0.5 mm tolerance.
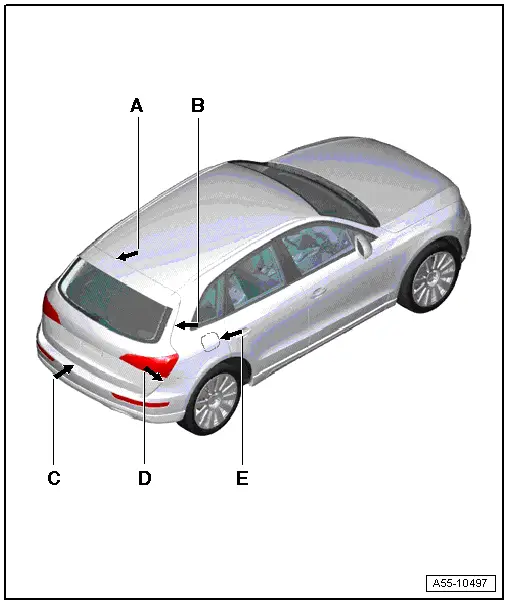
- Dimension -A- = 4.5 mm
- Dimension -B- = 4.5 mm
- Dimension -C- = 5.0 mm
- Dimension -D- = 4.5 mm
- Dimension -E- = 2.2 mm all around
- Make sure the gap is parallel to the body.
 Note
Note
The gas-filled struts must be installed before adjusting a new rear lid.
Adjusting with Striker Pin
 Note
Note
Before adjusting, install adjusting buffer on rear lid side completely. Refer to → Fig. "Adjusting Screw for Adjusting Buffer".
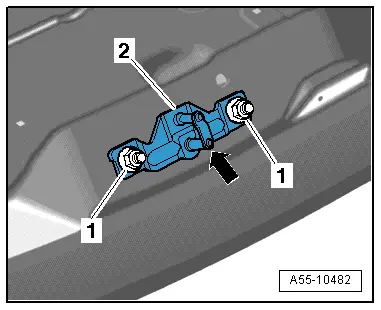
Vehicle with Solid Striker Pin
- Remove the rear lid end piece trim panel. Refer to → Body Interior; Rep. Gr.70; Luggage Compartment Trim Panels; Lock Carrier Trim Panel, Removing and Installing
- Loosen combination nuts -1-, the striker pin -2- must be able to move.
- Note different versions.

Rear Lid Unlock Motor - V139-
- Loosen combination screws, striker pin -2- with motor for closing aid -1- must be adjustable.
- For easier installation, there are markings on rear cross panel you can use to adjust the striker pin.
Upper and Lower End Position on the Rear Lid Unlock Motor - V139-.
 Caution
- To adjust rear lid, closing aid motor must be in "lid closed " position (lower end position).
- Striker pin cannot be installed in position not visible in drawing (upper end position) -1- because rear lid can contact block when closing and be damaged.
- Do not use the closing assist motor to adjust rear lid.
- Turn the upper section of the rear lid side of the adjusting buffer completely before adjusting the rear lid. Refer to → Fig. "Adjusting Screw for Adjusting Buffer".
- Tighten the nuts -1- hand-tight.
- Close rear lid and align with body contour.
- The rear lid lock must be engaged in the main detent (2nd lug) during this.
- Open the rear lid in this position and tighten the nuts -1- to the tightening specification. Refer to -item 13-.
Rear Lid Unlock Motor - V139-
- If the same striker pin is reinstalled, mark this location before removing.
 Note
Note
- Striker pin with closing aid can only be installed in "lid closed " position, same as delivery condition for a new part.
- If the same rear lid catch is going to be installed again, open the rear lid and lock the rear lid latch or the rotary latch with a screwdriver.
- Closing aid runs in "lid closed " position = basic position.
- Now remove connector from closing aid and rear lid lock can be opened again by activating grip piece in rear lid.
- Tighten the nuts -1- just loosely.
- Close the rear lid and align it with the body contour.
- The rear lid lock must be engaged in the main detent (2nd lug) during this.
- In this position, open the rear lid and tighten the nuts -1- to the tightening specification. Refer to -item 13-.
- Tighten the screws -2- for the stop on the body -1- to the tightening specification. Refer to -item 11-.
- Turn the adjusting buffer -arrow- just enough until the closed rear lid with stop buffer on rear lid side makes contact with the stop.
- See if rear lid still closes easily, continue adjusting the the adjusting buffer if necessary.
- If rear lid is difficult to close, tighten the adjusting buffer slightly.
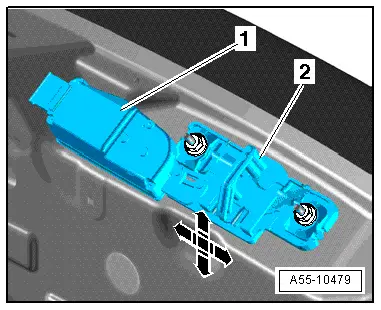
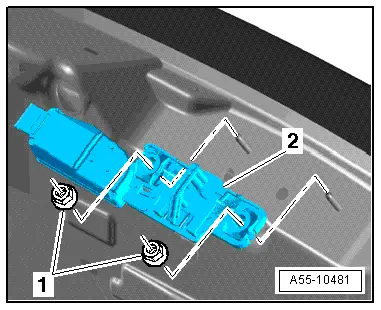
Adjustment Buffer Installation Position

1 - Rear Lid
- When adjusted correctly, adjusting buffer -3- must contact stop buffer -2- with light pretension when rear lid is closed.
2 - Stop, Rear Lid Side
- Installation, refer to → Fig. "Upper Stop, Lid Side"
- Tighten screws to 8 Nm when installing.
3 - Adjustment Buffer, Body Side
- Adjustment buffer secured on body-side with bolts
- Tighten screws to 8 Nm when installing.
- There is an adjusting screw for adjusting the height.
- When rear lid is adjusted correctly, adjusting buffer must make contact with light pre-tension with stop on rear lid side.
4 - Side Panel
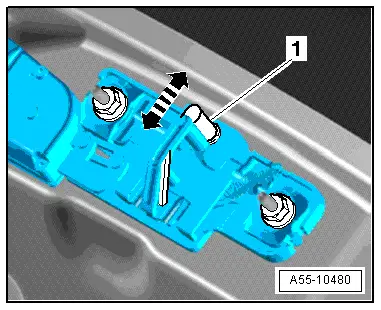
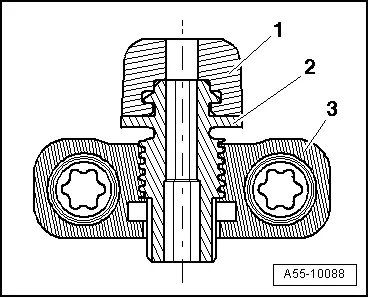
Adjusting Screw for Adjusting Buffer
- Before adjusting rear lid, install adjusting screw -2- with protective cap -1- completely in adjusting buffer -3-
- Remove the adjusting screw -2- just enough until the cap -1- makes contact with light pre-tension with stop on rear lid side when the rear lid is closed.
- Check whether lid sits without play and in flush position by pushing or pulling on the side edge of rear lid below rear window.
- Repeat the adjustment if necessary.
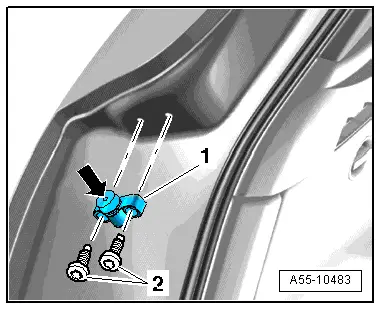
Upper Stop, Lid Side
- When installing stop -2- tighten screw -1- to 8 Nm.
- Height adjustment is carried out using adjusting buffer on body side.
Lower Stop, Lid Side
- To remove, bore out the rivet heads, drive out the rivet shafts and remove the lid.
- When correctly adjusted, the adjusting buffer just contacts the lower stop on the body side; if necessary adjust the buffer.
Stop, Body Side
- Install the stop -1- into the blind rivet nut -2- until it fits securely.
- The internally threaded pop rivet must fit flat when installed.
Lid Latch, Removing and Installing
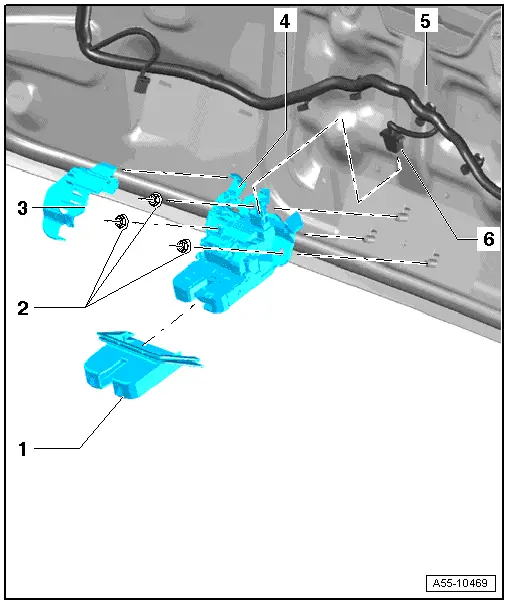
1 - Cover for Lid Lock
- When assembling, cover must engage audibly into lid lock.
- Mount the cover on the rear lid lock.
2 - Nuts
- 21 Nm
3 - Cover
- Mount the cover on the lock until it audibly clicks into place.
4 - Lid Latch
- Remove the cover for the rear lid lock.
- Remove rear lid trim. Refer to → Body Interior; Rep. Gr.70; Luggage Compartment Trim Panels; Lower Rear Lid Trim Panel, Removing and Installing
- Remove the cover -3-.
- Disconnect the connector for the rear lid lock.
- Remove the nuts -2- and then remove the rear lid lock.
5 - Rear Lid
6 - Connector
Hinges, Removing and Installing
 Note
Note
- The rear lid drives must be removed on vehicles equipped with a power rear lid release, refer to → Chapter "Overview - Rear Lid Motor".
- When installing, pay close attention to the tightening sequence for the bolts.
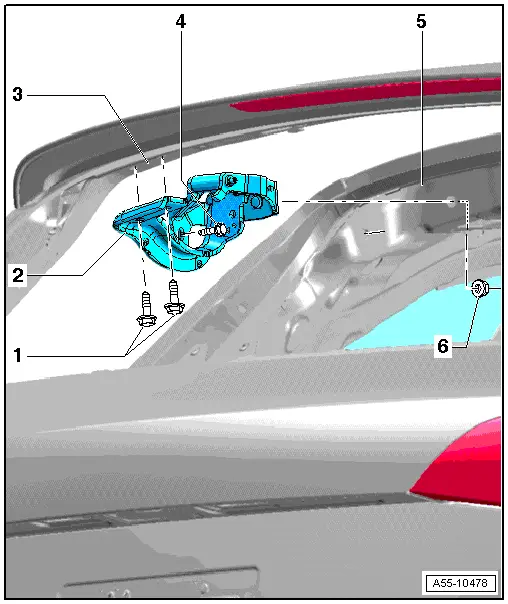
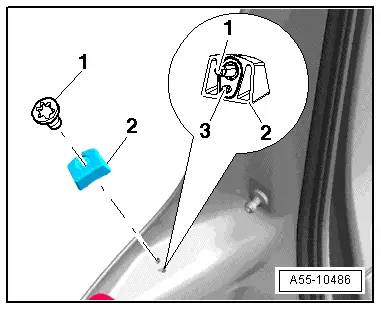
1 - Bolt
- 21 Nm
2 - Rear Lid Hinge
- Removing:
- The "D-pillar" is removed on both sides. Refer to → Body Interior; Rep. Gr.70; Passenger Compartment Trim; D-Pillar Trim Panel, Removing and Installing.
- Remove the "C-pillar" ( → Body Interior; Rep. Gr.70; Passenger Compartment Trim; C-Pillar Trim Panel, Removing and Installing) and the grab handle ( → Body Interior; Rep. Gr.68; Equipment; Roof Grab Handle, Removing and Installing) on the respective side.
- Lower the headliner near the hinge. Refer to → Body Interior; Rep. Gr.70; Roof Trim Panels; Headliner, Removing and Installing.
- Remove the rear lid hinge cover. Refer to → Fig. "Lid Hinge Cover".
 Note
Note
Support the rear lid to keep it from falling down and too prevent damage the rear lid or the vehicle body.
- Remove the bolts -1- from the rear lid.
- Remove the bolt -4- and nut -6- and then remove the hinge.
- Installing:
- Place the hinge onto the body and gently tighten the nut -6- on the roof frame.
- Then lightly attach the hinge on the side with the screw -4-.
- Secure the hinge with the screws -1-.
- Align the lid to the body on the left and right side and tighten the screws -3- to the tightening specification.
- Adjust the height of the rear lid to the roof and then tighten the screw -4- and nut -6- to the tightening specification.
- Press on hinge cover.
3 - Rear Lid
4 - Bolt
- 21 Nm
5 - Roof
6 - Nut
- 21 Nm
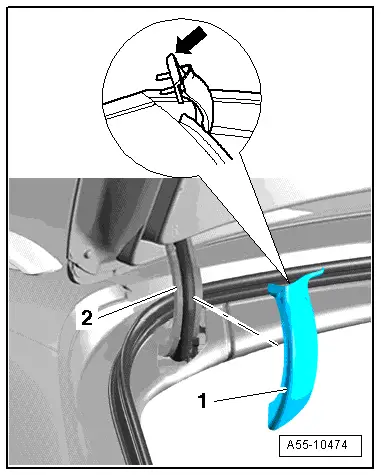
Lid Hinge Cover
- Cover is placed on rear lid hinge.
- Loosen side locking tabs on cover -1- and remove from hinge -2-.
- Insert the tongue -arrow- behind the rear lid cover.
- To install, position retainer tabs in catches on hinge arm and press opposite side of cover down completely.
- You must hear the cover lock in place.
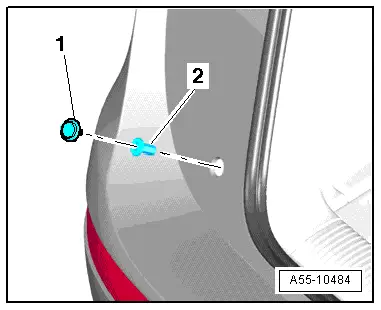
Rear Lid Seal, Removing and Installing
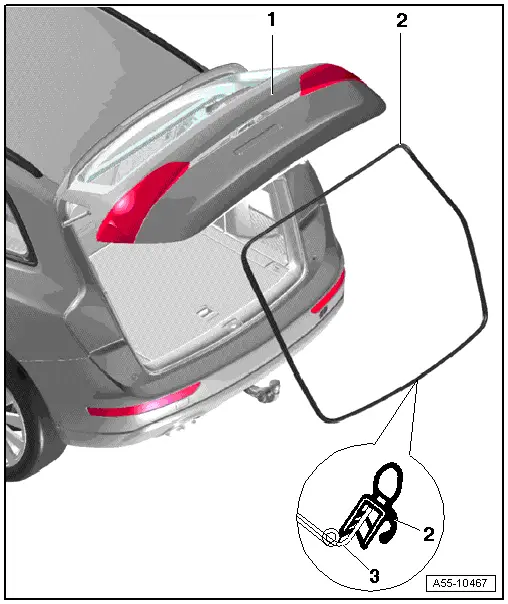
1 - Rear Lid Seal
- Removing:
- Open and support the rear lid.
- Remove the rear lid spoiler. Refer to → Chapter "Overview - Spoiler".
- Remove the gas-filled strut from the left and right ball studs on the body-side.
- Remove the seal from the flange on the body all the way around.
- When installing, align the seal to the upper marking -arrow- and then press it onto the flange all the way around.
2 - Rear Lid
Gas-Filled Strut, Removing and Installing
 Note
Note
- After completely removing gas-filled strut, ensure correct position when installing.
- Noise insulation component must be installed on the body side.
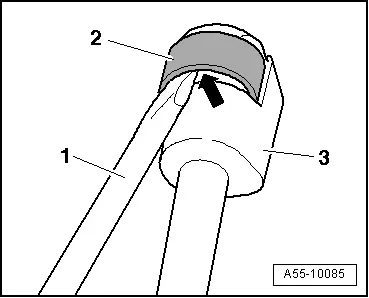
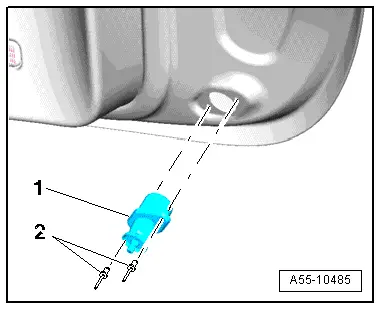
Removing
- Remove retaining spring -2- with small screwdriver -1- and disengage gas-filled strut -3- , that can finally be removed from ball stud.
Installing
Install in reverse order of removal. Note the following:
- To install, press gas-filled strut onto ball head pins so that it engages in position.
- Ball head pin tightening specification. Refer to -item 3-.