Audi Q5: Overview - Door

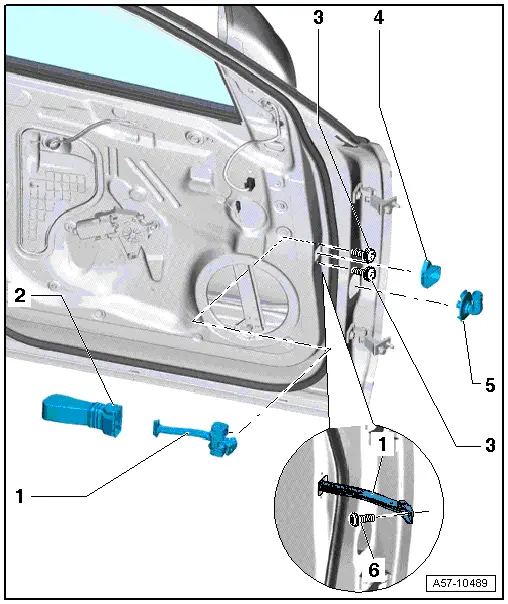
1 - Door
- Remove the door trim panel. Refer to
→ Body Interior; Rep. Gr.70; Front Door Trim Panels; Front Door Trim
Panel, Removing and Installing.
2 - Door Arrester
3 - Bolt
4 - Cap
5 - Stud Bolt
6 - Upper Door Hinge
7 - Bolt
8 - Bolt
 Note
Note
- The bolt is a fitting bolt so it is generally not necessary to
adjust the door using it.
- If it is necessary to make an adjustment using these bolts, the bolt
can be replaced with one of the same length and strength category.
9 - Bolt
10 - Lower Door Hinge
Overview - Door Arrester
1 - Door Arrester
2 - Rubber Grommet
3 - Bolt
4 - Cover
5 - Grommet
6 - Bolt
READ NEXT:
Removing
- Disconnect the connector on the A-pillar. Refer to
→ Electrical Equipment; Rep. Gr.97; Connectors.
- Remove the door arrester bolt -2-.
- Remove the cover ca
Removing
- Move the door window into the "closed" position.
- Remove the door trim panel. Refer to
→ Body Interior; Rep. Gr.70; Front Door Trim Panels; Front Door
Trim Pan
1 - Door
- Remove the door trim panel. Refer to
→ Body Interior; Rep. Gr.70; Front Door Trim Panels; Front Door Trim
Panel, Removing and Installing.
2 - Wi
SEE MORE:
Applies to vehicles: with diesel engine
The diesel particulate filter filters nearly all of the soot particles out of
the exhaust. The filter cleans itself automatically under normal driving
conditions. If the filter cannot clean itself (for example,
because you are only driving short distances),
The rear view camera system assists the driver during backup
driving by providing the driver with an image of the traffic
situation behind the vehicle via the Front Information Display
Control Head -J685-.
The rear view camera system is switched on when engaging the
reverse gear. The system can

