Audi Q5: Motor Support, Removing and Installing
Removing
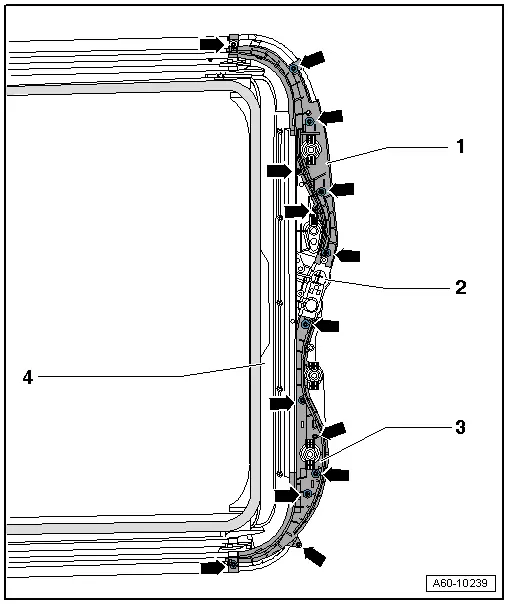
- Remove the assembly frame from the vehicle. Refer to → Chapter "Overview - Sunroof Frame".
- Remove sunroof motor. Refer to → Chapter "Roof Shade Control Module - J394-, Removing and Installing".
- Remove the screws -arrows- (2 Nm).
- Remove the cable covers -1 and 3- from the frame -4-.
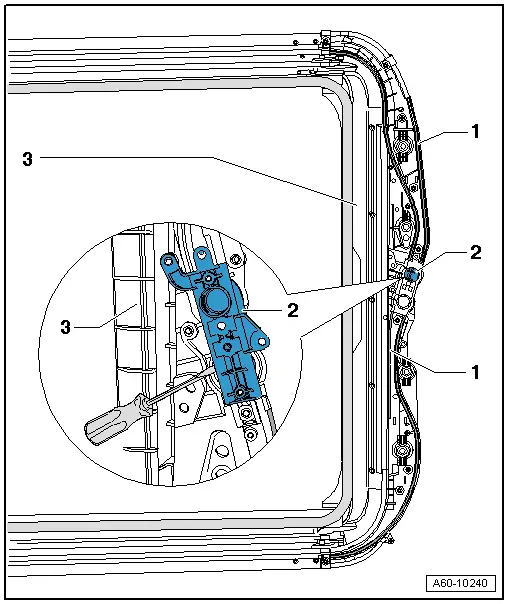
- Remove the cable ends -1- from the motor support -2-.
- Pry the motor support -1- out of the frame -3- with a screwdriver.
Installation is the reverse of removal.
 Note
Note
Do not lubricate the sun shade slide cables and motor support.
- Install the sunroof motor. Refer to → Chapter "Power Sunroof Control Module -J245-, Removing and Installing".
- Install the frame. Refer to → Chapter "Overview - Sunroof Frame".
- After completing the work procedure, perform an adaptation on the sun shade motor. Refer to → Chapter "Roof Shade Control Module - J394-, Programming".
Front Glass Panel Slotted Guide Rail and Cable, Removing and Installing
Removing
- Remove the front glass panel. Refer to → Chapter "Sunroof Panel, Removing and Installing".
- Remove the rear glass panel. Refer to → Chapter "Rear Sunroof Panel, Removing and Installing".
- Remove the frame. Refer to → Chapter "Overview - Sunroof Frame".
- Remove the sunroof motor. Refer to → Chapter "Roof Shade Control Module - J394-, Removing and Installing".
- Remove the frame section from the frame. Refer to → Chapter "Rear Frame, Removing and Installing".
After removing the frame, push the slotted guide rail to rear and and remove it.
 Caution
Note location of the cables before removing so installation errors can be avoided later.
The slotted guide rail must not be pulled or pushed on the guide.
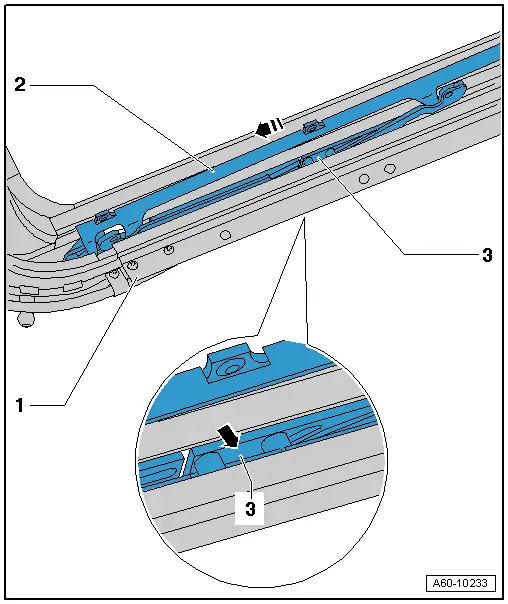
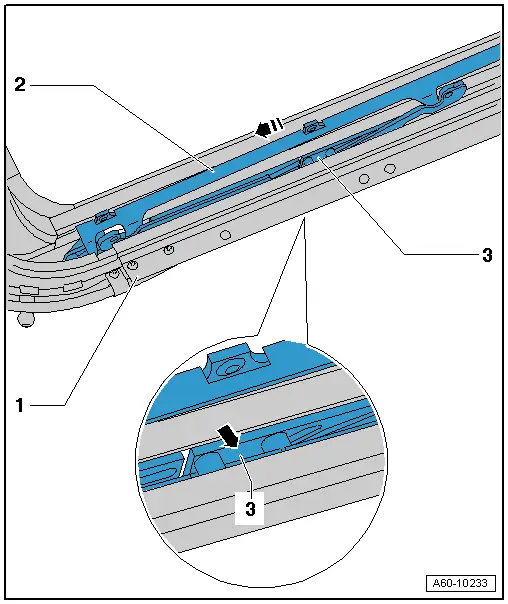
- Move the guide panel slotted guide rail only on the location -arrow- on the guide slots -3- and not on the guide rail -2-.
The slotted guide rail opens when pushed.
- Remove the slotted guide rail -2- on the guide slots -arrow- toward the rear and out of the guide rails -1- using a screwdriver.
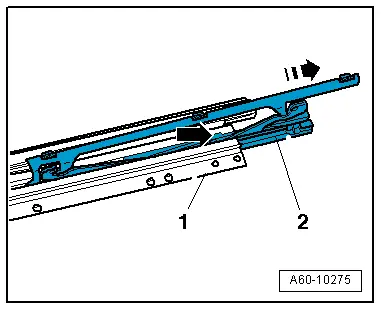
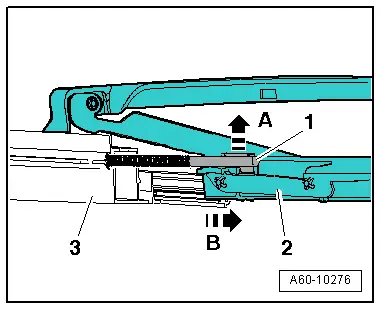
- Disengage the cable -2- from the guide slots -1- in direction of -arrow A-.
- Remove the slotted guide rail -1- in direction of -arrow B- from the guide rails -3-.
- Remove the cable -2- in direction of -arrow B- from the guide rails -3-.
Installing
 Note
Note
- Clean and lubricate the sliding areas of the guide rails before installing the new slotted guide rails.
- Clean with Cleaning Solution -D 009 401 04-.
- Then lubricate the sliding areas of the guide rails with Lithium Grease - G 052 147 A2-. Refer to → Chapter "Guide Rails, Lubricating".
- Do not lubricate the cables.
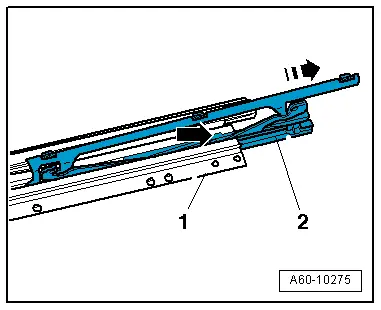
- Install the slotted guide rail into the guide rail -1-.
- Make sure the slider -2- points toward the rear when sliding the it into the guide rails -1- .
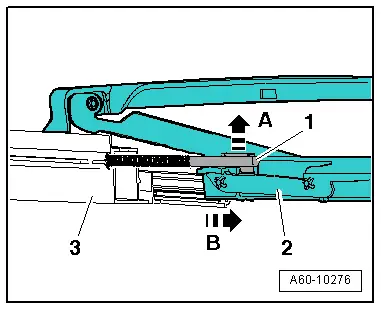
- Install the cable -2- into the guide rails -3- in direction of -arrow B-.
- Engage the cable -2- opposite the direction of -arrow A- into the guide slots -1-.
 Note
Note
The slotted guide rail must not be pulled or pushed on the guide.
- Slide the slotted guide rail on both sides all the way forward until it has completely lowered.
- When doing this, slide the tilting mechanism only on the locations -arrow- on the guide slot -3-, and not on the slotted guide rail -2-.
- Install the frame section on the frame. Refer to → Chapter "Rear Frame, Removing and Installing".
- Install the sunroof motor. Refer to → Chapter "Power Sunroof Control Module -J245-, Removing and Installing".
- Install the frame in the vehicle. Refer to → Chapter "Overview - Sunroof Frame".
- Install the rear glass panel. Refer to → Chapter "Rear Sunroof Panel, Removing and Installing".
- Install the front glass panel. Refer to → Chapter "Sunroof Panel, Removing and Installing".
- Perform an adaptation on the motors for the sunroof and the sunroof shade after completing the procedure. Refer to → Chapter "Power Sunroof Control Module -J245-, Programming" for the sunroof motor and → Chapter "Roof Shade Control Module - J394-, Programming" for the sunroof shade motor.
Guide Rails, Lubricating
Special tools and workshop equipment required
- Rail Cleaner - VAS6621-
 Note
Note
Clean and lubricate the sliding areas of the guide rails before installing the new slotted guide rails.
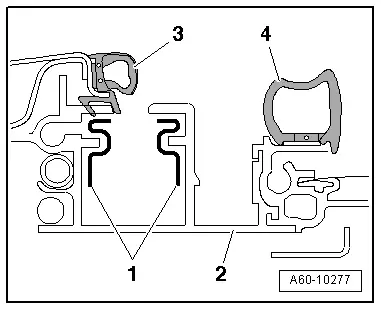
- Clean the sliding areas -1- with Cleaning Solution - D 009 401 04-.
- Only lubricate the sliding areas -1- on the assembly frame guide rails -2- with Grease - G 060 751 A2-.
- The inner -4- and outer -3- seals must be coated with a special lubricating varnish and must not be greased.
- Do not lubricate the cables and the motor support.
