Audi Q5: Fender
Overview - Fender
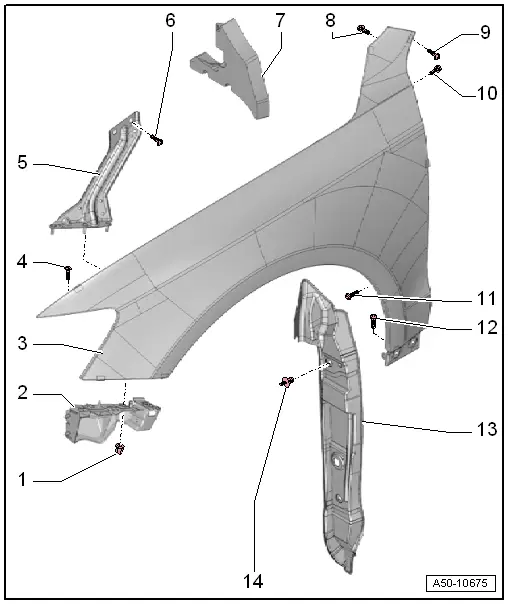
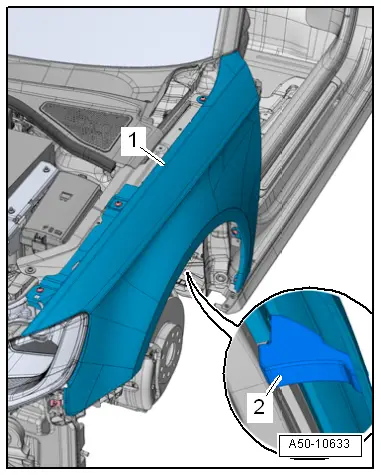
1 - Nut
- 4 Nm
- Quantity: 3
2 - Mount
- For the bumper cover
- Removing and installing. Refer to → Chapter "Bumper Guides, Removing and Installing".
3 - Fender
- Removing and installing. Refer to → Chapter "Fender, Removing and Installing".
4 - Bolt
- 10 Nm
- Quantity: 3
5 - Fender Brace
- Removing and installing. Refer to → Chapter "Fender Brace, Removing and Installing".
6 - Bolt
- 10 Nm
- Quantity: 2
7 - Seal
- Inside on the fender
8 - Bolt
- 1.5 Nm
9 - Bolt
- 8 Nm
10 - Bolt
- 8 Nm
11 - Bolt
- 8 Nm
- Quantity: 2
12 - Bolt
- 10 Nm
- Quantity: 2
13 - End Plate
- Removing and installing. Refer to → Chapter "Fender, Removing and Installing".
14 - Mount
- Quantity: 2
- There are different versions. Allocation. Refer to the Parts Catalog.
Vehicles through 09/2009
- Bolt
- 1.5 Nm
Vehicles from 10/2009
- Expanding Rivet
Overview - Fender Repair Set
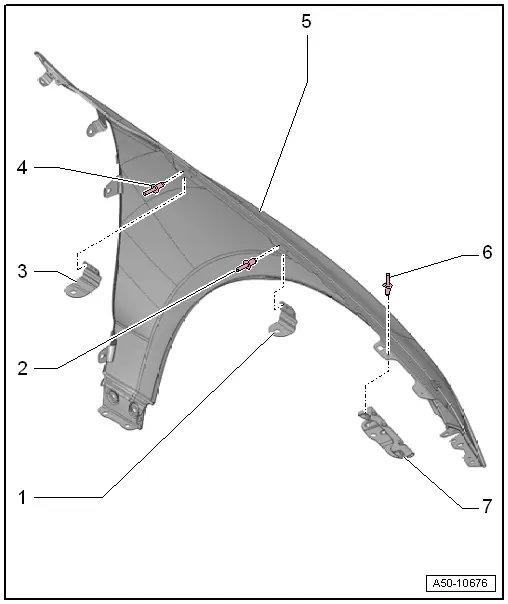
1 - Center Bracket
- Prepare for installation.
2 - Blind Rivet
- Quantity: 2
3 - Rear Bracket
- Prepare for installation.
4 - Blind Rivet
- Quantity: 2
5 - Fender
- Prepare for installation.
6 - Blind Rivet
- Quantity: 2
7 - Front Bracket
- Prepare for installation.
Fender, Removing and Installing
Special tools and workshop equipment required
- Pop Rivet Pliers -VAS5072-
- Drill
- Pop rivets. Refer to the Parts Catalog.
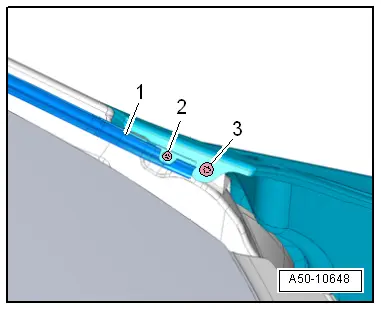
Removing
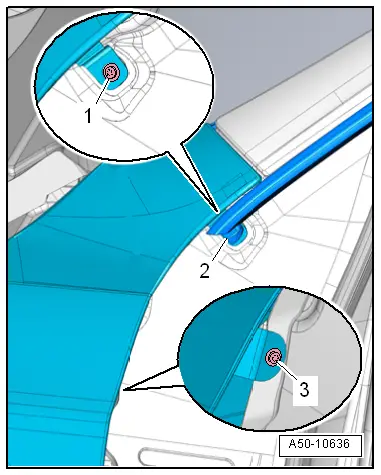
- Remove the drip rail.
- Drill out the rivet -2- on the drip rail mount -1-.
- Remove the bolt -3-.
- Open the front doors.
- Loosen the roof trim molding around the A-pillar. Refer to → Chapter "Overview - Roof Trim Molding".
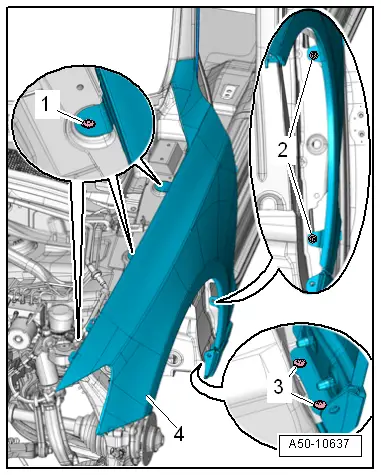
- Loosen the bracket -2- for the retainer from off the bolt.
- Remove the bolts -1 and 3-.
- Remove the plenum chamber cover. Refer to → Chapter "Plenum Chamber Cover, Removing and Installing".
- Remove the seal from the fender.
- Remove the headlamps. Refer to → Electrical Equipment; Rep. Gr.94; Headlamps; Headlamp, Removing and Installing.
- Remove the windshield washer fluid reservoir. Refer to → Electrical Equipment; Rep. Gr.92; Windshield Washer System; Windshield Washer Fluid Reservoir, Removing and Installing.
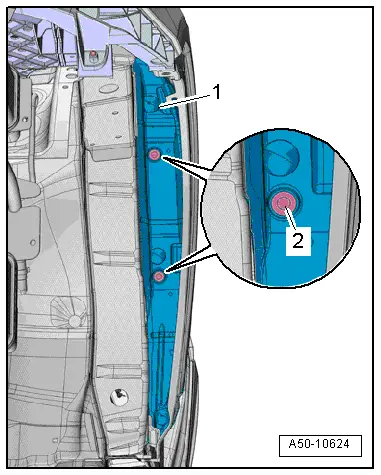
- Version 1: Remove the bolt and the expanding clip.
- Version 2: Remove expanding rivets -2-.
- Remove the end plate -1- downward.
- Remove the front bumper cover mount. Refer to → Chapter "Bumper Guides, Removing and Installing".
- Remove the bolts -1, 2, and 3-.
- Remove the fender -4-.
Fender, Preparing for Installation
 Note
Note
The fender can be ordered only as a single component and must be prepared for installation as follows.
Special tools and workshop equipment required
- Pop Rivet Pliers -VAS5072-
- Pop rivets. Refer to the Parts Catalog.
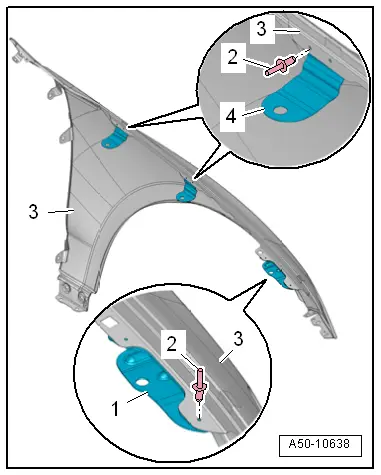
- Rivet the brackets -1 and 4- securely to the fender -3- using blind rivets -2-.
- The brackets must be installed behind and under the edge of the fender.
Installing
Install in reverse order of removal. Note the following:
- Insert the seal -2- in the fender near the center bolt -1- as illustrated.
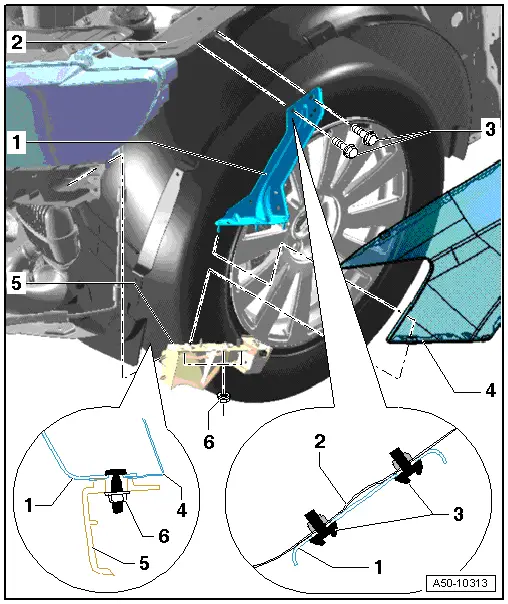
Fender Brace, Removing and Installing
Removing
- Remove the front wheel housing liner. Refer to → Chapter "Overview - Front Wheel Housing Liner".
- Remove the mount -5- from the bumper cover mount. Refer to → Chapter "Bumper Guides, Removing and Installing".
- Free up the lines.
- Remove the bolts -3-.
- Remove the fender brace -1- at the fender flange -2- and at the fender -4-.
Installing
Install in reverse order of removal. Note the following:
- Install the bumper cover mount. Refer to → Chapter "Bumper Guides, Removing and Installing".
- Install the front wheel housing liner. Refer to → Chapter "Overview - Front Wheel Housing Liner".