Audi Q5: Cover and Cushion Assembly Overview
Lower Seat Frame Cover and Cushion, Assembly Overview
 Note
Note
In the illustration is 2/3 left rear seat is shown.
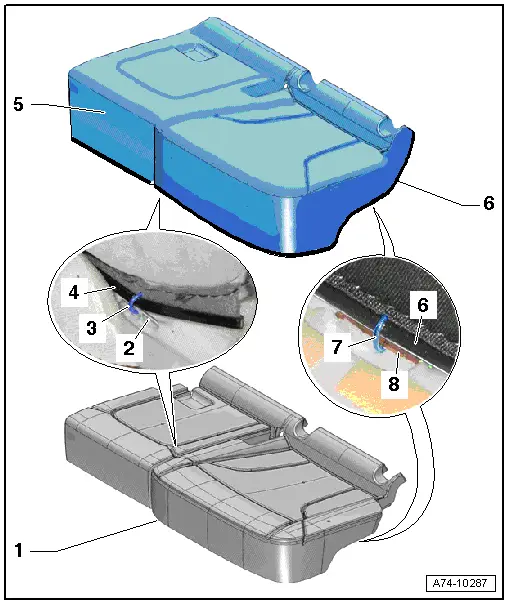
1 - Cushion
- Cover with upholstery, removing and installing. Refer to → Chapter "Seat Bench/Single Seat, Removing and Installing"
- Cover, Separating from Cushion and Connecting. Refer to → Chapter "Seat Pan Cover and Cushion, Separating"
2 - Wire
- In foam in upholstery
- For securing cover to upholstery
3 - Cushion clip
- For securing cover to upholstery
- Always replace if removed
- Install in same location as before removal
4 - Contour Strip
- Sewn into cover
- For securing cover to upholstery
5 - Cover
- Cover with upholstery, removing and installing. Refer to → Chapter "Seat Bench/Single Seat, Removing and Installing"
- Cover, Separating from Cushion and Connecting. Refer to → Chapter "Seat Pan Cover and Cushion, Separating"
6 - Molding
- Sewn into cover
- For securing cover to upholstery
7 - Cushion Clip
- For securing cover to outer cushion
- Always replace if removed
- Install in same location as before removal
 WARNING
Ends of wire clips must face in direction of upholstery after installing and must be bent correctly. Otherwise, there is a risk of injury.
8 - Wire
- In foam in upholstery
- For securing cover to upholstery
Cover and Cushion, Assembly Overview, Backrest without a Pass-Through
 Note
Note
In the illustration is 2/3 left rear seat is shown.
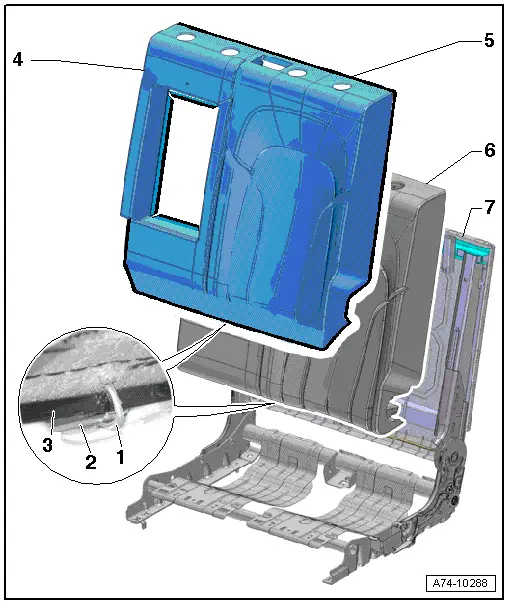
1 - Cushion Clip
- For securing cover to upholstery
- Always replace if removed
- Install in same location as before removal
2 - Wire
- In foam in upholstery
- For securing cover to upholstery
3 - Contour Strip
- Sewn into cover
- For securing cover to upholstery
4 - Cover
- Cover with upholstery, removing and installing. Refer to → Chapter "Backrest Cover and Padding without a Pass-Through, Removing and Installing"
- Cover, Separating from Cushion and Connecting. Refer to → Chapter "Backrest Cover and Cushion, Separating"
5 - Clamping Strip
- Sewn into cover
- For attaching the cover to the backrest frame
6 - Cushion
- Cover with upholstery, removing and installing. Refer to → Chapter "Backrest Cover and Padding without a Pass-Through, Removing and Installing"
- Cover, Separating from Cushion and Connecting. Refer to → Chapter "Backrest Cover and Cushion, Separating"
7 - Backrest Frame
Overview - Cover and Cushion, Backrest with a Pass-Through
 Note
Note
In the illustration is 2/3 left rear seat is shown.
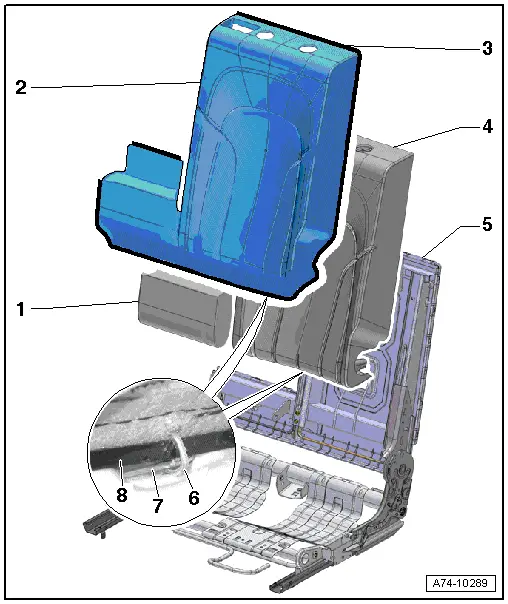
1 - Center Cushion
- Can only be removed and installed when the center armrest with pass-through cover is removed. Refer to → Chapter "Pass-Through Cover, Removing and Installing".
2 - Cover
- Cover with upholstery, removing and installing. Refer to → Chapter "Backrest Cover and Padding with Pass-Through, Removing and Installing"
- Cover, Separating from Cushion and Connecting. Refer to → Chapter "Backrest Cover and Cushion, Separating"
3 - Clamping Strip
- Sewn into cover
- For attaching the cover to the backrest frame
4 - Cushion
- Cover with upholstery, removing and installing. Refer to → Chapter "Backrest Cover and Padding with Pass-Through, Removing and Installing"
- Cover, Separating from Cushion and Connecting. Refer to → Chapter "Backrest Cover and Cushion, Separating"
5 - Backrest Frame
- Glue to the luggage compartment floor, refer to → Chapter "Backrest Frame, Gluing with Luggage Compartment Floor Covering"
6 - Cushion Clip
- For securing cover to upholstery
- Always replace if removed
- Install in same location as before removal
7 - Wire
- In foam in upholstery
- For securing cover to upholstery
8 - Contour Strip
- Sewn into cover
- For securing cover to upholstery
Pass-Through Door Cover And Cushion, Assembly Overview
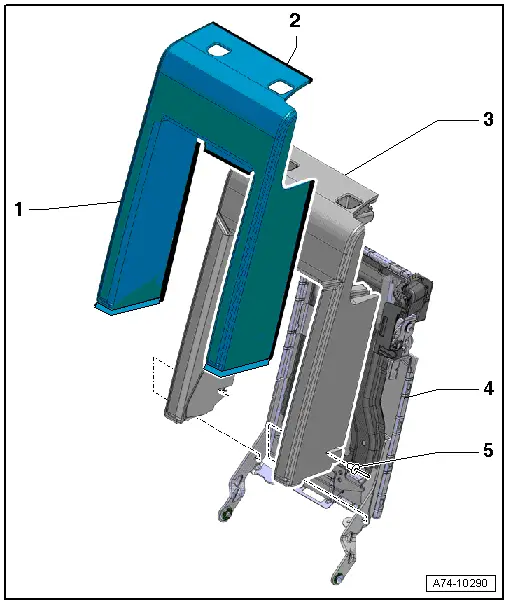
1 - Cover
- Removing and installing. Refer to → Chapter "Pass-Through Door Cover And Padding, Removing And Installing".
2 - Clamping Strip
- Sewn into cover
- For attaching the cover to the pass-through door
3 - Cushion
- Removing and installing. Refer to → Chapter "Pass-Through Door Cover And Padding, Removing And Installing".
4 - Pass-through Door
- Removing and installing. Refer to → Chapter "Pass-Through Cover, Removing and Installing".
- Glue to the luggage compartment floor, refer to → Chapter "Pass-through Door, Gluing with Luggage Compartment Cover"
5 - Rivet
- Quantity: 2
Headrest Cover and Cushion Assembly Overview
 Note
Note
A leather headrest is shown in the illustration. Because the headrest with fabric cover is not disassembled, that version is not shown in the assembly overview.
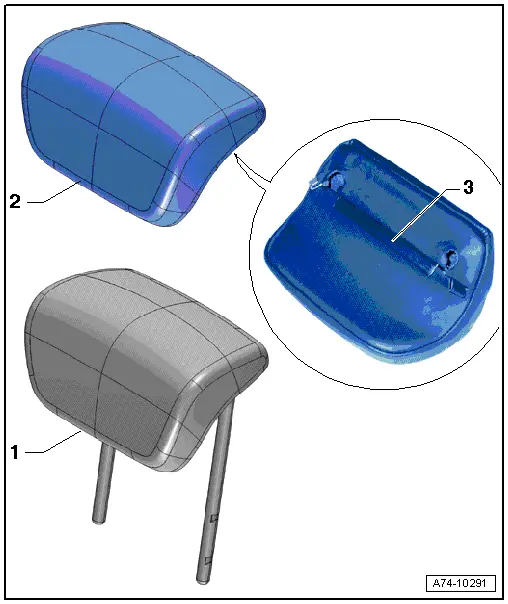
1 - Headrest Support
- With padding
- Vehicles with: Leather cover
- The headrest support is in the upholstery and cannot be separated
2 - Cover
- Vehicles with: Leather cover
- Removing and installing. Refer to → Chapter "Headrest Cover and Cushion, Removing and Installing".
 Caution
It is only possible to replace the cover on the headrest with a leather cover. It is not possible to replace a fabric headrest cover because the cover is filled with foam and also serves as the casing for the upholstery.
3 - Locking Strip
- Flat strip and U-strip
Overview - Seat Heating Element
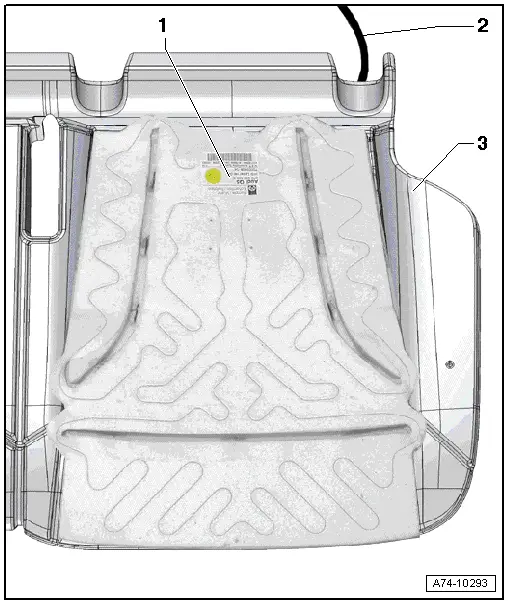
1 - Seat Bench Heating Element
- Bonded with upholstery
- Removing and installing. Refer to → Chapter "Seat Heating Element, Removing and Installing".
2 - Wire
- permanently attached to the heating element
3 - Cushion
- For the bench seat
Overview - Backrest Heating Element
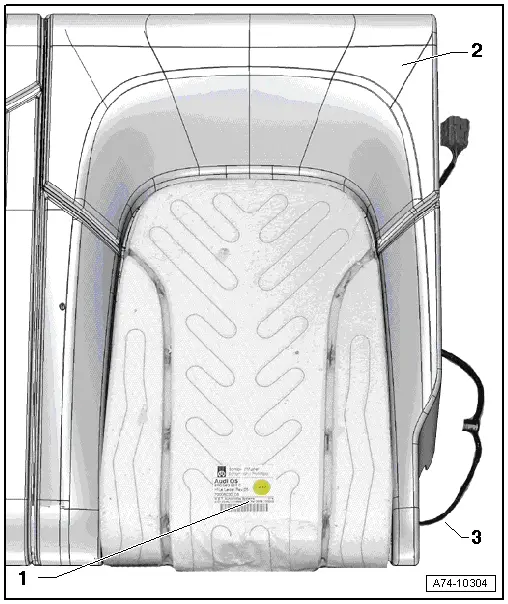
1 - Rear Seat Backrest Heating Element
- Bonded with upholstery
- Removing and installing. Refer to → Chapter "Backrest Heating Element, Removing and Installing".
2 - Cushion
- For the rear seat backrest
3 - Wire
- Permanently attached to the heating element

