Audi Q5: Electromechanical parking brake
Operation
The electromechanical parking brake replaces the hand brake.

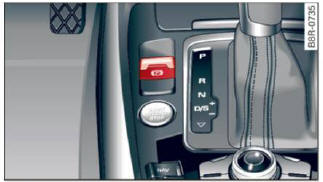
Fig. 103 Center console: Parking brake
- Pull on the switch
.png) > fig. 103 to apply the parking brake. The indicator Lights in the switch
and
> fig. 103 to apply the parking brake. The indicator Lights in the switch
and
.png) (USA models) /
(USA models) /
.png) (Canada models) in the instrument
cluster illuminate.
(Canada models) in the instrument
cluster illuminate. - With the ignition switched on, step on the
brake pedal or the accelerator pedal and press
the switch
.png) at the same time to release the parking brake. The indicator lights in the
switch and
at the same time to release the parking brake. The indicator lights in the
switch and
.png) (USA models) /
(USA models) /
.png) (Canada models) in the instrument
cluster go out.
(Canada models) in the instrument
cluster go out.
Your vehicle is equipped with an electromechanical parking brake. The parking brake is designed to prevent the vehicle from rolling unintentionally and replaces the hand brake.
In addition to the normal functions of a traditional hand brake, the electromechanical parking brake provides various convenience and safety functions.
When starting from rest
- The integral starting assist helps you when driving by automatically releasing the parking brake > Starting from rest.
- When starting on inclines, the starting assist prevents the vehicle from unintentionally rolling back. The braking force of the parking brake is not released until sufficient driving force has been built up at the wheels.
Emergency brake function
An emergency brake ensures that the vehicle can be slowed down even if the normal brakes fail.
WARNING
If a drive range is engaged with the vehicle stationary and the engine running, you must in no instance accelerate carelessly. Otherwise the vehicle will start to move immediately - risk of an accident.
Tips
- If the parking brake is applied with the ignition switched off, the
indicator lights in the switch and
.png) (USA models)
(USA models)
.png) (Canada models) in the
instrument cluster will go out after a certain period of time.
(Canada models) in the
instrument cluster will go out after a certain period of time. - Occasional noises when the parking brake is applied and released are normal and are not a cause for concern.
- When the vehicle is parked, the parking brake goes through a self-test cycle at regular intervals. Any associated noises are normal.
Parking
- Press the brake pedal to stop the vehicle.
- Pull the switch > fig. 103 to set the parking brake.
- Move the selector lever to P.
- Turn the engine off.
- When on inclines or declines, turn the steering wheel so that the vehicle will roll into the curb if it begins to move.
WARNING
- When you leave your vehicle - even if only briefly - always remove the ignition key. This applies particularly when children remain in the vehicle. Otherwise the children could start the engine, release the parking brake or operate electrical equipment (e.g. power windows). There is the risk of an accident.
- When the vehicle is locked, no one - particularly not children should remain in the vehicle. Locked doors make it more difficult for emergency workers to get into the vehicle - putting lives at risk.

