Audi Q5: Control Module/Amplifier for Digital Sound System, Removing and Installing
Digital Sound System Control Module -J525-, Removing and Installing, CAN
The Digital Sound System Control Module -J525- is located behind the left luggage compartment side trim panel.
- If replacing the control module, select the "Replace Control Module" function on the Vehicle Diagnostic Tester.
Use Vehicle Diagnostic Tester.
- Activate the parking brake.
- Turn off the ignition and all electrical consumers and remove the ignition key.
 WARNING
Danger of unintended engine ignition
Turn off the ignition and remove the ignition key from the vehicle interior for all work performed on the high voltage vehicle.
Removing
- Remove the cover from the left luggage compartment side trim panel.
- Remove the left actuator for the backrest release. Refer to → Body Interior; Rep. Gr.72; Rear Seats; Overview - Retainer.
The nut -1- is accessible above the backrest release opening.
- Loosen the bracket -3- and the nuts -1-, -2- and -4- and move the bracket with the Digital Sound System Control Module -J525--3- into the luggage compartment.
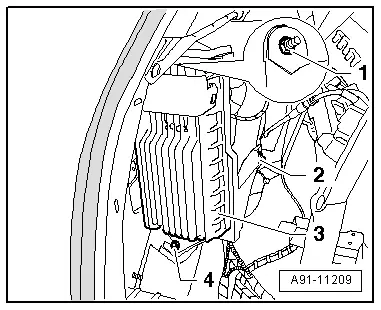
- Disconnect the connectors -2- and -3- on the Digital Sound System Control Module -J525--1- (connector -4- is not installed).
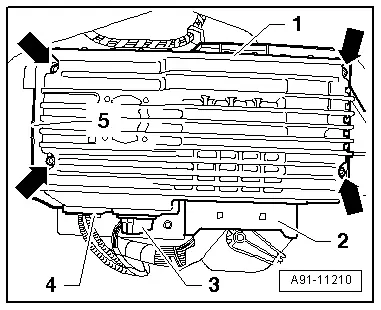
- Remove the screws -arrows- and take the Digital Sound System Control Module -J525--1- out of the bracket -5-.
Installing
- Install in reverse order of removal.
Tightening specifications and installation instructions can be found in the Component Location Overview. Refer to → Chapter "Component Location Overview - Sound System, Basic/Standard".
Digital Sound System Control Module -J525-, Removing and Installing, MMI
Special tools and workshop equipment required
- Fiber-Optic Repair Set - Connector Protective Caps -VAS6223/9-.
The Digital Sound System Control Module -J525- is located behind the left luggage compartment side trim panel.
- If replacing the control module, select the "Replace Control Module" function on the Vehicle Diagnostic Tester.
Use Vehicle Diagnostic Tester.
- Activate the parking brake.
- Turn off the ignition and all electrical consumers and remove the ignition key.
 WARNING
Danger of unintended engine ignition
Turn off the ignition and remove the ignition key from the vehicle interior for all work performed on the high voltage vehicle.
Removing
- Remove the cover from the left luggage compartment side trim panel.
- Remove the left actuator for the backrest release. Refer to → Body Interior; Rep. Gr.72; Rear Seats; Overview - Retainer.
The nut -1- is accessible above the backrest release opening.
- Remove the bracket with the Radio -R- and move it to the side. Refer to → Chapter "Radio -R-, Removing and Installing, MMI".
- Loosen the bracket -3- and the nuts -1-, -2- and -4- and move the bracket with the Digital Sound System Control Module -J525--3- into the luggage compartment.

- Disconnect the MOST-Bus connector -4- from the Digital Sound System Control Module -J525--1-.

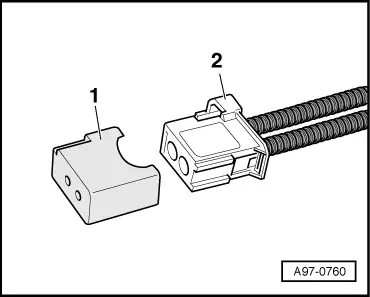
- Insert the Fiber-Optic Repair Set - Connector Protective Caps -VAS6223/9--1- onto the MOST Bus connector -2-.
- Disconnect the connectors -2- and -3- on the Digital Sound System Control Module -J525--1-.
- Remove the screws -arrows- and take the Digital Sound System Control Module -J525--1- out of the bracket -5-.
Installing
- Install in reverse order of removal.
Tightening specifications and installation instructions can be found in the Component Location Overview. Refer to → Chapter "Component Location Overview - Sound System, Basic/Standard".

Left/Right Rear Treble Speaker -R14-/-R16-, Removing and Installing
The Left Rear Treble Speaker -R14-/Right Rear Treble Speaker -R16- are located in the rear door trim panel.
Removing and installing is identical.
- Turn off the ignition and all electrical consumers and remove the ignition key.
 WARNING
Danger of unintended engine ignition
Turn off the ignition and remove the ignition key from the vehicle interior for all work performed on the high voltage vehicle.
Removing
- Remove the rear door trim panel. Refer to → Body Interior; Rep. Gr.70; Rear Door Trim Panels; Rear Door Trim Panel, Removing and Installing.
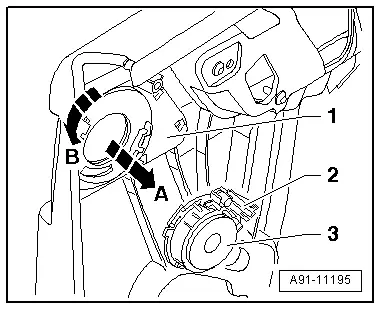
- Disconnect the connector -2- from the Left Rear Treble Speaker -R14--3-.
- Turn the Left Rear Treble Speaker -R14--3- in direction of -arrow B- until it is possible to remove the Left Rear Treble Speaker -R14--3- from the door trim panel -1- in direction of the -arrow A-.
Installing
- Install in reverse order of removal.
Tightening specifications and installation instructions can be found in the Component Location Overview. Refer to → Chapter "Component Location Overview - Sound System, Basic/Standard".