Audi Q5: Locking Handel, Removing and Installing
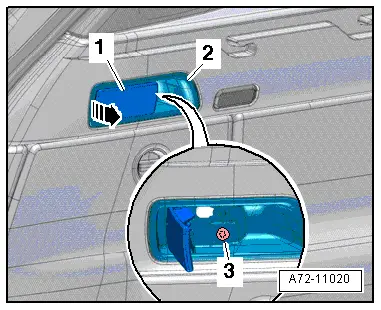
Removing
- Remove the outer cover on the rear seat backrest. Refer to → Chapter "Outer Cover, Removing and Installing".
- Carefully remove the backrest release handle -2- from the rear seat.
- Lift the tab on the inside of the backrest release handle -3- with a small screwdriver and remove the handle from the lever -1--arrow-.
Installing
Install in reverse order of removal. Note the following:
- Make sure the handle is mounted correctly on the lever.

Locking Lever, Removing and Installing
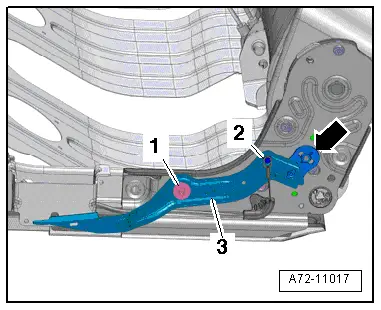
Removing
- Remove the rear seat. Refer to → Chapter "Seat Bench/Single Seat, Removing and Installing".
- Remove the outer cover on the rear seat backrest. Refer to → Chapter "Outer Cover, Removing and Installing".
- Disengage the cable -2- from the bolt on the release lever -3-.
- Remove the bolt -1-.
- Disengage the release lever of the rear seat backrest -arrow- and remove it.
Installing
Install in reverse order of removal. Note the following:
- Attach the release leer to the rear seat backrest.
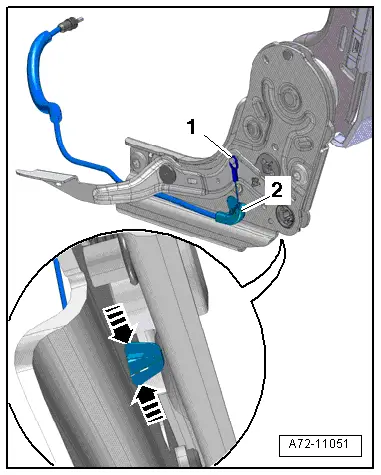
Lower Cable, Removing and Installing
Removing
- Remove the rear seat. Refer to → Chapter "Rear Seat, Removing and Installing".
- Remove the rear seat backrest. Refer to → Chapter "Rear Seat Backrest, Removing and Installing".
- Disengage the cable -1- from the bolt on the release lever.
- Unclip the release cable -2- on the rear seat backrest -arrows-.
- Remove the cable.
Installing
Install in reverse order of removal. Note the following:
- Make sure the cable is fully attached.
Backrest lock Adjustment Actuator, Removing and Installing
Special tools and workshop equipment required
- Trim Removal Wedge -3409-
Removing
- Pull the release lever -1- and release the rear seat backrest.
- Hold the release lever pulled and remove the screw -3-.
- Pry the backrest release actuator -2- out of the trim using the Trim Removal Wedge -3409--arrow- and remove it.
- Unclip the cable on the backrest release actuator.
- Disengage the cable ball studs and remove the backrest release actuator.
Installing
Install in reverse order of removal.
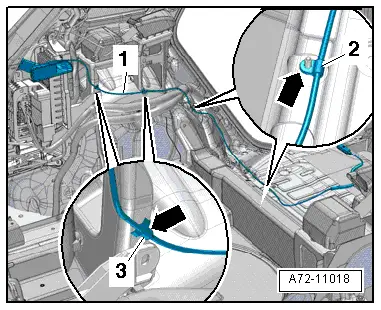
Upper Cable, Removing and Installing
Special tools and workshop equipment required
- Pry Lever -80 - 200-
Removing
- Remove the rear seat. Refer to → Chapter "Rear Seat, Removing and Installing".
- Remove the backrest release actuator. Refer to → Chapter "Backrest lock Adjustment Actuator, Removing and Installing".
- Remove the luggage compartment side trim. Refer to → Chapter "Luggage Compartment Side Trim Panel, Removing and Installing".
- Remove the rear sill trim. Refer to → Chapter "Sill Panel, Removing and Installing, Rear Sill Panel".
- Unclip the cable retainers -2 and 3--1- using the Pry Lever -80 - 200- and remove the cable.
Installing
Install in reverse order of removal. Note the following:
- Make sure the cable is fully attached.
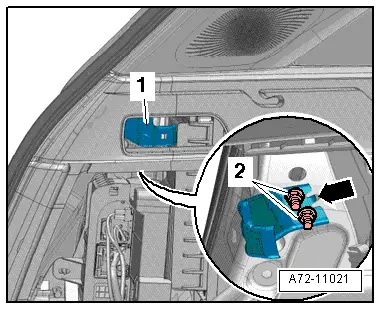
Actuator Bracket, Removing and Installing
Removing
- Remove the backrest release actuator. Refer to → Chapter "Backrest lock Adjustment Actuator, Removing and Installing".
- Open the cover in the luggage compartment side trim panel.
- Remove the nuts -1- and then remove the bracket -2-.
Installing
Install in reverse order of removal. Note the following:
- Mount the bracket so that the tab fits into the opening -arrow- in the body.