Audi Q5: Brake Caliper, Replacing, Brake 1LV and 1ZK, SQ5
Special tools and workshop equipment required
- Torque Wrench 1332 40-200Nm -VAG1332-
- Brake Pedal Actuator -VAG1869/2-.
- Container from the Brake Charger/Bleeder Unit -VAS5234-
Removing
- Remove affected front wheel. Refer to →Wheel and Tire Guide; Rep. Gr.44.
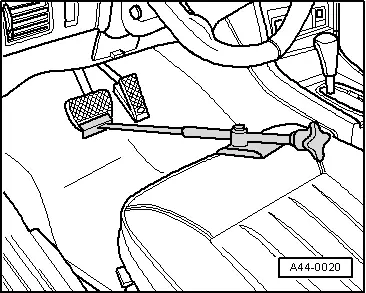
- Insert the Brake Pedal Actuator -VAG1869/2- between the brake pedal and driver seat. Preload the brake pedal at least 60 mm.
 Note
Note
By doing this, the valves in the brake master cylinder are closed and the brake fluid reservoir does not run empty.
- Connect the container hose to a front brake caliper bleed screw -2-.
- Open a brake caliper bleed screw on the front brake caliper to reduce the pressure from the brake system.
 WARNING
- Brake fluid is poisonous. NEVER siphon brake fluid with your mouth!
- Wash off any brake fluid that comes into contact with the skin with a lot of water.
- If brake fluid comes in contact with the eyes, wash out the eye(s) and see a doctor.
- Close the bleed screw.
 Note
Note
Do not remove the Brake Pedal Actuator -VAG1869/2-.
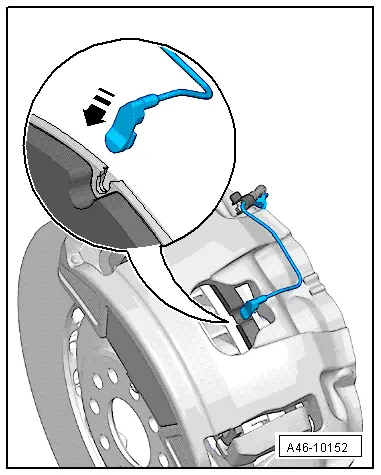
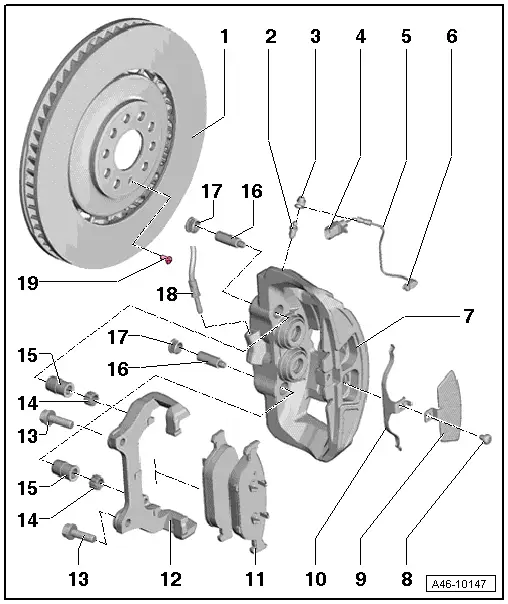
- Remove the brake hose -18- from brake caliper.
- Remove the brake pads. Refer to → Chapter "Brake Pads, Removing and Installing, Brake 1LV and 1ZK, SQ5".
Installing
 Note
Note
Use new bolts. Refer to Parts Catalog.
- Install the brake pads. Refer to → Chapter "Brake Pads, Removing and Installing, Brake 1LV and 1ZK, SQ5".
- Install the brake hose into the brake caliper and tighten.
 WARNING
- Brake fluid is poisonous. NEVER siphon brake fluid with your mouth!
- Wash off any brake fluid that comes into contact with the skin with a lot of water.
- If brake fluid comes in contact with the eyes, wash out the eye(s) and see a doctor.
- Remove the Brake Pedal Actuator -VAG1869/2-.
Only bleed the brakes on the wheel which the brake caliper and the brake line was separated.
 Note
Note
Only bleed the brakes on the wheel which the brake caliper and the brake line was separated. If the brake pedal still feels "soft", completely bleed the brakes. Refer to → Chapter "Hydraulic System, Bleeding".
 WARNING
There is the risk of an accident.
- Before moving the vehicle, press the brake pedal firmly several times to seat the brake pads correctly in their operating position.
- Make sure the brakes are working correctly before driving the vehicle.
Brake Pad Wear Display Wire, Removing and Installing
Removing
- Remove affected front wheel. Refer to →Wheel and Tire Guide; Rep. Gr.44.
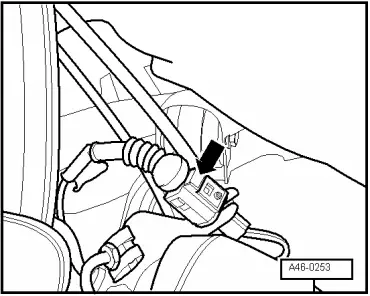
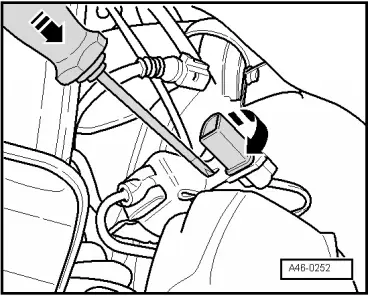
- Disconnect the connector for the brake pad wear display -arrow-.
- Release the connector from the mount while turning it 90º at the same time.
- Remove the connector from the bracket.
- Remove the brake pad wear display contact form the clip inside the inner brake pad.
- Remove the clip from the inner brake pad.
Installing
- Install the clip for the brake pad wear display into the inner brake pad.
- Install contact -arrow-.
 Note
Note
Make sure the contact for the brake pad wear display fits correctly in the clip inside the inner brake pad.
- Connect wear indicator connector.
- Install the electrical connection for the brake pad wear display in the bracket.
- Mount the wheels. Refer to →Wheel and Tire Guide; Rep. Gr.44.