Audi Q5: Brake Booster/Brake Master Cylinder
Overview - Brake Booster/Brake Master Cylinder
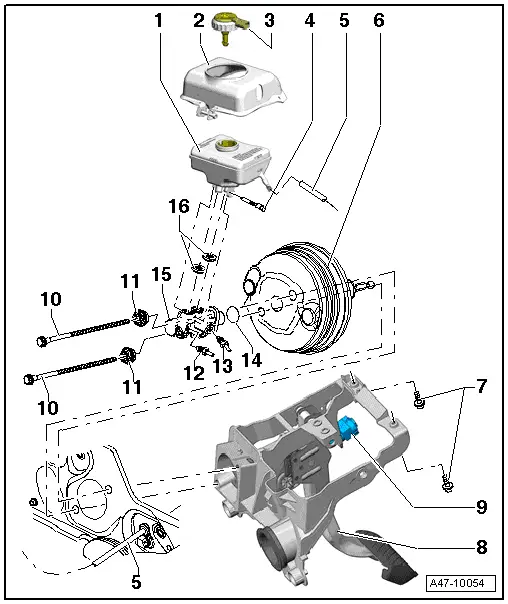
1 - Brake Fluid Reservoir
- Do not remove the screen in the brake fluid reservoir.
2 - Brake Fluid Reservoir Cover
- Not installed in all vehicles.
3 - Cap with Seal and Brake Fluid Level Warning Switch -F34-
4 - Bolt
- 5 Nm
5 - Wiring to the Clutch Master Cylinder
6 - Brake Booster
- Functionality test: with engine switched off, depress brake pedal firmly several times (to deplete vacuum in the tool).
- Depress and hold brake pedal with average foot pressure and start engine. If brake booster is working properly, pedal will be felt to give noticeably under foot (booster assistance becomes effective).
- With adhesive seal
- If malfunctioning: replace as complete unit.
7 - Pedal Support Bolt
- 20 Nm
8 - Brake Pedal
- Removing and Installing, with Manual Transmission
- Removing and Installing, with Automatic Transmission
9 - Brake Lamp Switch -F-
10 - Bolt
- 25 Nm
- Connects the brake booster to the mounting bracket
11 - Hex Nut
- 49 Nm
- For the brake master cylinder
12 - Brake Line
- 14 Nm
- Brake master cylinder to the hydraulic unit
13 - Brake Line
- 14 Nm
- Brake master cylinder to the hydraulic unit
14 - Seal
- Replace
15 - Brake Master Cylinder
- Cannot be serviced. Replace as complete unit if malfunctioning.
16 - Sealing Plug
- Moisten with brake fluid and press into brake fluid reservoir
 Note
Note
Use only new brake fluid. Observe information on brake fluid reservoir!
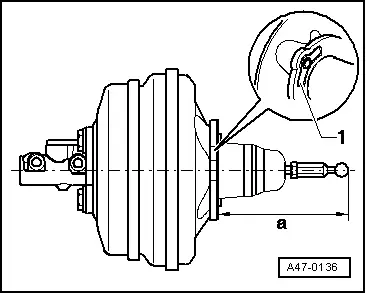
Adjusting ball head
Left-hand drive vehicles:
Right-hand drive vehicles:
-a = 164.7mm +- 0.5mm-
 Note
Note
- Surface -1- for measuring.
- When measuring, ball head must be arranged at a right angle to surface of brake booster.
- Measure to end of ball head without gasket installed.
Ball head to the push rod, 30 Nm.
Brake Booster, Removing and Installing
Special tools and workshop equipment required
- Torque Wrench 1331 5-50Nm -VAG1331-
- Brake Bleeder Adapter -VAS5234/1-
- Brake Charger/Bleeder Unit -VAS5234-
- Sealing Plug Repair Set -1H0 698 311 A-
Removing
- Switch the engine off.
- Press the brake pedal until there is no more brake assistance - "pump the brake booster empty". The brake pedal becomes hard.
- Separate the brake pedal from brake booster. Refer to → Chapter "Brake Pedal, Removing from Brake Booster".
- Remove the plenum chamber cover. Refer to → Body Exterior; Rep. Gr.50; Bulkhead; Plenum Chamber Cover, Removing and Installing.
Applies to Hybrid Vehicles
 WARNING
Follow the High Voltage System General Warnings. Refer to →Electrical System Hybrid; Rep. Gr.93.
- Remove the Electric A/C Compressor High Voltage Cable -P3- from the plenum chamber bulkhead. Refer to → Electrical System Hybrid; Rep. Gr.93; High Voltage Cables; Electrical A/C Compressor High Voltage Cable, Removing and Installing.
Continuation for All Vehicles
- Remove the plenum chamber bulkhead. Refer to → Body Exterior; Rep. Gr.50; Bulkhead; Overview - Bulkhead.
- Remove the brake fluid reservoir. Refer to → Chapter "Brake Fluid Reservoir, Removing and Installing".
 WARNING
- Brake fluid is poisonous. NEVER siphon brake fluid with your mouth!
- Wash off any brake fluid that comes into contact with the skin with a lot of water.
- If brake fluid comes in contact with the eyes, wash out the eye(s) and see a doctor.
- Remove the brake master cylinder at the nuts -3-. Refer to → Chapter "Brake Master Cylinder, Removing and Installing".
- Remove master brake cylinder
- Place the brake master cylinder so no brake fluid can drain out.

- Remove the vacuum line -3- from the brake booster.
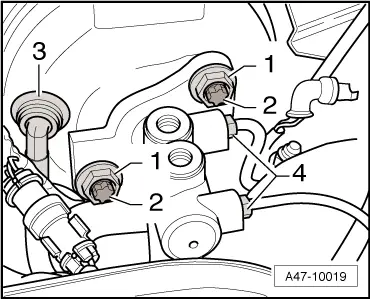
- Remove the bolts mounting the brake booster -1- to the mounting bracket.
- Remove the brake booster from the vehicle.

Installing
- Insert the brake booster in the vehicle.
Make sure the seal is seated correctly.
- Install the bolts from the brake booster -1- to the mounting bracket and tighten them.
- Press the vacuum line -3- into the brake booster.


- Install the brake master cylinder -15-. Refer to → Chapter "Brake Master Cylinder, Removing and Installing".
- Install the brake fluid reservoir -1-. Refer to → Chapter "Brake Fluid Reservoir, Removing and Installing".
- With manual transmissions, insert the clutch hydraulic line -5- into the brake fluid reservoir.
- Fill the brake fluid up to the marking.
 WARNING
- Brake fluid is poisonous. NEVER siphon brake fluid with your mouth!
- Wash off any brake fluid that comes into contact with the skin with a lot of water.
- If brake fluid comes in contact with the eyes, wash out the eye(s) and see a doctor.
- Bleed the hydraulic system. Refer to → Chapter "Hydraulic System, Bleeding".
- Install the plenum chamber bulkhead. Refer to → Body Exterior; Rep. Gr.50; Bulkhead; Overview - Bulkhead.
Applies to hybrid vehicles
 WARNING
Follow the High Voltage System General Warnings. Refer to →Electrical System Hybrid; Rep. Gr.93.
- Install the Electric A/C Compressor High Voltage Cable -P3- from the plenum chamber bulkhead. Refer to → Electrical System Hybrid; Rep. Gr.93; High Voltage Cables; Electrical A/C Compressor High Voltage Cable, Removing and Installing.
Continuation for all vehicles
- Install plenum chamber cover. Refer to → Body Exterior; Rep. Gr.50; Bulkhead; Plenum Chamber Cover, Removing and Installing.
- Attach the brake pedal to the brake booster.
Brake Master Cylinder, Removing and Installing
Special tools and workshop equipment required
- Torque Wrench 1331 5-50Nm -VAG1331-
- Brake Charger/Bleeder Unit -VAS5234-
- Brake Bleeder Adapter -VAS5234/1-
- Sealing Plug Repair Set -1H0 698 311 A-
Applies to Hybrid Vehicles
 WARNING
Follow the High Voltage System General Warnings. Refer to →Electrical System Hybrid; Rep. Gr.93.
Removing
- Remove the plenum chamber cover. Refer to → Body Exterior; Rep. Gr.50; Bulkhead; Plenum Chamber Cover, Removing and Installing.
Applies to Hybrid Vehicles
 WARNING
Follow the High Voltage System General Warnings. Refer to →Electrical System Hybrid; Rep. Gr.93.
- Remove the Electric A/C Compressor High Voltage Cable -P3- from the plenum chamber bulkhead. Refer to → Electrical System Hybrid; Rep. Gr.93; High Voltage Cables; Electrical A/C Compressor High Voltage Cable, Removing and Installing.
Continuation for all vehicles
- Remove the plenum chamber bulkhead. Refer to → Body Exterior; Rep. Gr.50; Bulkhead; Overview - Bulkhead.
- To protect against escaping brake fluid, place enough lint-free cloths in the area below the master brake cylinder.
- Extract as much brake fluid as possible from the brake fluid reservoir with the Brake Charger/Bleeder Unit -VAS5234-.
 WARNING
- Brake fluid is poisonous. NEVER siphon brake fluid with your mouth!
- Wash off any brake fluid that comes into contact with the skin with a lot of water.
- If brake fluid comes in contact with the eyes, wash out the eye(s) and see a doctor.
- Remove the brake fluid reservoir. Refer to → Chapter "Brake Fluid Reservoir, Removing and Installing".
- Disconnect the brake lines -2- at brake master cylinder and seal the brake lines with plugs from the repair kit.
- Remove the brake master cylinder nuts -3-.
- Remove brake master cylinder from brake booster.
- Remove the brake master cylinder from the vehicle.
 Caution
Do not let any brake fluid run into the brake booster.

Installing
Install in reverse order of removal.
 Caution
Do not let any brake fluid run into the brake booster.
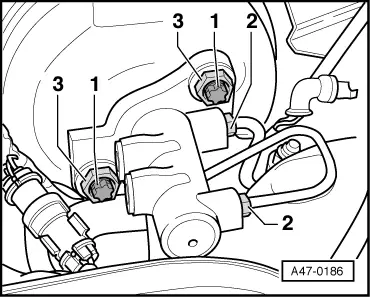
Use new nuts.
- Replace sealing ring between brake master cylinder and brake booster.
- When replacing brake master cylinder, ensure pressure rod in brake booster is seated correctly.
- Press brake pedal down slightly. This makes it easier to guide the push rod into the brake master cylinder.
- Install new nuts -3- and tighten. Note torque.
- Install the brake lines -2- on the brake master cylinder. Note torque.

- Install the brake fluid reservoir -1-. Refer to → Chapter "Brake Fluid Reservoir, Removing and Installing".
- With manual transmissions, insert the clutch hydraulic line -5- into the brake fluid reservoir.
- Fill the brake fluid up to the marking.
 WARNING
- Brake fluid is poisonous. NEVER siphon brake fluid with your mouth!
- Wash off any brake fluid that comes into contact with the skin with a lot of water.
- If brake fluid comes in contact with the eyes, wash out the eye(s) and see a doctor.
- Bleed the hydraulic system. Refer to → Chapter "Hydraulic System, Bleeding".
- Install the plenum chamber bulkhead. Refer to → Body Exterior; Rep. Gr.50; Bulkhead; Overview - Bulkhead.
Applies to hybrid vehicles
 WARNING
Follow the High Voltage System General Warnings. Refer to →Electrical System Hybrid; Rep. Gr.93.
- Install the Electric A/C Compressor High Voltage Cable -P3- from the plenum chamber bulkhead. Refer to → Electrical System Hybrid; Rep. Gr.93; High Voltage Cables; Electrical A/C Compressor High Voltage Cable, Removing and Installing.
Continuation for all vehicles
- Install plenum chamber cover. Refer to → Body Exterior; Rep. Gr.50; Bulkhead; Plenum Chamber Cover, Removing and Installing.
- Perform ESP driving and system test.

