Audi Q5: Brake Fluid Reservoir, Removing and Installing
Brake Fluid Reservoir Cover, Removing and Installing
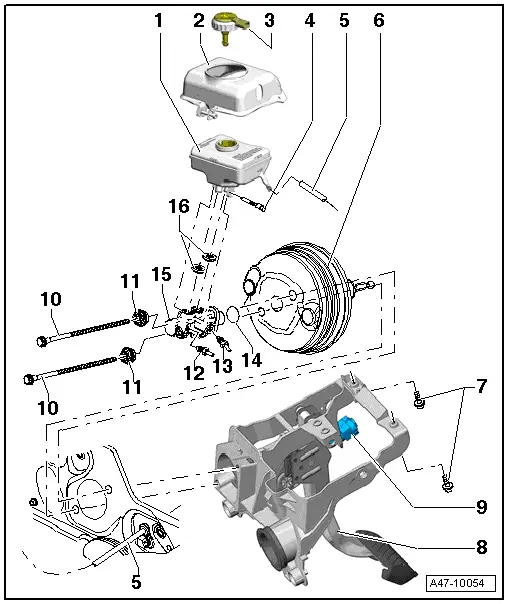
Not installed in all vehicles.
The brake fluid reservoir cover has an opening on the left to check the brake fluid level. To prevent damage later, brake fluid must not enter between the brake fluid reservoir cover and the brake fluid reservoir.
Removing
- Remove the plenum chamber cover. Refer to → Body Exterior; Rep. Gr.50; Bulkhead; Plenum Chamber Cover, Removing and Installing.
- Remove the screw -4-.
- Remove the brake fluid reservoir cover from the vehicle.
Installing
- Place the brake fluid reservoir cover over the brake fluid reservoir.
- Install the bolt -4- and tighten.
- Install plenum chamber cover. Refer to → Body Exterior; Rep. Gr.50; Bulkhead; Plenum Chamber Cover, Removing and Installing.
Brake Fluid Reservoir, Removing and Installing
Removing
- Remove the plenum chamber cover. Refer to → Body Exterior; Rep. Gr.50; Bulkhead; Plenum Chamber Cover, Removing and Installing.
- Disconnect the connector from the Brake Fluid Level Warning Switch -F34-.
- If installed: Remove the brake fluid reservoir cover over the brake fluid reservoir. Refer to → Chapter "Brake Fluid Reservoir Cover, Removing and Installing".
 WARNING
- Brake fluid is poisonous. NEVER siphon brake fluid with your mouth!
- Wash off any brake fluid that comes into contact with the skin with a lot of water.
- If brake fluid comes in contact with the eyes, wash out the eye(s) and see a doctor.
- To protect against escaping brake fluid, place enough lint-free cloths in the area below the master brake cylinder.
- Siphon as much brake fluid as possible using the Brake Charger/Bleeder Unit -VAS5234- and Adapter -VAS5234/1- from the brake fluid reservoir.

- With manual transmissions, remove the clutch hydraulic line -5- from the brake fluid reservoir and seal it.
- Pull the lower locking pin out of the brake fluid reservoir.
- Remove the brake fluid reservoir from the brake master cylinder.
Installing
Remove the protective cap on the new brake fluid reservoir just before filling it.
- Coat the plugs on the brake fluid reservoir with brake fluid.
- Insert the brake fluid reservoir in the sealing plugs in the brake master cylinder.
- Push the lower locking pin through the brake fluid reservoir.
- Connect the connector for the Brake Fluid Level Warning Switch -F34-.
- With manual transmission, connect the clutch hydraulic line -5- to the brake fluid reservoir.
- Fill the brake fluid up to the marking.
 WARNING
- Brake fluid is poisonous. NEVER siphon brake fluid with your mouth!
- Wash off any brake fluid that comes into contact with the skin with a lot of water.
- If brake fluid comes in contact with the eyes, wash out the eye(s) and see a doctor.
- Bleed the hydraulic system. Refer to → Chapter "Hydraulic System, Bleeding".
- Install the brake fluid reservoir cover over the brake fluid reservoir.
 Note
Note
The brake fluid reservoir cover is not installed on all vehicle models.
- Install plenum chamber cover. Refer to → Body Exterior; Rep. Gr.50; Bulkhead; Plenum Chamber Cover, Removing and Installing.

