Audi Q5: Wheel Bearing Housing, Removing and Installing
Wheel Bearing Housing, Removing and Installing, FWD Vehicles
Special tools and workshop equipment required
- Torque Wrench 1332 40-200Nm -VAG1332-
- Torque Wrench -VAG1410-
- Grease
Removing
- Remove the wheels.
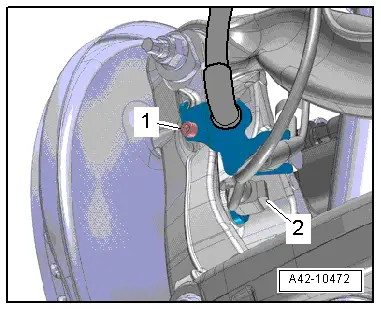
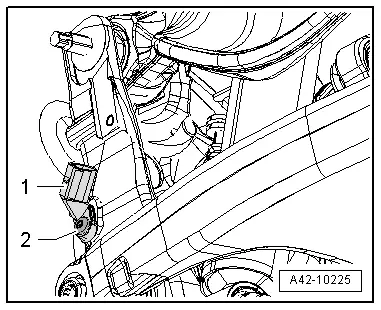
- Disconnect the connector -2- from the rear speed sensor.
- Remove the bolt -1- and the bracket with the wires from the wheel bearing housing.
- Remove the brake caliper and the brake rotor (refer to → Brake System; Rep. Gr.46; Rear Brakes; Brake Rotor, Removing and Installing) and then guide the brake rotor past the suspension and secure it to the body.
 Caution
- Make sure the weight of the removed brake caliper cannot crush or damage the brake hose or brake line.
- Do not press the brake pedal whenever the brake caliper is removed.
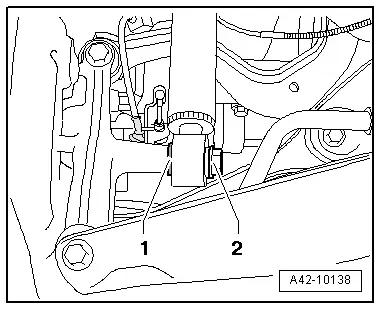
- Remove the bolt -1- and the rear speed sensor -2-.
- Remove the coil spring. Refer to → Chapter "Spring, Removing and Installing".
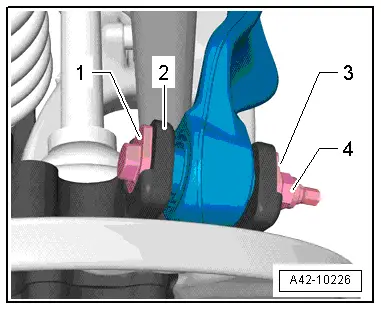
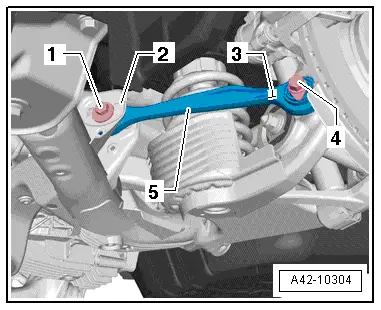
- Mark the installed position of the adjusting screw -1- to the wheel bearing housing -2-.
- Remove the nut -4- and the shim -3-.
- Remove the adjusting screw.
- Remove the bolt -4-.
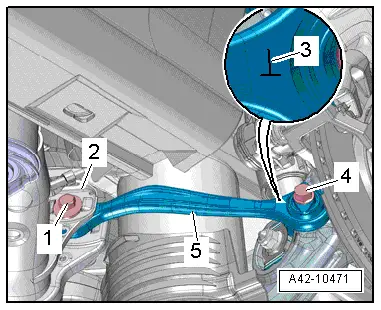
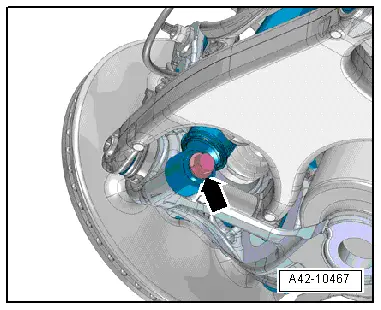
- Remove the bolt -arrow- and the washer between the wheel bearing housing and the shock absorber.
- Remove the nut -3-.
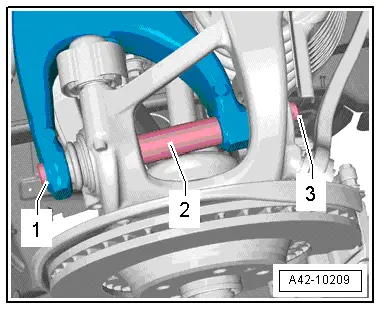
- Remove the bolt -1- and the spacer -2-.
- Remove the wheel bearing housing.

Installing
Install in reverse order of removal. Note the following:
 Note
Note
- Bonded rubber bushings have a limited range of motion. Only tighten suspension screws when vehicle is in curb weight or control position.
- Lifting the wheel bearing into curb weight position, vehicles with steel suspension. Refer to → Chapter "Wheel Bearing in Curb Weight, Lifting Vehicles with Coil Spring".
- Install wheel bearing housing.
- Insert the bolt -1- with the spacer tube -2- and install the nut -3- loosely.
 Caution
Do not tighten the threaded connection using the nut -3-.
- Tighten the bolt -1-.
- Install the coil spring. Refer to → Chapter "Spring, Removing and Installing".
- Install the brake caliper and the brake rotor. Refer to → Brake System; Rep. Gr.46; Rear Brakes; Brake Rotor, Removing and Installing.
- Install the tie rod. Refer to → Chapter "Tie Rod, Removing and Installing".
- Install the upper transverse link. Refer to → Chapter "Upper Transverse Link, Removing and Installing".
- Install the lower transverse link. Refer to → Chapter "Lower Transverse Link, Removing and Installing".
- Install the speed sensor. Refer to → Brake System; Rep. Gr.45; Sensors; Right/Left Rear ABS Wheel Speed Sensor G44/G46, Removing and Installing.
- Mount the rear wheel. Refer to → Chapter "Wheel Bolt Tightening Specifications".
- An axle alignment may be required. Refer to → Chapter "Evaluating Need for Axle Alignment".

Wheel Bearing Housing, AWD, Removing and Installing
Special tools and workshop equipment required
- Torque Wrench 1332 40-200Nm -VAG1332-
- Torque Wrench -VAG1410-
Removing
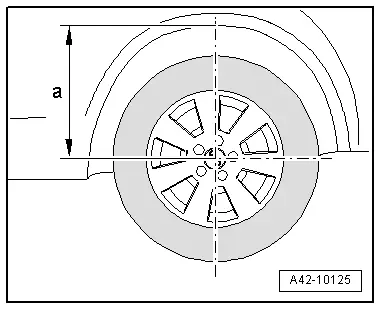
- Determine dimension -a- from the center of the wheel to the lower edge of the wheel housing before starting work while the vehicle is resting on its wheels.
- Place the vehicle on a hoist.
Loosen the connection between the drive axle and wheel hub. Refer to → Chapter "Drive Axle Threaded Connection, Loosening and Tightening".
- Remove the wheel.
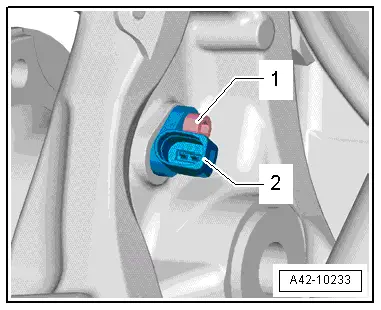
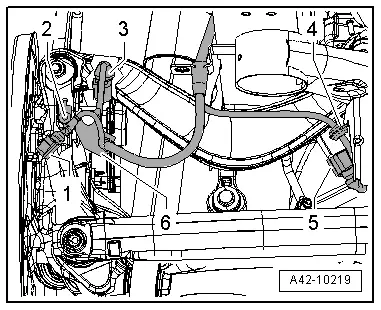
- Release the connector -1- from the rear wheel speed sensor and remove it.
- Disconnect the electromechanical parking brake connector -3-.
- Remove the bolt -2- and the bracket with lines -6-.
- Remove the brake caliper and the brake rotor. Refer to → Brake System; Rep. Gr.46; Rear Brakes; Brake Rotor, Removing and Installing.
- Secure the brake caliper to the body so that the weight of the caliper does not stress or damage the brake hose or brake line.
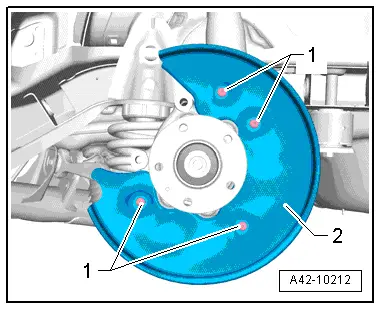
- Remove the bolts -1- and the brake shield -2-.
- Remove the rear wheel speed sensor -1-. Remove bolt -2-.
- Remove the coil spring. Refer to → Chapter "Spring, Removing and Installing".
- Mark the position of the bolt -1- to the wheel bearing housing -2-.
- Remove the nut -4- and the eccentric washer -3-.
- Remove the bolt -1-.

- Remove the bolt -4-.
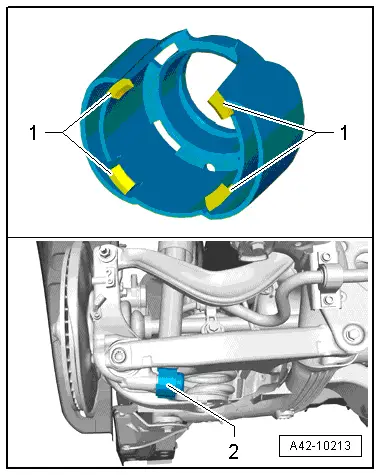
- Release the retaining tabs -1- and remove the stone deflector -2-.
- Remove the bolt -2- and washer -1-.
- Remove the nut -3-.
- Remove the bolt -1- and the spacer tube -2-.
 Note
Note
Axle alignment is necessary if the nut -3- is loosened or the bolt -1- is removed.
- Tip the wheel bearing housing to the side and remove the drive axle from it.
- Remove the wheel bearing housing.
Remove the wheel bearing unit. Refer to → Chapter "Wheel Bearing Unit, AWD, Removing and Installing".
Installing
Install in reverse order of removal. Note the following:
 Note
Note
- Bonded rubber bushings have a limited range of motion. Only tighten suspension screws when vehicle is in curb weight or control position.
- Wheel bearing, lifting to curb weight position on vehicles with coil springs. Refer to → Chapter "Wheel Bearing in Curb Weight, Lifting Vehicles with Coil Spring".
- Install wheel bearing housing.
- Insert the bolt -1- with the spacer tube -2- and install the nut -3- loosely.
 Caution
Do not tighten the threaded connection using the nut -3-.
- Tighten the bolt -1-.
- Install the coil spring. Refer to → Chapter "Spring, Removing and Installing".
- Install the brake caliper and the brake rotor. Refer to → Brake System; Rep. Gr.46; Rear Brakes; Brake Rotor, Removing and Installing.
- Install the Rear Speed Sensor. Refer to → Brake System; Rep. Gr.45; Sensors; Right/Left Rear ABS Wheel Speed Sensor G44/G46, Removing and Installing.
- Install the wheel.
- Tighten the wheel. Refer to → Chapter "Wheel Bolt Tightening Specifications".
Tighten the drive axle to wheel hub threaded connection. Refer to → Chapter "Drive Axle Threaded Connection, Loosening and Tightening".
- An axle alignment may be required. Refer to → Chapter "Evaluating Need for Axle Alignment".
The axle alignment on the front and rear axles must be performed on a VW/Audi approved alignment rack.


