Audi Q5: Wheel Bearing Unit, Removing and Installing
Wheel Bearing Unit, FWD, Removing and Installing
Special tools and workshop equipment required
- Puller - Grease Cap -VW637/2-
- Seal Installer - Camshaft Installer Kit - Sleeve -3241/4-
- Torque Wrench 1332 40-200Nm -VAG1332-
- Torque Wrench -VAG1410-
- Grease
Removing
- Remove the wheels.
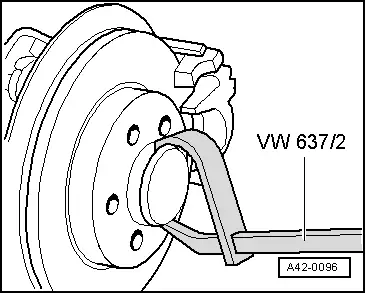
- Loosen the cap by lightly tapping on the Puller - Grease Cap -VW637/2-.
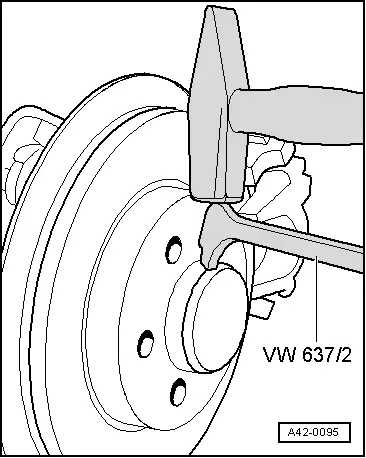
- Pry the cap using the Puller - Grease Cap -VW637/2-.
- Loosen the wheel bearing unit bolt.
- Remove the brake caliper and brake rotor from the wheel bearing housing and (refer to → Brake System; Rep. Gr.46; Rear Brakes; Brake Rotor, Removing and Installing), guide them past the suspension and secure them to the body.
 Caution
- Make sure the weight of the removed brake caliper cannot crush or damage the brake hose or brake line.
- Do not press the brake pedal whenever the brake caliper is removed.
- Remove the bolts -1- from the brake shield -2-.
- Move the brake shield -2- toward the outside.
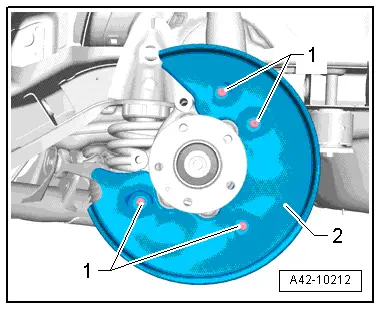
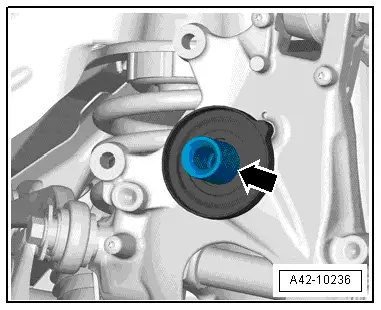
- Reach behind the front seal -arrow-. Remove the wheel bearing unit (not illustrated) over the front seal -arrow-.
 Caution
Do not pull the wheel bearing off by the outer race (wheel hub).
 Note
Note
If the wheel bearing unit can be removed from the wheel bearing housing by hand, the wheel bearing unit is OK and can be reinstalled.

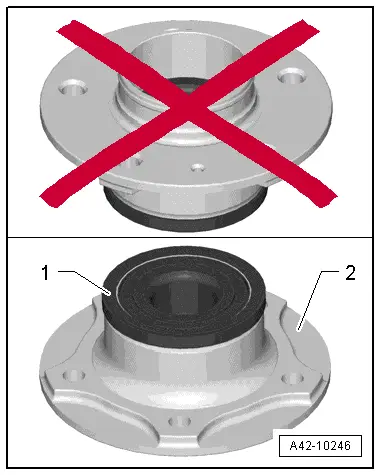
 Caution
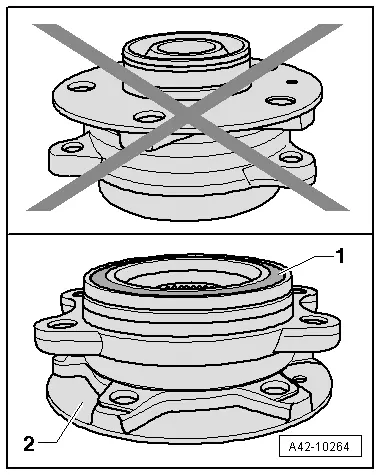
Avoid contaminating with dirt and damaging the seal when setting down/storing.
- The wheel bearing -1- must always face up.
- Always set the wheel bearing unit down on the wheel hub -2-.
Installing
Install in reverse order of removal. Note the following:
- Clean the front seal.
- Install the front seal and grease the stub axle -arrow- lightly with Grease.
- Install the brake caliper and the brake rotor. Refer to → Brake System; Rep. Gr.46; Rear Brakes; Brake Rotor, Removing and Installing.
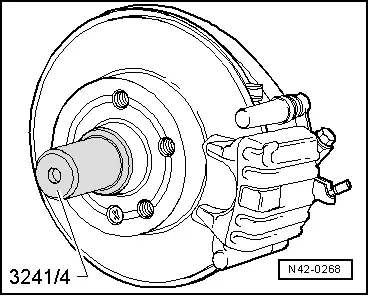
- Drive in the cap with the Camshaft Installer Kit - Sleeve -3241/4-.
 Note
Note
- Always replace a damaged cap.
- Damaged caps allow moisture to get in. Therefore, always use the tool shown.
- Install the brake caliper and the brake rotor. Refer to → Brake System; Rep. Gr.46; Rear Brakes; Brake Rotor, Removing and Installing.
- Tighten the wheel bearing unit bolt.
- Mount the rear wheel. Refer to → Chapter "Wheel Bolt Tightening Specifications".
Wheel Bearing Unit, AWD, Removing and Installing
Removing
- Remove wheel bearing housing. Refer to → Chapter "Wheel Bearing Housing, AWD, Removing and Installing".
- Clamp the wheel bearing housing in a vise with aluminum protective covers.
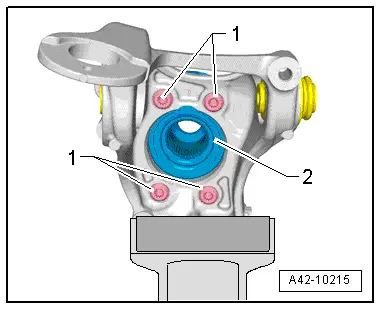
- Remove the bolts -1- and the wheel bearing unit -2-.
 Caution
Avoid contaminating with dirt and damaging the seal when setting down/storing.
The wheel bearing -1- must always face up.
- Always set the wheel bearing unit down on the wheel hub -2-.
The same procedure also applies to the wheel bearing without a wheel hub.
Installing
Install in reverse order of removal. Note the following:

Wheel Bearing Unit, Servicing
Special tools and workshop equipment required
- Press Plate -VW401-
- Press Plate -VW402-
- Press Piece - Multiple Use -VW412-
- Hydraulic Press - Bushing Assembly Tool Kit -T10230-
- Puller - Kukko Separating Tool - Diameter 25-155mm -15/3- with Puller - Kukko Quick Action Separating Tool - 25-155mm -17/3-
- Wheel bearing housing is removed. Refer to → Chapter "Wheel Bearing Unit, AWD, Removing and Installing".
Wheel Hub, Removing from Wheel Bearing
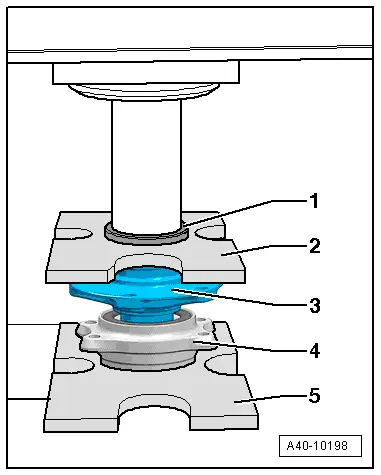
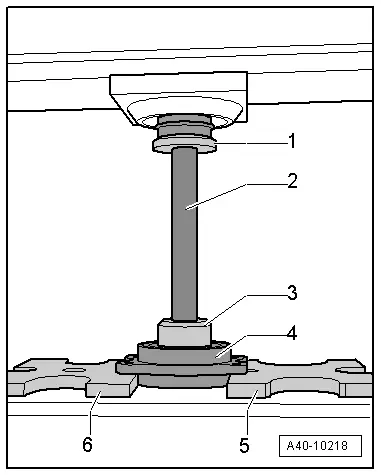
- Install special tools as shown in illustration.
1 - Press Piece - Multiple Use -VW412-
2 - Sleeve T10230/3 from the Hydraulic Press - Bushing Assembly Tool Kit -T10230-
3 - Thrust piece T10230/8 from the Hydraulic Press - Bushing Assembly Tool Kit -T10230-
4 - Wheel Bearing Unit
5 - Press Plate -VW402-
6 - Press Plate -VW401-
- Press the wheel hub out of the wheel bearing.
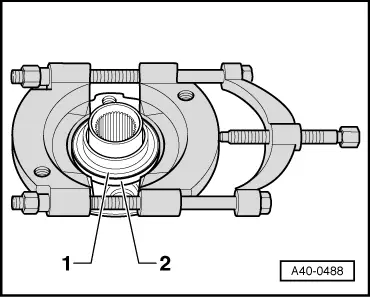
Removing the Bearing Inner Race from the Hub
- Insert the separating tool between the bearing inner race -1- and the wheel hub -2- and pretension with the spindle.
 Note
Note
Use a commercially available separating tool such as the Kukko 15/3 with 17/3.
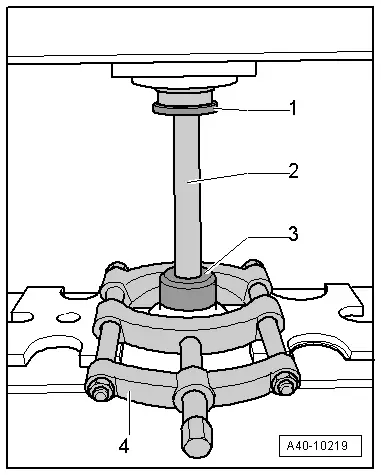
- Install special tools as shown in illustration.
1 - Press Piece - Multiple Use -VW412-
2 - Sleeve T10230/8 from the Hydraulic Press - Bushing Assembly Tool Kit -T10230-
3 - Thrust piece T10230/3 from the Hydraulic Press - Bushing Assembly Tool Kit -T10230-
4 - Wheel hub
5 - Bearing inner race
6 - Kukko 15/3 with 17/3
- Press the bearing inner race from the hub.
Pressing wheel hub into wheel bearing
 Caution
Avoid contaminating with dirt and damaging the seal when setting down/storing.
The wheel bearing -1- must always face up.
- Always set the wheel bearing unit down on the wheel hub -2-.
- Install special tools as shown in illustration.
1 - Press Piece - Multiple Use -VW412-
2 - Press Plate -VW402-
3 - Wheel hub
4 - Ball Bearing
5 - Press Plate -VW401-
 Note
Note
The reworked surface on the wheel bearing outer race faces down.
 Caution
When setting down or pressing in, make sure there is no dirt or contaminants between the Press Plate -VW401--5- and the ball bearing -4-.
- Press the wheel hub into the wheel bearing.
- Install the wheel bearing unit. Refer to → Chapter "Wheel Bearing Unit, AWD, Removing and Installing".