Audi Q5: Side Windows
Overview - Side Window
 WARNING
When removing a window, always wear protective eyewear and leather gloves.
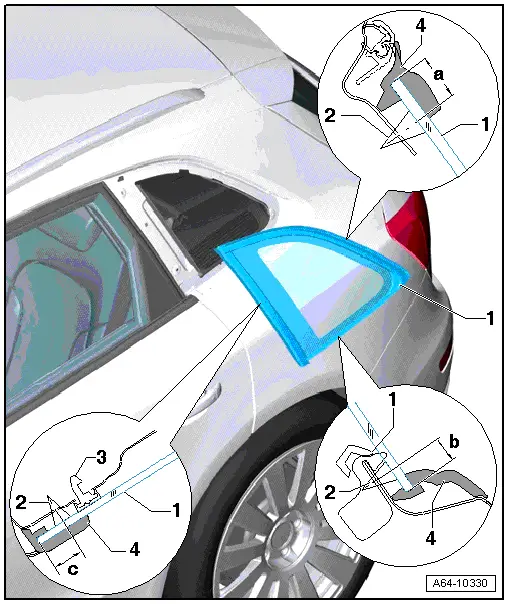
1 - Side Window
 Note
Note
For vehicles with high gloss, the side panel trim molding must be removed first and then roof trim molding must be unclipped in this area.
2 - Adhesive Bead
 Note
Note
Apply the adhesive sealing material directly next to the molding around the antenna connections.
- Dimension -a- = 14 mm
- Dimension -b- = 14 mm
- Dimension -c- = 8.5 mm
3 - Centering Pin
- is cut during removal.
4 - Side Window Molding
- No replacement part
- Must not be damaged in field of vision.
Side Window, Removing and Installing
Undamaged Side Window, Removing
 WARNING
- To prevent damage to paint when removing and installing trim molding, cover area below side window and on side panel using adhesive tape.
- Remove the upper "C-pillar" and "D-pillar" trim and secure the antenna connections with adhesive tape to the center of the window.
Vehicles with high gloss roof trim molding
- Roof trim molding and side trim molding removed. Refer to → Chapter "Overview - Roof Trim Molding".
Vehicles with standard roof trim molding.
- Unclip the roof trim molding on the roof around the side window.
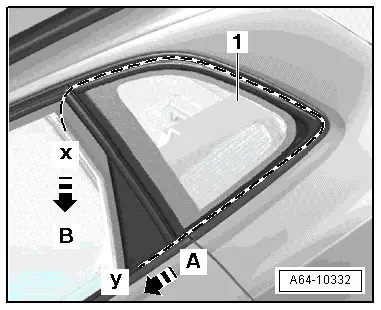
- Route the cutting wire around the side window as shown in the illustration.
- Secure ends X and Y in two pull grips from Bonded Window Tool Kit -VAG1351-.
- Pull cutting wire forward in direction of arrow -A- using sawing motions and cut through lower adhesive sealing material at side panel and at roof frame.
- In this way, first the securing pin on the rear of the window and then the adhesive bead are cut through.
- Then pull cutting cord through in direction of arrow -B- downward through adhesive sealing material.
- Remove window from window opening.
Broken Side Window, Removing
- Protect body and interior from glass splinters.
- Bond flange all around with fabric reinforced adhesive tape.
- Remove glass pieces from adhesive material.
 WARNING
When removing a window, always wear protective eyewear and leather gloves.
- Cut through the adhesive sealing material (with glass residue) in the from window opening using Window Cutter - VAG1561A- and Window Cutter - Universal Blade (2 pc.) - VAG1561/11-
Preparations for Installing Side Window
- When reusing an undamaged window, cut remaining adhesive sealing material on window and flange using a carpet knife so that it is even, but do not remove completely!
 Note
Note
The remaining material acts as an adhesive base for the new sealant that will be applied.
 Caution
- Keep the adhesive surface free of dirt and grease.
- Cut back the adhesive surface shortly before installing.
- Do not prime or use a cleaning solution on the adhesive surface.
With New Window:
- Clean all around the adhesive surface with Cleaning Solution -D 009 401 04-.
- Apply Glass/Paint Primer - D 009 200 02- all around ont he adhesive surface.
- Curing time 10 minutes.
Side Window, Installing
- The roof trim molding and side trim molding must be installed before installing the side window.
- Install the side window and centering pins into the window flange and press it all the way into the body.
 Note
Note
Side window without centering pins must be secured to the body with adhesive tape.
- Observe the minimum curing time. Refer to → Chapter "Minimum Curing Time for Bonded Windows".

