Audi Q5: Overview - Window Regulator
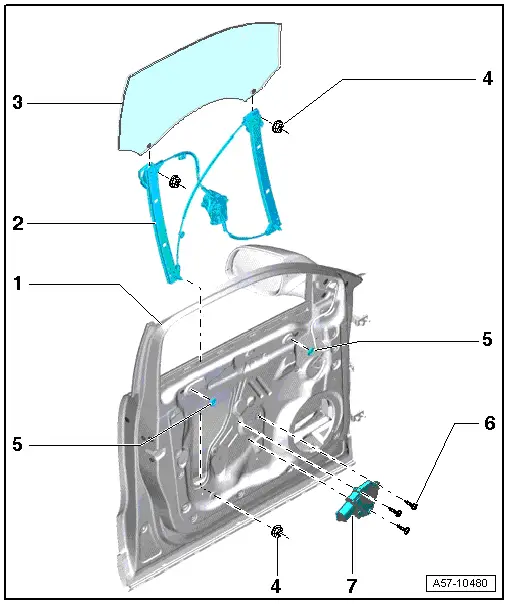
1 - Door
- Remove the door trim panel. Refer to → Body Interior; Rep. Gr.70; Front Door Trim Panels; Front Door Trim Panel, Removing and Installing.
2 - Window Regulator
- The door window is removed. Refer to → Chapter "Front Door Window, Removing and Installing".
- Removing and installing. Refer to → Chapter "Window Regulator, Removing and Installing".
3 - Door Window
- Removing and installing. Refer to → Chapter "Front Door Window, Removing and Installing".
4 - Nut
- 6 Nm
5 - Seal
6 - Bolt
- 3.5 Nm
- Quantity: 3
7 - Window Regulator Motor
- Removing and installing. Refer to → Chapter "Window Regulator, Removing and Installing".
Overview - Door Handle and Door Lock
Door Handle and Door Lock
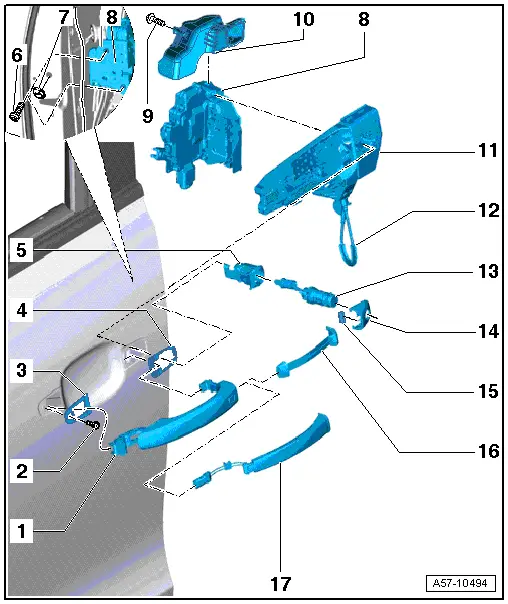
1 - Exterior Door Handle
- Versions: with trim molding, removing and installing. Refer to → Chapter "Door Handle Trim Molding, Removing and Installing ".
- Removing and Installing. Refer to → Chapter "Door Handle, Removing and Installing".
2 - Bolt
- 2.5 Nm
3 - Front Backing
- Removing and installing. Refer to → Chapter "Door Handle, Removing and Installing".
4 - Rear Backing
- Removing and installing. Refer to → Chapter "Door Handle, Removing and Installing".
5 - Housing
- For the front passenger door in place of a lock cylinder
6 - Bolt
- Tightening specification. Refer to -item 3-.
7 - Cap
- Unclip prior to removing the exterior door handle.
8 - Door Lock
9 - Bolt
- 3.5 Nm
10 - Cover
- With the cover for the door lock
- Removing and installing. Refer to → Chapter "Lock Cylinder Guide, Removing and Installing".
11 - Bracket
- Removing and installing. Refer to → Chapter "Bracket, Removing and Installing".
12 - Operating Cable
- For the door lock
- Removing and installing. Refer to → Chapter "Door Lock Cable, Removing and Installing".
13 - Lock Cylinder
- For the driver door only
- Removing and installing. Refer to → Chapter "Overview - Lock Cylinder".
14 - Cap
- Driver side: for the lock cylinder
- Front passenger side: closed version
- Versions: with trim molding, removing and installing. Refer to → Chapter "Door Handle Trim Molding, Removing and Installing ".
- Removing and Installing.
15 - Magnet
- Only for vehicles with "keyless access authorization system".
16 - Exterior Door Handle Trim
- For vehicles without the "keyless entry system"
- Removing and installing. Refer to → Chapter "Door Handle Trim, Removing and Installing".
17 - Left and Right Front Outside Door Handle Touch Sensor, Removing and Installing
- For vehicles with the "keyless entry system"
- Removing and installing. Refer to → Chapter "Left and Right Front Outside Door Handle Touch Sensors -G605-/-G606-, Removing and Installing".
Door Handle
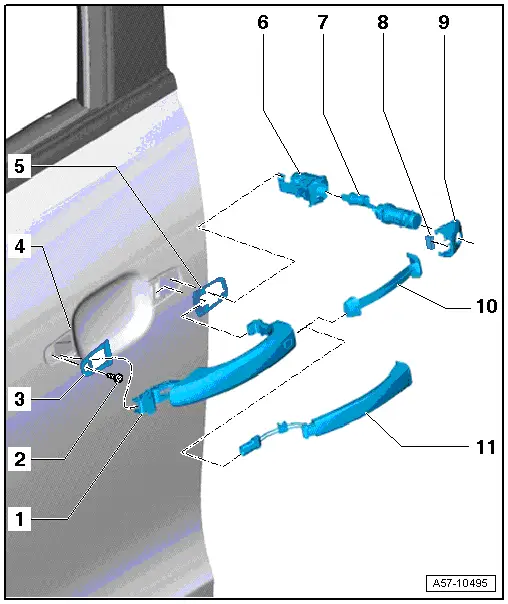
1 - Exterior Door Handle
- Versions: with trim molding, removing and installing. Refer to → Chapter "Door Handle Trim Molding, Removing and Installing ".
- Removing and Installing. Refer to → Chapter "Door Handle, Removing and Installing".
2 - Bolt
- 2.5 Nm
3 - Front Backing
- Removing and installing. Refer to → Chapter "Door Handle, Removing and Installing".
4 - Door
5 - Rear Backing
- Removing and installing. Refer to → Chapter "Door Handle, Removing and Installing".
6 - Housing
- Instead of the lock cylinder
- For the front passenger door
- Removing and installing is performed in the same way as with the lock cylinder.
7 - Lock Cylinder
- For the driver door
- Removing and installing. Refer to → Chapter "Overview - Lock Cylinder".
8 - Magnet
- For vehicles with the "keyless entry system"
9 - Cap
- Driver side: for the lock cylinder
- Front passenger side: closed version
- Versions: with trim molding, removing and installing. Refer to → Chapter "Door Handle Trim Molding, Removing and Installing ".
- Removing and Installing.
10 - Exterior Door Handle Trim
- For vehicles without the "keyless entry system"
- Removing and installing. Refer to → Chapter "Door Handle Trim, Removing and Installing".
11 - Left and Right Front Outside Door Handle Touch Sensor, Removing and Installing
- For vehicles with the "keyless entry system"
- Removing and installing. Refer to → Chapter "Left and Right Front Outside Door Handle Touch Sensors -G605-/-G606-, Removing and Installing".
Door Lock
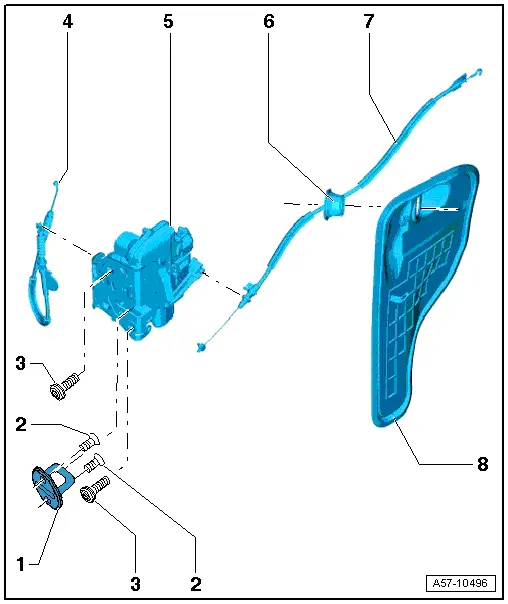
1 - Catch
- Removing and installing. Refer to → Chapter "Catch, Removing and Installing".
2 - Bolt
- 25 Nm
3 - Bolt
- 19 Nm
4 - Door Lock Cable
5 - Door Lock
 Caution
There is a risk of malfunctions.
The door lock must be removed and installed together with the bracket to prevent overbending the cable when disengaging and engaging it.
The cable must be disconnected from/attached to the lever on the door lock outside of the door.
- Removing and installing. Refer to → Chapter "Door Lock, Removing and Installing".
6 - Grommet
- No replacement part
7 - Door Opener Cable
- Removing and installing. Refer to → Chapter "Operating Cable for Interior Door Mechanism, Removing and Installing".
8 - Door Cover
- Removing and installing. Refer to → Chapter "Door Inner Cover, Removing and Installing".
Overview - Lock Cylinder
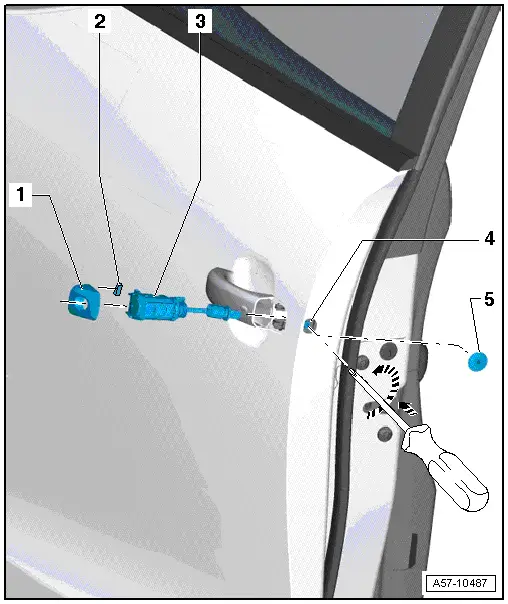
1 - Cap
- Driver side: for the lock cylinder
- Front passenger side: closed version
- Versions: with trim molding, removing and installing. Refer to → Chapter "Door Handle Trim Molding, Removing and Installing ".
- Removing and Installing.
2 - Magnet
- For vehicles with the "keyless entry system"
3 - Lock Cylinder
- Unclip the cover on the front side of the door.
- Remove the screw from the clip with a screwdriver.
- Using a screwdriver, press the retaining bracket and then remove the lock cylinder and cap.
4 - Clip
- No replacement part, supplied with the mounting bracket
5 - Cover
Overview - Window Guides and Window Shaft Strips
Window Guide
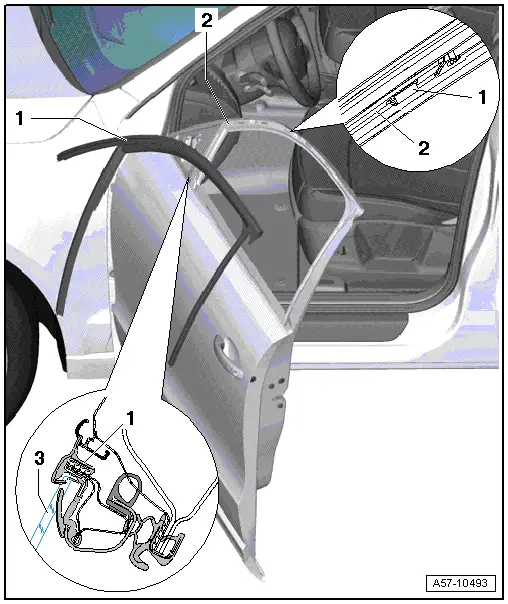
1 - Window Guide
- Remove B-pillar trim, refer to → Chapter "B-Pillar Door Trim, Removing and Installing"
- Remove the door window. Refer to → Chapter "Front Door Window, Removing and Installing".
- Beginning at the upper window guide and on the "A-pillar" and "B-pillar", remove it from the door.
- Remove the window guide from the door.
- To make it easier to install, spray the window guide with soap solution.
- Push the window guide into the guide shafts as illustrated below.
- Press the window guide and retaining tabs into the door as illustrated above.
2 - Door
3 - Door Window
Window Shaft Strips
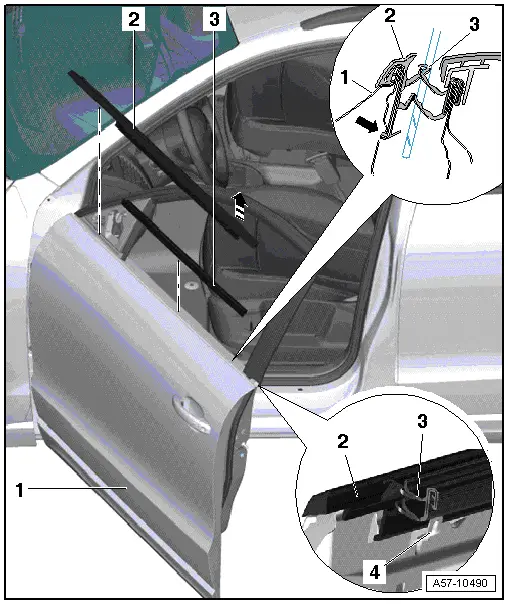
1 - Door
2 - Outer Window Shaft Strip
- Removing and installing. Refer to → Chapter "Outer Window Shaft Strip, Removing and Installing".
3 - Inner Window Shaft Strip
- The door trim panel is removed.
- Remove upward from the door flange.
4 - Catches
- Push the window shaft strip into the hooks as illustrated.

