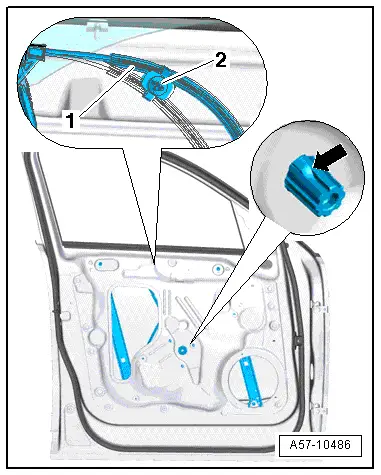
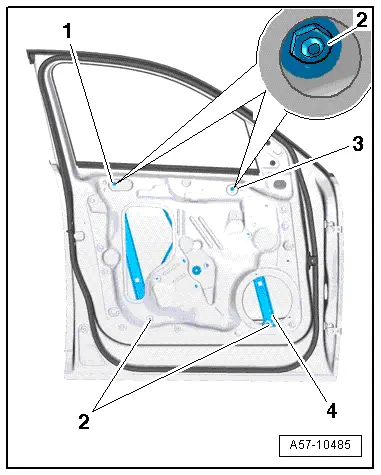
Audi Q5: Door Inner Cover, Removing and Installing
1 - Cover
- Remove the door trim panel. Refer to → Body Interior; Rep. Gr.70; Front Door Trim Panels; Front Door Trim Panel, Removing and Installing.
- Remove the wiring harness -4- from the bracket -5-.
- Remove the cable grommet -2- on the door cover.
- When removing the cover, always start at the top.
2 - Grommet
3 - Cable
4 - Wire
- Disengage from the bracket -5-.
5 - Bracket
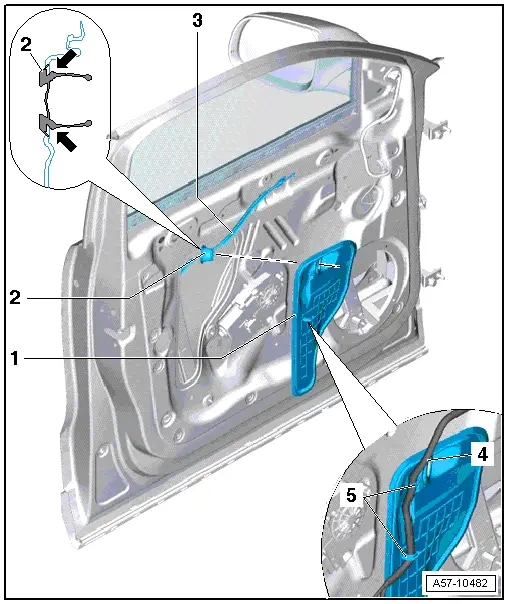
Window Regulator, Removing and Installing
1 - Connector
- Disconnect the connector from the door control module.
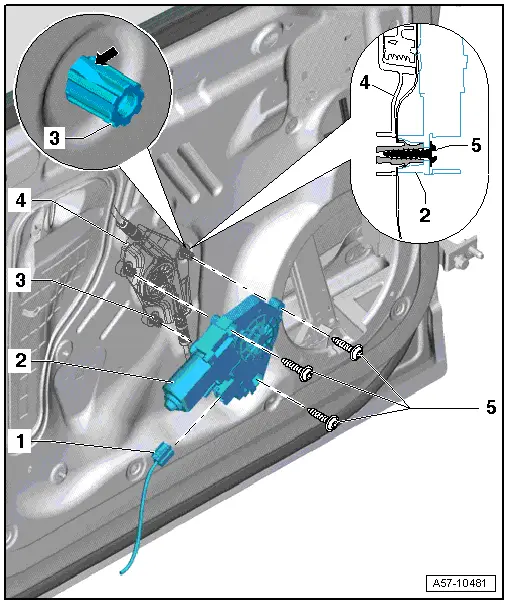
2 - Window Regulator Motor
 Note
Note
The window regulator motor can be removed or installed with the motor or door window in any position.
- Removing:
- Remove the door trim panel. Refer to → Body Interior; Rep. Gr.70; Front Door Trim Panels; Front Door Trim Panel, Removing and Installing.
- Remove the screws -6- and remove the window regulator motor from the window regulator.
- Installing
- Tightening specification. Refer to → Chapter "Overview - Window Regulator".
- The clips -arrow- for the window regulator threaded pins must be locked into the inner door panel.
- Mount the window regulator motor on the threaded pins and tighten the screws -6-.
 Note
Note
- With the window regulator motor switches connected, switch the ignition on and run the door windows up to the stop.
- Continue holding the window regulator switch for approximately 2 seconds so the basic setting and one-touch up/down function are activated.
3 - Threaded Pin
4 - Window Regulator
5 - Bolt
- 3.5 Nm
Window Regulator, Removing and Installing
1 - Lower Window Regulator Mount
2 - Window Regulator
- Removing:
- Remove door trim. Refer to → Body Interior; Rep. Gr.70; Front Door Trim Panels; Front Door Trim Panel, Removing and Installing.
- Remove the bass speaker. Refer to → Communication; Rep. Gr.91; Sound System; Left/Right Front Bass Speaker R21/R23, Removing and Installing.
- The window regulator motor is removed. Refer to → Chapter "Window Regulator, Removing and Installing".
- The door window is removed. Refer to → Chapter "Overview - Front Door Window".
- Door cover removed, refer to → Chapter "Door Inner Cover, Removing and Installing"
- Release the window regulator motor threaded pins and push it through the inside panel.
- Only loosen the upper nuts.
- Remove the lower nuts and lift the window regulator out of the "key holes".
- Remove the window regulator through the opening in the door inner panel.
3 - Nut
- 6 Nm
- For removing the window regulator, only loosen the top, remove the bottom.
Removing
- Remove the power window motor. Refer to → Chapter "Window Regulator, Removing and Installing".
- Remove the door window. Refer to → Chapter "Front Door Window, Removing and Installing".
- Remove the bass speaker. Refer to → Communication; Rep. Gr.91; Sound System; Left/Right Front Bass Speaker R21/R23, Removing and Installing.
- Release the threaded pins clips -arrow- for the window regulator with an 11 mm socket by mounting the socket onto the threaded pins.
- Remove the clip -1- for the cable -2- from the inner side of the cable guide -1-.

- Remove the seals -1 and 3-.
- Remove the upper and lower nuts -2-.
- Lift the window regulator -4- from the door through the cut-out in the door inner panel.
Installing
- The threaded pin clips -arrow- for the window regulator must lock into the inner door panel.
- Install the bass speaker. Refer to → Communication; Rep. Gr.91; Sound System; Left/Right Front Bass Speaker R21/R23, Removing and Installing.
- Install the door window. Refer to → Chapter "Front Door Window, Removing and Installing".
- Install the window regulator motor. Refer to → Chapter "Window Regulator, Removing and Installing".