Audi Q5: Overview - Wheel Bearing
Overview - Wheel Bearing, Vehicles with FWD
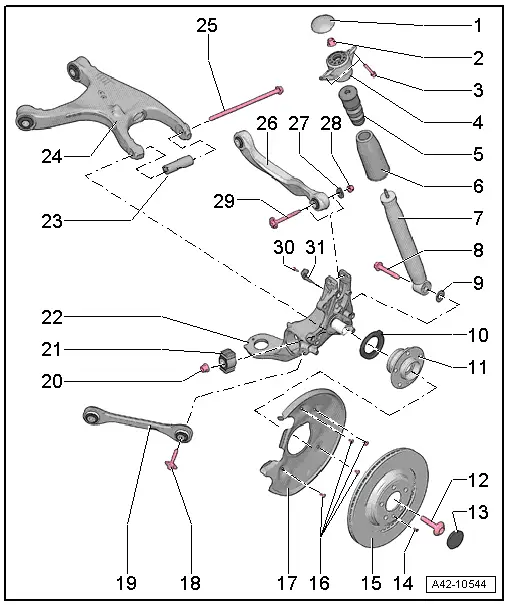
1 - Protective Cap
2 - Nut
- 35 Nm
- Always replace if removed
3 - Bolt
- 50 Nm +45º
- Always replace if removed
4 - Upper Shock Absorber Mount
- Installed position.
5 - Stop Buffer
6 - Protective Sleeve
7 - Shock Absorber
- Removing and installing. Refer to → Chapter "Shock Absorber, FWD, Removing and Installing"
8 - Bolt
- 150 Nm +180º
- Always replace if removed
- Must be tightened in the curb weight position. Refer to → Chapter "Wheel Bearing in Curb Weight, Lifting Vehicles with Coil Spring".
9 - Washer
- Serves as corrosion protection
- Always use
10 - Front Seal
11 - Wheel Bearing Unit
 Caution
Avoid contaminating with dirt and damaging the seal when setting down/storing. Refer to → Fig. "Avoid contaminating with dirt and damaging the seal when setting down/storing.".
- Wheel bearing unit, removing and installing. Refer to → Chapter "Wheel Bearing Unit, FWD, Removing and Installing".
12 - Bolt
- 200 Nm +180º
- Always replace if removed
13 - Protective Cap
- Remove with Puller - Grease Cap -VW 637/2-
- Always replace if removed
14 - Bolt
- Tightening specification. Refer to → Brake System; Rep. Gr.46; Rear Brakes; Overview - Rear Brakes.
15 - Brake Rotor
16 - Bolt
- Tightening specification. Refer to → Brake System; Rep. Gr.46; Rear Brakes; Overview - Rear Brakes.
17 - Brake Shield
18 - Bolt
- 90 Nm +90º
- Always replace if removed
- Must be tightened in the curb weight position. Refer to → Chapter "Wheel Bearing in Curb Weight, Lifting Vehicles with Coil Spring".
19 - Tie Rod
- There are versions made of aluminum and steel. Refer to the Parts Catalog for the allocation.
- A mixed installation is not permitted
20 - Nut
- Always replace if removed
 Caution
Do not tighten the threaded connection using the nut.
 Note
Note
Axle alignment is necessary if the nut is loosened.
21 - Bonded Rubber Bushing
- Replacing. Refer to → Chapter "Wheel Bearing Housing Bonded Rubber Bushing, Replacing, FWD Vehicles".
22 - Wheel Bearing Housing
- Removing and installing. Refer to → Chapter "Wheel Bearing Housing, Removing and Installing, FWD Vehicles"
23 - Spacer Tube
- Always replace if removed
24 - Lower Transverse Link
25 - Bolt
- 120 Nm +360º
- Always replace if removed
- Must be tightened in the curb weight position. Refer to → Chapter "Wheel Bearing in Curb Weight, Lifting Vehicles with Coil Spring".
 Note
Note
Axle alignment is necessary if the bolt is removed.
26 - Upper Transverse Link
27 - Shim
28 - Nut
- 95 Nm
- Always replace if removed
- Must be tightened in the curb weight position. Refer to → Chapter "Wheel Bearing in Curb Weight, Lifting Vehicles with Coil Spring".
29 - Bolt
30 - Bolt
- Tightening specification. Refer to → Brake System; Rep. Gr.46; Rear Brakes; Overview - Rear Brakes.
31 - Rear Speed Sensor
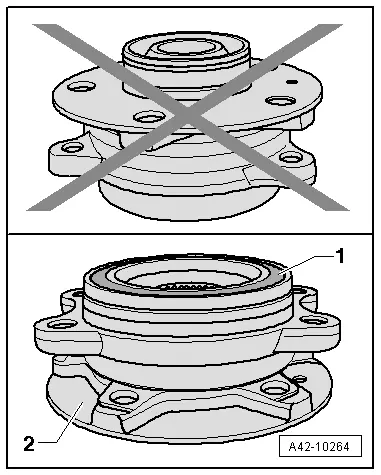
Avoid contaminating with dirt and damaging the seal when setting down/storing.
- The wheel bearing -1- must always face up.
- Always set the wheel bearing down on the wheel hub -2-.
Overview - Wheel Bearing, Vehicles with AWD
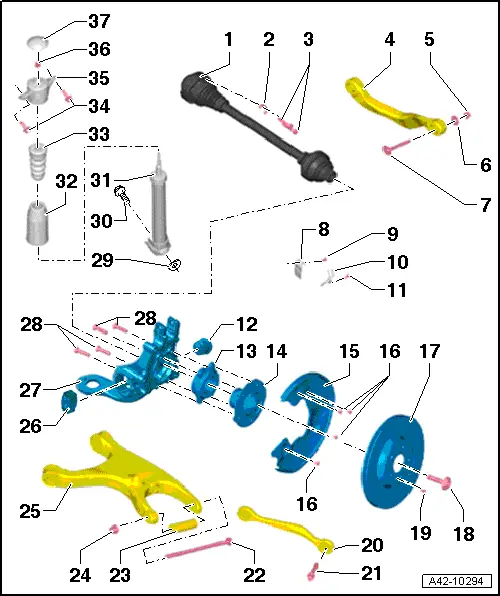
1 - Drive Axle
- There are different versions. Refer to the Parts Catalog.
2 - Backing Plate
3 - Bolt
- Tightening specification. Refer to → Chapter "Drive Axle".
4 - Upper Transverse Link
5 - Nut
- 95 Nm
- Always replace if removed
- Must be tightened in the curb weight position. Refer to → Chapter "Wheel Bearing in Curb Weight, Lifting Vehicles with Coil Spring".
6 - Eccentric Washer
7 - Bolt
8 - Bracket
- For the brake hose, brake caliper wiring harness and rear wheel speed sensor wiring harness
9 - Bolt
- 10 Nm
10 - Rear Wheel Speed Sensor
11 - Bolt
- 9 Nm
12 - Bonded Rubber Bushing
- Cannot be exchanged separately
13 - Ball Bearing
 Caution
Avoid contaminating with dirt and damaging the seal when setting down/storing.
- Wheel bearing unit, removing and installing. Refer to → Chapter "Wheel Bearing Unit, AWD, Removing and Installing".
- Servicing the wheel bearing unit. Refer to → Chapter "Wheel Bearing Unit, Servicing".
14 - Wheel Hub
 Caution
Avoid contaminating with dirt and damaging the seal when setting down/storing.
- Wheel bearing unit, removing and installing. Refer to → Chapter "Wheel Bearing Unit, AWD, Removing and Installing".
- Servicing the wheel bearing unit. Refer to → Chapter "Wheel Bearing Unit, Servicing".
15 - Brake Shield
16 - Bolt
- 10 Nm
17 - Brake Rotor
18 - Collar Screw
- 200 Nm +180º
- Always replace if removed
19 - Bolt
- 5 Nm
20 - Tie Rod
- There are versions made of aluminum and steel. Refer to the Parts Catalog for the allocation.
- A mixed installation is not permitted
21 - Bolt
- 90 Nm +90º
- Always replace if removed
- Must be tightened in the curb weight position. Refer to → Chapter "Wheel Bearing in Curb Weight, Lifting Vehicles with Coil Spring".
22 - Bolt
- 120 Nm +360º
- Always replace if removed
- Must be tightened in the curb weight position. Refer to → Chapter "Wheel Bearing in Curb Weight, Lifting Vehicles with Coil Spring".
 Note
Note
Axle alignment is necessary if the bolt is removed.
23 - Spacer Tube
- Always replace if removed
24 - Nut
- Always replace if removed
 Caution
Do not tighten the threaded connection using the nut.
 Note
Note
Axle alignment is necessary if the nut is loosened.
25 - Lower Transverse Link
26 - Bonded Rubber Bushing
- Replacing. Refer to → Chapter "Wheel Bearing Housing Bonded Rubber Bushing, Replacing, AWD Vehicles".
27 - Wheel Bearing Housing
- Removing and installing. Refer to → Chapter "Wheel Bearing Housing, AWD, Removing and Installing"
28 - Bolt
- 80 Nm +90º
- Always replace if removed
29 - Washer
- Serves as corrosion protection
- Always use
30 - Bolt
- 150 Nm +180º
- Always replace if removed
- Must be tightened in the curb weight position. Refer to → Chapter "Wheel Bearing in Curb Weight, Lifting Vehicles with Coil Spring".
31 - Shock Absorber
- Removing and installing. Refer to → Chapter "Shock Absorber, AWD, Removing and Installing"
32 - Protective Sleeve
33 - Stop Buffer
34 - Bolt
- 50 Nm +45º
- Always replace if removed
35 - Upper Shock Absorber Mount
- Installed position. Refer to → Fig. "Upper shock absorber mount installation position"
36 - Nut
- 35 Nm
- Always replace if removed
37 - Protective Cap
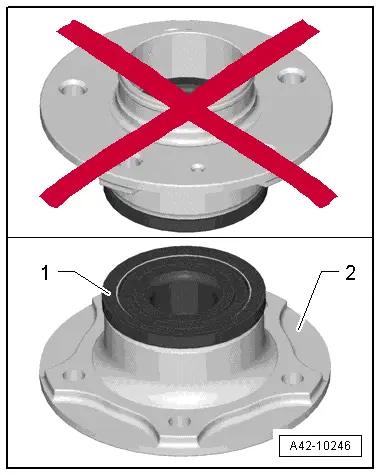
Avoid contaminating with dirt and damaging the seal when setting down/storing
- The wheel bearing -1- must always face up.
- Always set the wheel bearing down on the wheel hub -2-.
The same procedure also applies to the wheel bearing without a wheel hub.