Audi Q5: Overview - Tire Pressure Monitoring Sensor
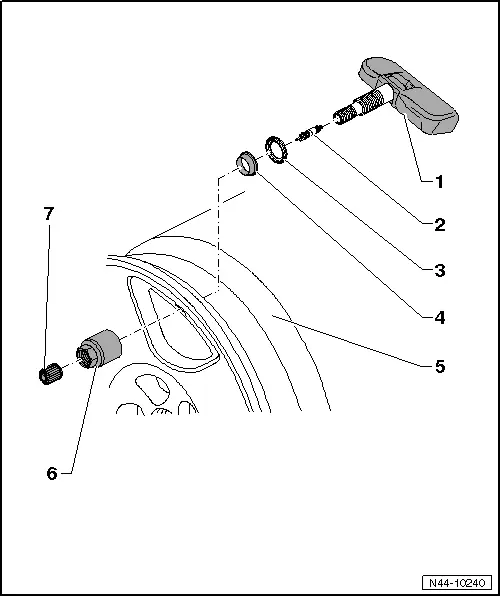
1 - Left Front Tire Pressure Monitoring Sensor -G222-, Right Front Tire Pressure Monitoring Sensor -G223-, Left Rear Tire Pressure Monitoring Sensor -G224- or Right Rear Tire Pressure Monitoring Sensor -G225-
- Replace the valve insert each time a tire is changed. Refer to the Parts Catalog
- When using used Tire Pressure Monitoring Sensors, replace the union nut, valve insert, seal, sealing washer and valve cap. Refer to the Parts Catalog.
- After installing, visually check if the sensor is secure in its bed.
- Replace damaged sensors.
- Do not clean the sensors with steam blasting or strong compressed air.
- Removing and installing. Refer to → Chapter "Tire Pressure Sensor -G222-/-G223-/-G224-/-G225-, Removing and Installing"
2 - Valve Insert
- Replace damaged valves.
- When changing a tire, replace the valve insert.
3 - Sealing Washer
- When installing the new sealing washer, counterhold it to prevent the valve body from pushing through. If the connection breaks, then replace the Tire Pressure Monitoring Sensor.
4 - Seal
- When installing the new seal, counterhold it to prevent the valve body from pushing through. If the connection breaks, then replace the Tire Pressure Monitoring Sensor.
5 - Rim
- Tires, removing and mounting. Refer to → Chapter "Tires, Changing, Vehicles with Tire Pressure Monitoring System"
6 - Union Nut
- 8 Nm
7 - Valve Cap
- Use only original valve caps from the repair set. Refer to the Parts Catalog
- Do not use Comfort valve caps and metal caps
Tire Pressure Sensor -G222-/-G223-/-G224-/-G225-, Removing and Installing
Special tools and workshop equipment required
- Torque Wrench -VAG1410-
Removing
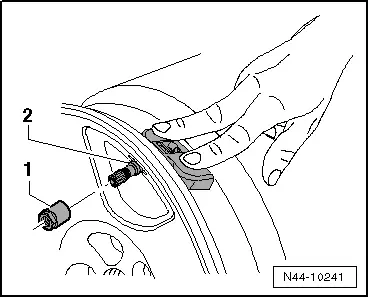
- Remove the union nut -1-.
- Remove tire pressure monitoring sensor -2- from rim well.

Installing
 Note
Note
- Always replace damaged sensors.
- When using used tire pressure monitoring sensors, check the connection between the sensor and the valve for damage.
- For safety reasons, replace the Tire Pressure Monitoring Sensor and clean the rim after using tire sealant.
- Do not clean the tire pressure sensors with steam jet cleaners or strong compressed air.
- When sliding the new seal and sealing washer on, prevent the valve body from being pressed through by counter-holding it (the antenna connection could be damaged).
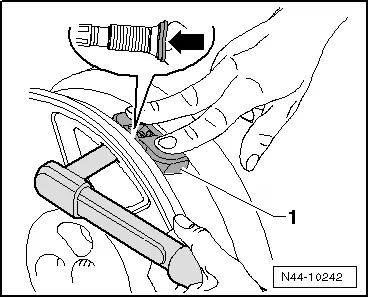
- Insert the sensor -2- with the new seal and sealing washer through the rim from the inside and press the seal into the valve bore. Refer to the Parts Catalog. Make sure the valve shaft is in the center inside the valve hole.
- Install the union nut -1- on the tire pressure monitoring sensor -2-. When doing this, press the sensor into the bed and hold it there.
 Caution
When tightening the union nut, avoid excessive pressure on the nut and on the tool
- Press the tire pressure monitoring sensor -1- onto the rim well and tighten the union nut. Refer to → Chapter "Overview - Tire Pressure Monitoring Sensor".
 Note
Note
- After installing, tire pressure monitoring sensor must lie firmly in its bed.
- Sealing washer -arrow- becomes slightly deformed when doing this.
Tires, Changing, Vehicles with Tire Pressure Monitoring System
Replace the nickel-plated valve insert each time a tire is changed. Refer to the Parts Catalog
The tire pressure monitoring sensor can be reused.
- For safety reasons, replace the tire pressure monitoring sensor and clean the rim after using tire sealant.
- Let air out of tire by removing nickel-plated valve insert.
- Remove the tires. Refer to → Fig. "Dismounting tire".
- When changing a tire, replace the valve insert -item 2-.
- Do not clean the sensors with steam blasting or strong compressed air.
- When reusing used tire pressure monitoring sensor, inspect connection between sensor and metal valve visually for damage.
Replace damaged sensors.
 Caution
When installing the new sealing washer and the new sealing ring, counterhold them so that the valve body cannot slip through.
If the connection breaks, then replace the tire pressure monitoring sensor.
- Install tires. Refer to → Fig. "Mounting tire".
- Install new nickel-plated valve insert.
- Fill tires.
- Balance the tire.
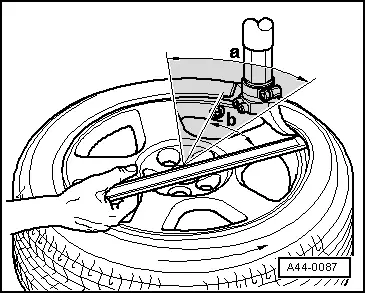
Dismounting tire
Roll or press the tire off.
When using pressure paddles, first separate tires from side opposite of valve.
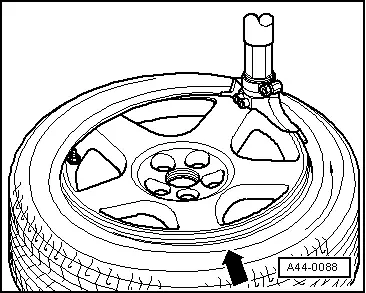
Do not use pressure paddles in hatched area -a-.
- Position mounting head near valve so that so that tire iron can be put on approximately 30º -b- next to tire valve.
- Then remove tire in valve area first.
Mounting tire
Do not use pressure paddles in valve area.
- Position the tire pressure monitoring sensor approximately 180º opposite the mounting head.
- Press tire in bed approximately 90º in front of mounting head -arrow-.
- Mount tire.