Audi Q5: Overview - Rear Door Trim Panel
Audi Q5 Type 8R (2008 - 2017) Service Manual / Body / Body Interior / Interior Trim / Overview - Rear Door Trim Panel
 Note
Note
The rear left door panel is illustrated.
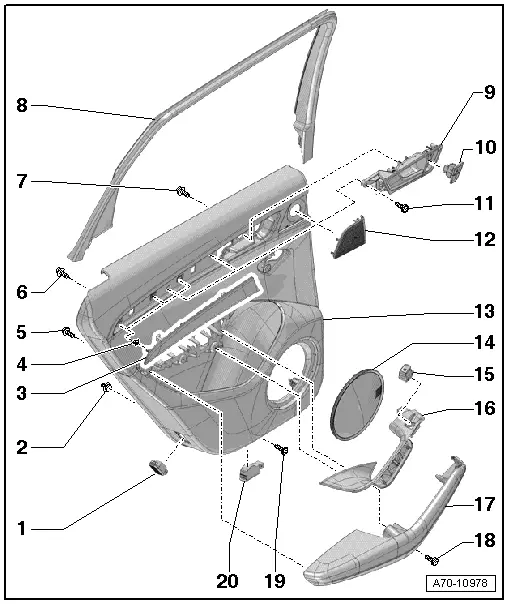
1 - Active or Passive Rear Reflector
- Equipment levels
2 - Clip
- With seal
- For door trim
- Quantity: 7
3 - Trim Molding
- For door trim
- Removing and installing. Refer to → Chapter "Trim Molding, Removing and Installing".
4 - Bracket
- For trim panel
- Quantity: 3
- Press into the door trim
5 - Bolt
- 1.2 Nm
- For armrest
- Quantity: 7
6 - Bolt
- 1.2 Nm
- For pull handle
- Quantity: 2
7 - Bolt
- 1.2 Nm
- For inside door release mechanism
- Quantity: 4
8 - Trim Panel
- For the window frame
- Removing and installing. Refer to → Chapter "Window Frame Trim, Removing and Installing".
9 - Interior Door Mechanism
- Removing and installing. Refer to → Chapter "Interior Door Mechanism, Removing and Installing".
10 - Rear Interior Locking Button
- Equipment levels
- Driver side: Left Rear Interior Locking Button -E310-
- Front passenger side: Right Rear Interior Locking Button -E311-
- Removing and Installing. Refer to → Electrical Equipment; Rep. Gr.96; Controls; Overview - Rear Door Controls.
11 - Bolt
- 2.5 Nm
- For door trim
- Quantity: 2
12 - Trim
- For high range speaker
- Removing and installing. Refer to → Chapter "Treble Speaker Trim, Removing and Installing".
13 - Rear Door Trim Panel
- Removing and installing. Refer to → Chapter "Rear Door Trim Panel, Removing and Installing".
14 - Speaker Trim
- For mid range speaker
- Equipment levels
- Removing and installing. Refer to → Chapter "Mid-Range Speaker Trim, Removing and Installing".
15 - Power Window Switch in the Rear Door
- Driver side: Left Rear Power Window Switch in Left Rear Door -E52-
- Front passenger side: Right Rear Window Switch in Right Rear Door -E54-
- Removing and Installing. Refer to → Electrical Equipment; Rep. Gr.96; Controls; Overview - Rear Door Controls.
16 - Pull Handle
- Removing and installing. Refer to → Chapter "Rear Pull Handle, Removing and Installing".
17 - Armrest
- Removing and installing. Refer to → Chapter "Rear Armrest, Removing and Installing".
18 - Bolt
- for door trim
- 2.5 Nm
19 - Bolt
- For door trim
- 2.5 Nm
20 - Entry Lamp
- Equipment levels
- Removing and installing. Refer to → Electrical Equipment; Rep. Gr.96; Lamps; Left/Right Rear Entry Lamp W33/W34, Removing and Installing.
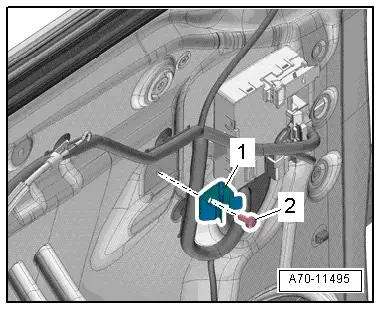
Clip for the Pull Handle
1 - Clip for the pull handle
2 - Bolt - 2.5 Nm
Door Window Sun Shade Assembly Overview
 Note
Note
The rear left sunshade is illustrated.
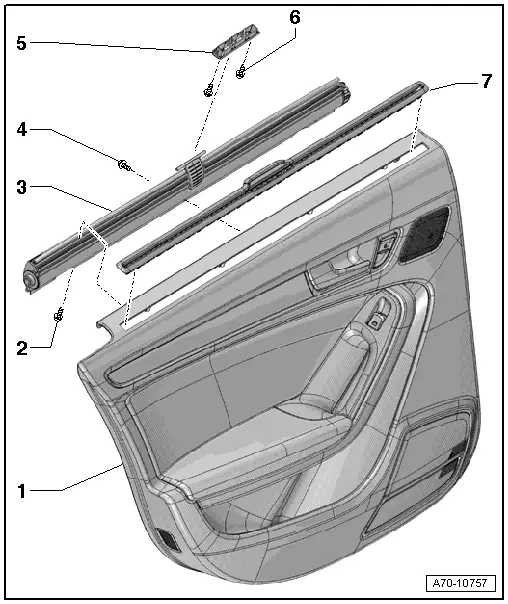
1 - Rear Door Trim Panel
- Removing and installing. Refer to → Chapter "Rear Door Trim Panel, Removing and Installing".
2 - Bolt
- 1.2 Nm
- For the sunshade
- Quantity: 4
3 - Sun Shade
- For the door window
- Removing and installing. Refer to → Chapter "Door Window Sun Shade, Removing and Installing".
4 - Bolt
- 1.2 Nm
- For the sunshade
- Quantity: 3
5 - Mount
- For the sunshade
- Removing and installing. Refer to → Chapter "Sun Shade Mount, Removing and Installing".
6 - Bolt
- 1.3 Nm
- For the mount
- Quantity: 2
7 - Guide Strip
- Removing and installing. Refer to → Chapter "Door Window Sun Shade, Removing and Installing".

