Audi Q5: Overview - Luggage Compartment Side Trim Panel
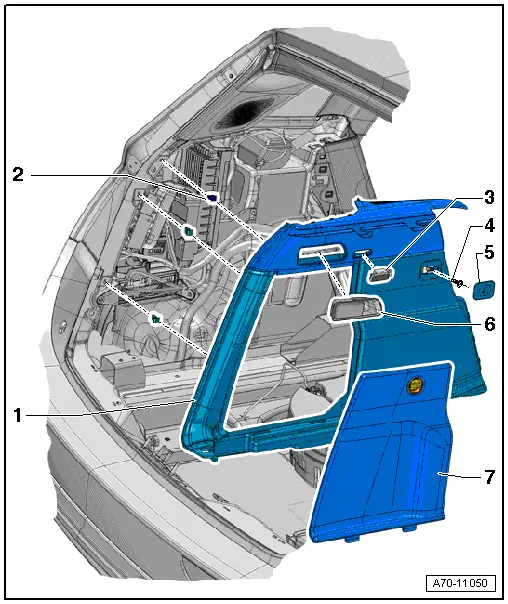
1 - Luggage Compartment Side Trim
- Removing and installing. Refer to → Chapter "Luggage Compartment Side Trim Panel, Removing and Installing".
2 - Bracket
- Quantity: 3
- Insert in the trim panel
- Replace if damaged or deformed
- Remove the clips that are still in the mounting points on the body using the Omega Clip Tool -T40280-.
3 - Luggage Compartment Lamp
- Removing and Installing. Refer to → Electrical Equipment; Rep. Gr.96; Lamps; Overview - Luggage Compartment Lamps.
4 - Bolt
- 3 Nm
5 - Coat Hooks
- Removing and installing. Refer to → Chapter "Coat Hooks, Removing and Installing".
6 - Rear Backrest Release
- Overview. Refer to → Chapter "Overview - Retainer".
- Removing and installing. Refer to → Chapter "Backrest lock Adjustment Actuator, Removing and Installing".
7 - Cover
- for the luggage compartment side trim
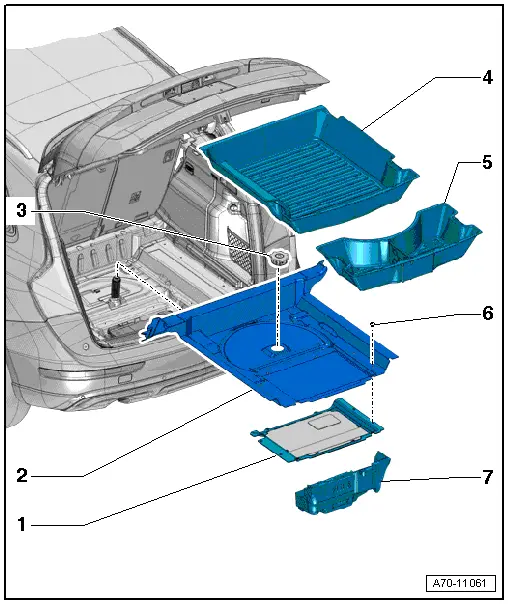
Overview - Luggage Compartment Floor
Luggage Compartment Floor, Assembly Overview, Versions without a Retaining Track

1 - Bolt
- Quantity: 2
- Tightening specification. Refer to → Body Exterior; Rep. Gr.63; Front Bumper; Overview - Impact Member.
2 - Gap Cover
- Removing and installing. Refer to → Chapter "Gap Cover, Removing and Installing, Vehicles without a Retaining Track".
3 - Tie-Down Eye
- Quantity: 2
- Removing and installing. Refer to → Chapter "Tie Down, Removing and Installing".
4 - Bolt
- Quantity: 4
- 6 Nm
5 - Rear Luggage Compartment Floor
6 - Front Luggage Compartment Floor
- Removing and installing. Refer to → Chapter "Luggage Compartment Floor, Removing and Installing, Non-Hybrid Vehicles".
7 - Bolt
- 20 Nm
- Quantity: 2
8 - Front Bracket
- Removing and installing. Refer to → Chapter "Luggage Compartment Floor Covering Bracket, Removing and Installing, Front Bracket".
9 - Rear Bracket
- Removing and installing. Refer to → Chapter "Luggage Compartment Floor Covering Bracket, Removing and Installing, Rear Bracket, Non-Hybrid Vehicles".
Luggage Compartment Floor, Assembly Overview, Versions with a Retaining Track
1 - Bolt
- Quantity: 2
- Tightening specification. Refer to → Body Exterior; Rep. Gr.63; Front Bumper; Overview - Impact Member.
2 - Gap Cover
- Removing and installing. Refer to → Chapter "Gap Cover, Removing and Installing, Vehicles with a Retaining Track".
3 - Retaining Tracks
- Removing and installing. Refer to → Chapter "Rail, Removing and Installing".
4 - Bolt
- 7 Nm
- Quantity: 3
5 - Rear Luggage Compartment Floor
6 - Front Luggage Compartment Floor
- Removing and installing. Refer to → Chapter "Luggage Compartment Floor, Removing and Installing, Non-Hybrid Vehicles".
7 - Bolt
- 20 Nm
- Quantity: 2
8 - Front Bracket
- Removing and installing. Refer to → Chapter "Luggage Compartment Floor Covering Bracket, Removing and Installing, Front Bracket".
9 - Rear Bracket
- Removing and installing. Refer to → Chapter "Luggage Compartment Floor Covering Bracket, Removing and Installing, Rear Bracket, Non-Hybrid Vehicles".
Luggage Compartment Trim Panel and Battery Recess Cover, Assembly Overview
1 - Battery Recess Cover
- Removing and installing. Refer to → Chapter "Battery Recess Cover, Removing and Installing".
2 - Trim Panel
- For the spare wheel well
- Removing and installing. Refer to → Chapter "Spare Wheel Well Trim, Removing and Installing".
3 - Nut
- for spare wheel mounting
- when tightening, it must audibly click into place, otherwise, turn some more
4 - Large Dirt Shield
- Equipment levels
5 - Small Dirt Shield
- Equipment levels
6 - Clip
7 - Tool Box
Overview - Luggage Compartment Floor, Hybrid Vehicles
1 - Rear Bracket
- Removing and installing. Refer to → Chapter "Luggage Compartment Floor Covering Bracket, Removing and Installing, Rear Bracket, Hybrid Vehicles".
2 - Bolt
- Quantity: 2
- Tightening specification. Refer to → Body Exterior; Rep. Gr.63; Front Bumper; Overview - Impact Member.
3 - Tie-down Eye
- Quantity: 4
- Removing and installing. Refer to → Chapter "Tie Down, Removing and Installing".
4 - Bolt
- Quantity: 8
- Tightening specification. Refer to -item 4-.
5 - Luggage Compartment Floor
- Removing and installing. Refer to → Chapter "Luggage Compartment Floor, Removing and Installing, Hybrid Vehicles".
6 - Tool Box
- Removing and installing. Refer to → Chapter "Tool Box, Removing and Installing".
- Press on until it engages audibly
7 - Bolt
- Quantity: 4
- Tightening specification, refer to -item 7-.
8 - Front Bracket
- Quantity: 2
- Removing and installing. Refer to → Chapter "Luggage Compartment Floor Covering Bracket, Removing and Installing, Front Bracket".

