Audi Q5: Overview - Front Bumper Cover
Overview - Bumper Cover, One-Piece Version, Audi Q5
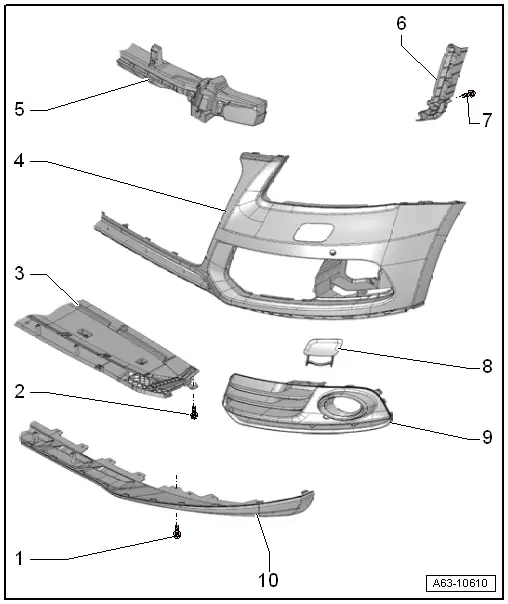
1 - Bolt
- 2.5 Nm
- Quantity: 4
2 - Bolt
- 5 Nm
- Quantity: 4
3 - Bumper Cover End Plate
- Removing and installing. Refer to → Chapter "Bumper Cover End Plate, Removing and Installing, Audi Q5".
4 - Front Bumper Cover
- Removing and installing. Refer to → Chapter "Bumper Cover, Removing and Installing".
5 - Molded Foam Piece
- Removing and installing. Refer to → Chapter "Attachments, Removing and Installing".
6 - Connecting Strip
- Removing and installing.
7 - Bolt
- 2.5 Nm
- Quantity: 2
8 - Spray Nozzle Cover
- For the headlamp washer system
- Removing and installing. Refer to → Chapter "Attachments, Removing and Installing".
9 - Air Intake Grille
- Removing and installing. Refer to → Chapter "Air Intake Grille, Removing and Installing, Audi Q5".
10 - Front Spoiler
- Removing and installing. Refer to → Chapter "Attachments, Removing and Installing".
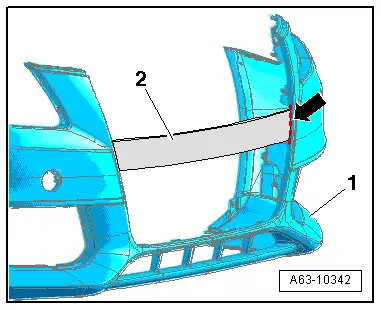
Removing the Transportation Brace on the One-Piece Bumper Cover
- Remove the transport brace -2- from the left -arrow- and right cover -1- before painting.
Overview - Bumper Cover, One-Piece Version, Audi Q5 S-Line and Audi SQ5
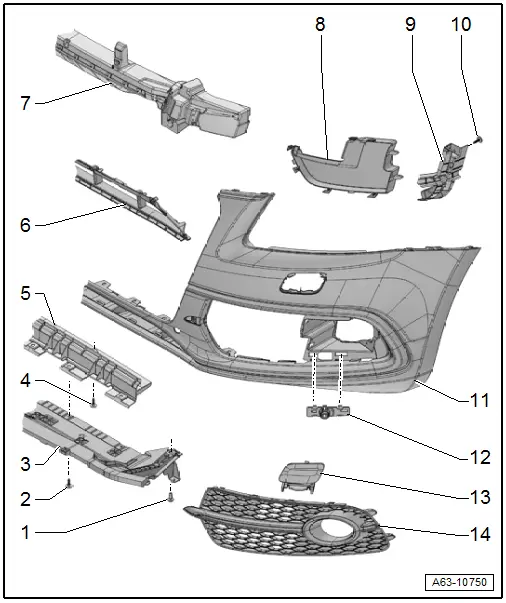
1 - Bolt
- 5 Nm
2 - Bolt
- Quantity: 4
- 5 Nm
3 - Front Bumper Cover End Plate
- Removing and installing. Refer to → Chapter "Bumper Cover End Plate, Removing and Installing, Audi Q5 S-Line and Audi SQ5".
4 - Bolt
- Quantity: 2
- 5 Nm
5 - Rear Bumper Cover End Plate
- Removing and installing. Refer to → Chapter "Bumper Cover End Plate, Removing and Installing, Audi Q5 S-Line and Audi SQ5".
6 - Center Air Intake Grille
- Removing and installing. Refer to → Chapter "Air Intake Grille, Removing and Installing, Audi Q5 S-Line and Audi SQ5".
7 - Molded Foam Piece
- Removing and installing. Refer to → Chapter "Attachments, Removing and Installing".
8 - Cover
9 - Connecting Strip
10 - Bolt
- Quantity: 2
- 2.5 Nm
11 - Front Bumper Cover
- Removing and installing. Refer to → Chapter "Bumper Cover, Removing and Installing".
12 - Mount
- for the parking aid sensor
- Removing and installing. Refer to → Chapter "Parking Aid Sensor Mount, Removing and Installing".
13 - Spray Nozzle Cover
- For the headlamp washer system
- Removing and installing. Refer to → Chapter "Attachments, Removing and Installing".
14 - Air Intake Grille
- Removing and installing. Refer to → Chapter "Air Intake Grille, Removing and Installing, Audi Q5".
Overview - Bumper Cover, Multi-Piece Version, Audi Q5
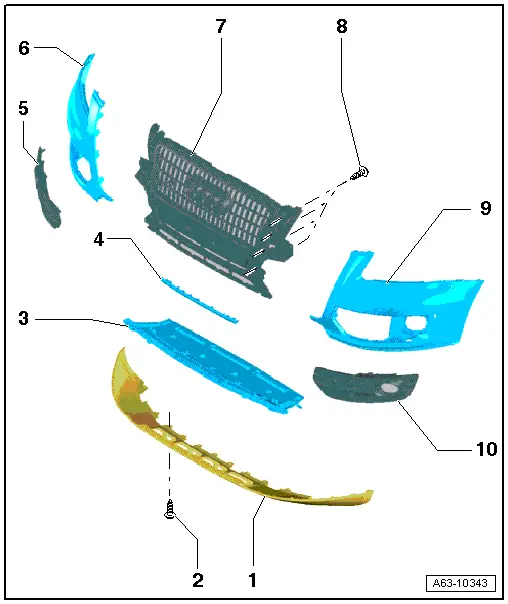
1 - Front Spoiler
- Removing and installing. Refer to → Chapter "Attachments, Removing and Installing".
2 - Bolt
- 2.5 Nm
3 - Bumper Cover End Plate
- Removing and installing. Refer to → Chapter "Bumper Cover End Plate, Removing and Installing, Audi Q5".
4 - Connecting Piece
- Clipped into the radiator grille at the bottom
5 - Right Air Intake Grille
- Removing and installing. Refer to → Chapter "Air Intake Grille, Removing and Installing, Audi Q5".
6 - Right Bumper Cover
- To remove, remove the bolts from the radiator grille, unclip the retainers on the bottom of the spoiler and remove the connecting piece.
7 - Radiator Grille
- Removing and installing. Refer to → Chapter "Radiator Grille, Removing and Installing".
8 - Bolt
- 2.5 Nm
9 - Left Bumper Cover
- To remove, remove the bolts from the radiator grille, unclip the retainers on the bottom of the spoiler and remove the connecting piece.
10 - Left Air Intake Grille
- Removing and installing. Refer to → Chapter "Air Intake Grille, Removing and Installing, Audi Q5".
Overview - Impact Member
Overview - Impact Absorber, Vehicles through MY 2012
 Caution
Note the following if the vehicle is equipped with adaptive cruise control (ACC).
If modifications were made to the impact absorber bracket or the bracket for the Distance Regulation Control Module - J428-, the adaptive cruise control must be recalibrated. Refer to → Suspension, Wheels, Steering; Rep. Gr.44; Adaptive Cruise Control (ACC); Adaptive Cruise Control (ACC), Calibrating.
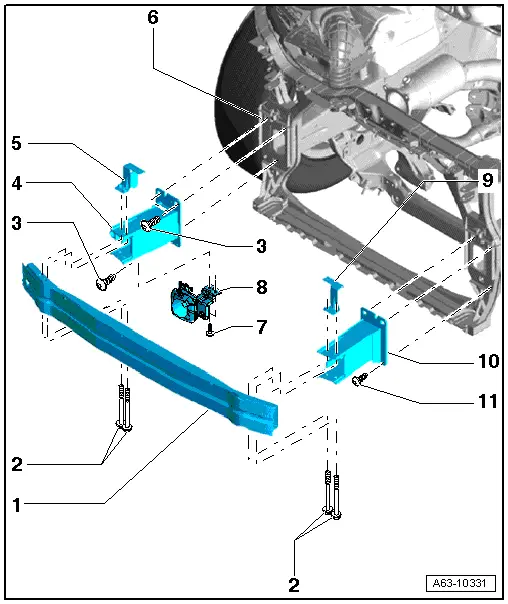
1 - Impact Member
- Removing and installing. Refer to → Chapter "Impact Absorber, Removing and Installing, Vehicles from MY 2013".
2 - Bolt
- 20 Nm
3 - Bolt
- 4 Nm
- For attaching to the lock carrier
4 - Right Impact Bar Bracket
- Removing and installing. Refer to → Chapter "Impact Member Bracket, Removing and Installing".
5 - Right Support Piece
6 - Lock Carrier
7 - Bolt
- 8 Nm
8 - Distance Regulation Control Module - J428-
9 - Left Support Piece
10 - Left Impact Bar Bracket
- Removing and installing. Refer to → Chapter "Impact Member Bracket, Removing and Installing".
11 - Bolt
- 4 Nm
- For attaching to the lock carrier
Overview - Impact Absorber, Vehicles from MY 2013
 Caution
Note the following if the vehicle is equipped with adaptive cruise control (ACC).
If modifications were made to the impact absorber bracket or the bracket for the Distance Regulation Control Module - J428-, the adaptive cruise control must be recalibrated. Refer to → Suspension, Wheels, Steering; Rep. Gr.44; Adaptive Cruise Control (ACC); Adaptive Cruise Control (ACC), Calibrating.
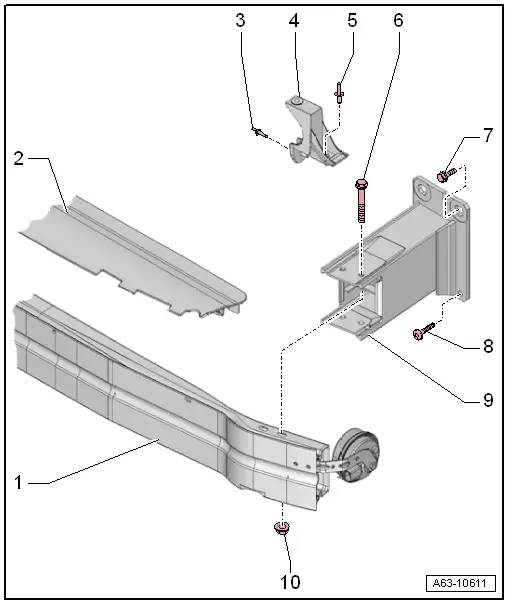
1 - Impact Member
- Removing and installing. Refer to → Chapter "Impact Absorber, Removing and Installing, Vehicles through MY 2012".
2 - Cover
- For impact member
3 - Rivet
4 - Support Piece
- For the headlamp housing mount
- Removing and installing. Refer to → Chapter "Headlamp Housing Mount Support, Removing and Installing".
5 - Rivet
6 - Bolt
- Quantity: 2
7 - Bolt
- 55 Nm
- Quantity: 3
8 - Bolt
- 4 Nm
- Secures the lock carrier
9 - Impact Member Bracket
- Removing and installing. Refer to → Chapter "Impact Member Bracket, Removing and Installing".
10 - Nut
- 20 Nm
- Quantity: 2

