Audi Q5: Current Draw Test
 WARNING
Do not check or charge a Battery -A- when the visual indicator has "no color or is bright yellow". Jump starting must not be used!
There is a risk of explosion during testing, charging or jump starting.
These Batteries -A- must be replaced.
Make sure the correct charging mode is set on the battery charger so the current draw test is not inaccurate.
- Battery Charger -VAS5095A-. Refer to → Chapter "Battery, Charging with Battery Charger -VAS5095A-".
- Battery Charger -VAS5900-. Refer to → Chapter "Battery Charger -VAS5900-".
- Battery Charger -VAS5903-. Refer to → Chapter "Battery Charger -VAS5903-".
In order to receive an indication as quickly as possible of the battery condition of discharged Batteries -A-, a conclusion can be made during the charging process using the Battery -A- current draw as to whether the Battery -A- should be replaced or charged completely.
 Note
Note
In the case of the Battery Tester -VAS6161-, the current draw test must always be conducted when the test result "conduct current draw test" appears in the display.
The current draw test should always be performed if the test using the Battery Tester with Printer -VAS5097A- had the following results:
1 - Starting power sufficient
2 - Starting power insufficient
3 - Starting power very insufficient
4 - Cannot be tested - charge the Battery -A- and perform the test again
5 - Battery Tester with Printer -VAS5097A- does not turn on (no LED, no printout)
Depending on the test results Battery Tester with Printer -VAS5097A- (refer to → Chapter "Test Result Evaluation"), additional test steps or work for a clear evaluation of the battery charge must be made.
By checking a current draw capacity on a Battery -A- during the charging procedure, it can be determined in a short time whether a partially discharged or severely discharged Battery -A- can become operable again by further charging. Refer to → Chapter "Severely Discharged Batteries".
Test Prerequisites
- When charging a battery, the temperature of the battery must be at least 10 ºC (50 ºF).
- The charger must be able to deliver at least 30 A charge current, such as on the Battery Charger -VAS5095A-/Battery Charger -VAS5900-/Battery Charger -VAS5903-.
- When charging with the Battery Charger -VAS5095A-, the Battery -A- current draw must be measured using a current probe (Test Instrument Set - Current Clamp - 100A -VAS6356/4A-).
- The Battery Charger -VAS5900- and the Battery Charger -VAS5903- indicate the current draw.
Procedure
- Connect the Battery -A- to the Battery Charger and start the charging process.
- Measure the Battery -A- charge current after five minutes.
Test Result
The charge current must be above 10% of the nominal capacity 5 minutes after charging begins.
Example
With a 60 Ah battery, the charge current must be greater than 6 A 5 minutes after charging begins.
- Fully charge the Battery -A- if the charge current is higher than 10% of the nominal capacity.
- Let the Battery -A- sit for two hours and then perform the battery load test. Refer to → Chapter "Battery Load Test".
If the charge current is less than 10% of the nominal capacity (less than 6 A for a 60 Ah battery) five minutes after starting the charging, then replace the Battery -A-. Refer to → Electrical Equipment; Rep. Gr.27; Battery; Battery, Removing and Installing.
- In warranty and Goodwill cases, fill out the battery test sheet and keep it with the Battery -A-.
Battery, Checking Resting Voltage, Vehicles in Storage or Inventory
 WARNING
Risk of injury. Follow all warning messages and safety precautions. Refer to → Chapter "Warnings and Safety Precautions".
 Note
Note
- The resting voltage may only be measured on vehicles in storage or inventory within the scope of the prescribed maintenance and care work as an assessment criteria for the Battery -A- condition.
- The resting voltage measurement serves to determine whether it is necessary to recharge the Battery -A- on vehicles in storage or inventory. Refer to →Maintenance Intervals; Rep. Gr.03.
Special tools and workshop equipment required
- Analog/Digital Multimeter -FLU83III-
Test Conditions
The Battery -A- may not be charged or discharged for at least two days.
Procedure
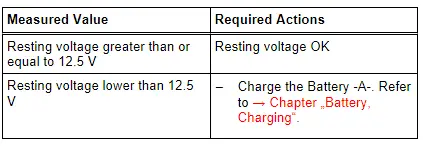
- Measure the Battery -A- resting voltage using the Analog/Digital Multimeter -FLU83III-.
Test Result


