Audi Q5: Modular Wire Routing with Corrugated Tube on Front Seat
 Note
Note
The wires between the seat pan and the connector station are inside a double-shell corrugated tube in the so-called modulate wiring routing.
Special tools and workshop equipment required
- Trim Removal Wedge -3409-
Opening the corrugated tube and removing the individual wire
 WARNING
- Follow all Safety Precautions when working with pyrotechnic components. Refer to → Chapter "Pyrotechnic Components Safety Precautions".
- Before handling pyrotechnic components (for example, disconnecting the connector), the person handling it must "discharge static electricity". This can be done by touching the door striker, for example.
- Remove the front seat. Refer to → Chapter "Front Seat, Removing and Installing".
- Attach the front seat to the Engine/Transmission Holder - Seat Repair Fixture -VAS6136-. Refer to → Chapter "Front Seat, Mounting on Fixture for Seat Repair".
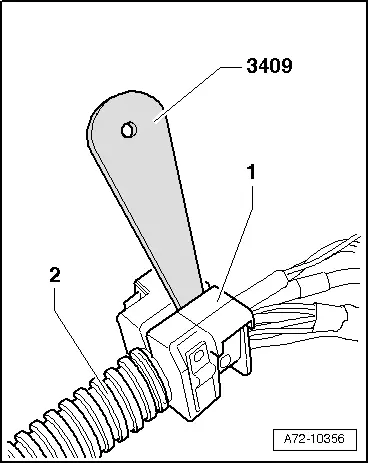
- Using Trim Removal Wedge -3409-, open the cable holder -1-.
- Remove the cable holder from the corrugated tube -2-.
- Open the corrugated tube and replace the faulty wires or the side airbag. Refer to → Electrical Equipment General Information; Rep. Gr.97; Wiring Harness and Connector Repairs; Wiring Harnesses, Repairing or → Chapter "Front Side Airbag with Igniter, Removing and Installing".
Installing individual wires and closing the corrugated tube
Install in reverse order of removal. Note the following:
- When bundling and placing individual wires in the corrugated tube, make sure the wires are not twisted.
 Note
Note
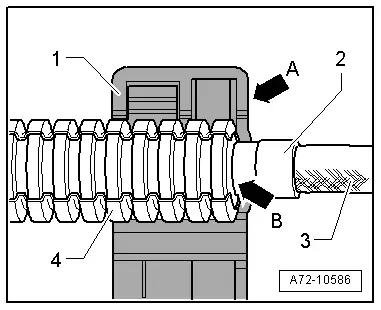
Note the installation position of the two-part corrugated tube to the wiring harness and the position of the wiring bracket to the corrugated tube.
- The beginning of the corrugated tube -4- should be placed immediately after the clip -2- or cable tie around the wiring harness -3-.
- Make sure the two-piece corrugated tube is closed correctly over the entire length.
- After connecting both halves of the corrugated tube, wiring bracket -1- should be positioned and clipped into place according to the illustration.
- Make sure the side -arrow A- of the cable bracket connects to the last rib -arrow B- on the corrugated tube.
- Install the cable ties, wiring bracket and clips in the same positions as before removal.
 Note
Note
Make sure the connectors are installed correctly and are secure.
 WARNING
Ignition must be on when connecting battery. If pyrotechnic components (for example, airbag, belt tensioner) are not repaired correctly, they may deploy unintentionally after connecting battery. There must not be anyone inside the vehicle when connecting the battery.
 DANGER!
When working on vehicles with the ignition already switched on or that are ready to drive there is a danger of the engine starting unexpectedly and of being poisoned by gas in enclosed areas. Risk of body parts and/or clothing being clamped or pulled.
Perform the following before switching on the ignition:
- Move the selector lever into P.
- Activate the parking brake
- Turn off the ignition.
- Open the hood
- Connect Battery Charger -VAS5095A- to the battery jump start terminal.
- Turn on the ignition.
- Connect the battery ground cable with the ignition turned on. Refer to → Electrical Equipment; Rep. Gr.27; Battery; Battery, Disconnecting and Connecting.
 Note
Note
If the Airbag Indicator Lamp -K75- indicates a fault, check the DTC memory, erase it and check it again. Refer to Vehicle Diagnostic Tester.
Seat Forward/Back Adjustment Handle, Removing and Installing
 Note
Note
- The backrest cover can be removed and installed with the seat still installed.
- The seat fore and aft adjustment handle cannot be removed without destroying it.
Removing
- Move the front seat all the way forward.
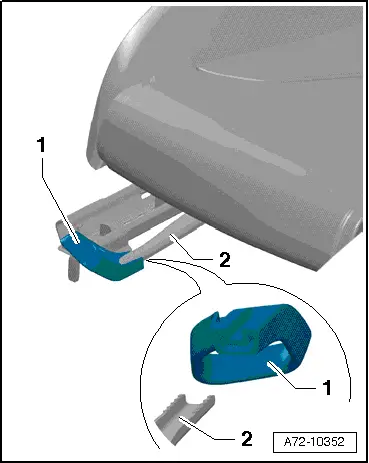
- Remove the seat forward/back adjustment handle -1- from its mount -2- using a rubber or plastic mallet.
 Note
Note
The unit is shown rotated 180º.
Installing
- Push the seat forward/back adjustment handle back onto its mount.
- Hit the seat forward/back adjustment handle all the way back on with a rubber hammer.
 Note
Note
Be careful not to damage the handle when hitting it with the rubber hammer.
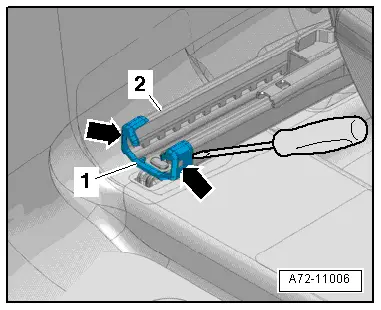
Seat Rail Cover, Removing and Installing
Removing
- Carefully release the tabs -arrows- on the cover with a screwdriver and remove the cover from the seat rail -2-.
- Remove the cover -1- from the seat rail.
Installing
- Install the seat rail cover and press on it until it audibly engages.