Audi Q5: Sill Side Trim, Removing and Installing
Sill Side Trim, Removing and Installing, Standard/Sport Manual Seats
 Note
Note
The backrest cover can be removed and installed with the seat still installed.
Removing
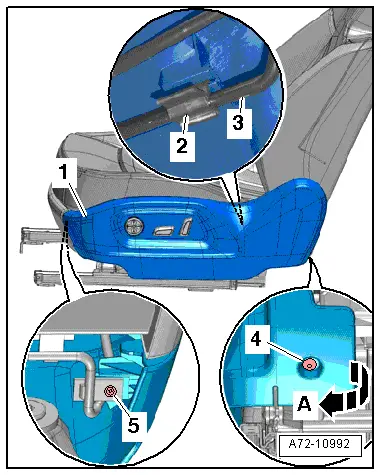
- Tilt seat all the way up.
- Remove backrest adjustment wheel. Refer to → Chapter "Backrest Adjuster, Removing and Installing".
- Remove seat height adjustment handle. Refer to → Chapter "Seat Height Adjuster, Removing and Installing".
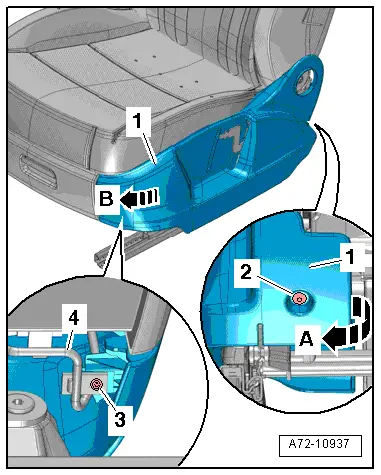
- Remove the screw -3- and the remove the seat side trim spreader clip -2-.
- Disengage the side trim -1- from the rear of the seat -arrow A-.
- Pull the rear side trim slightly upward, remove it from the bracket-4- and then remove it forward -arrow B-.
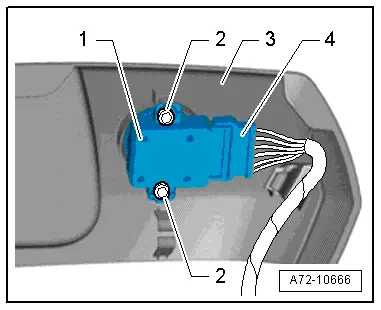
- Versions with four-way lumbar support: Disconnect the connector -4- on the lumbar support adjustment switch -1-.
 Note
Note
Ignore -item 2-.
- Remove the seat side sill panel trim -3-.
Bracket for Seat Side Panel
- Remove the screw -1-, if applicable.
- Remove the screws -2- and remove the bracket -3- from the front seat.

Installing
Install in reverse order of removal. Note the following:
 Note
Note
- Make sure the trim on the sill side trim is correctly attached to the mounting bracket.
- Make sure the wire is as close as possible to the connector -4- as possible.
Sill-Side Trim, Removing and Installing, Front Passenger Side Folding Seat
 Note
Note
The backrest cover can be removed and installed with the seat still installed.
Removing
- Raise the front seat all the way up.
- Remove the release lever. Refer to → Chapter "Backrest Release, Removing and Installing".
- Remove seat height adjustment handle. Refer to → Chapter "Seat Height Adjuster, Removing and Installing".
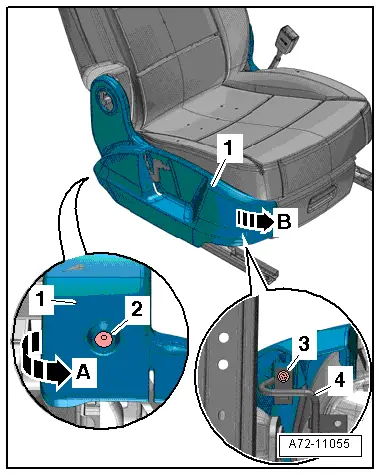
- Remove the screw -3- and the remove the seat side trim spreader clip -2-.
- Disengage the side trim -1- from the rear of the seat -arrow A-.
- Pull the rear side trim slightly upward, remove it from the bracket-4- and then remove it forward -arrow B-.
- Remove the seat side sill trim.
Installing
Install in reverse order of removal. Note the following:
 Note
Note
Make sure the trim on the sill side trim is correctly attached to the mounting bracket.
Sill Side Trim, Removing and Installing, Standard, Comfort Seat, Sport Seat Power Seats
 Note
Note
The backrest cover can be removed and installed with the seat still installed.
Removing
- Raise the front seat all the way up.
- Remove the screw -5- and the remove the seat side trim spreader clip -4-.
- Disengage the side trim -1- from the rear of the seat -arrow A-.
- Open the clip -2- on the seat side trim and disengage the bracket -3-, then carefully remove the seat side trim, from the front seat.
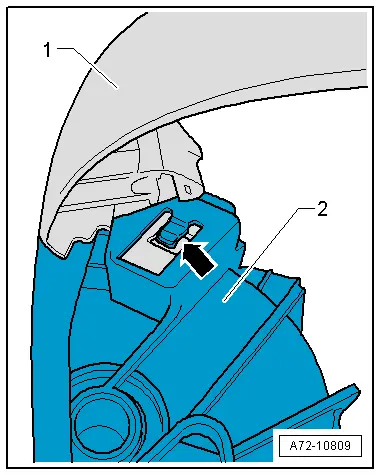
- Disconnect the retainer -arrow- between the storage compartment -2- and the seat side sill trim -1-.
- Disengage the seat side sill trim from the bracket and remove it forward.
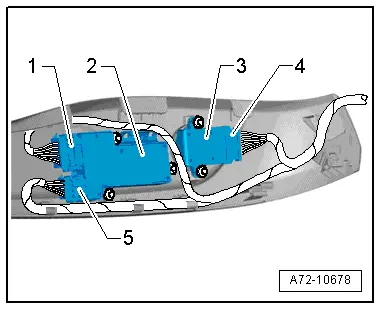
- Disconnect the connector -4- on the lumbar support adjustment switch -3-.
- Disconnect the connectors -1 and 5- and on the seat adjustment control head -2-.
- Remove the seat side sill trim.
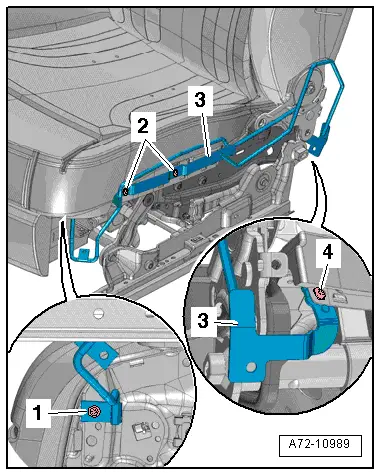
Bracket for Seat Side Panel
- Remove the bolts -1, 2 and 4-.
- Remove bracket -3- from the front seat. Remove any cable ties from the retaining bracket.
Installing
Install in reverse order of removal. Note the following:
 Note
Note
- Make sure the connectors are installed correctly and are secure.
- Make sure the seat side sill trim is engaged correctly on the retaining bracket and the lock clip is closed.
- Make sure the wires are as close as possible close to the connectors -1, 4 and 5-.