Audi Q5: Mid-Range Speaker Trim, Removing and Installing
Removing
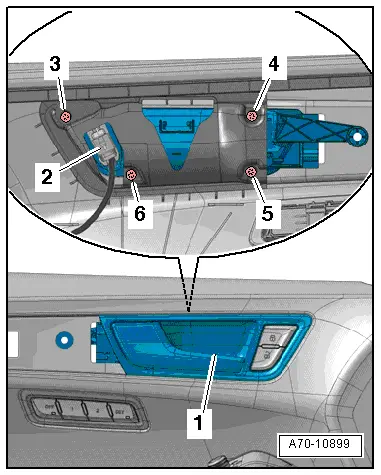
- Remove the front door trim panel. Refer to → Chapter "Front Door Trim Panel, Removing and Installing".
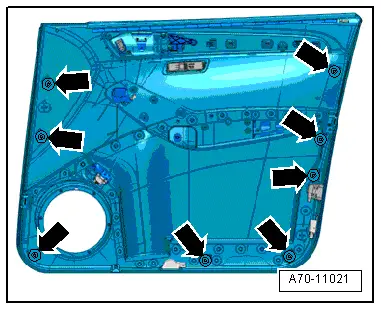
- Remove the screws on the back of the door trim panel -arrows- and remove the speak trim -1-.
Installing
Install in reverse order of removal.

Treble Speaker Trim, Removing and Installing
Special tools and workshop equipment required
- Trim Removal Wedge -3409-
Removing
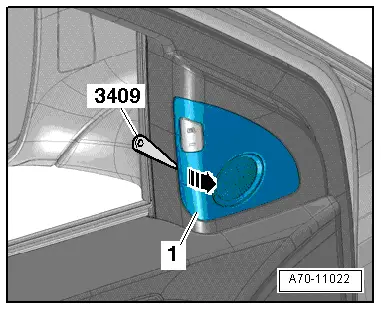
- Carefully pry off the treble speaker trim -1- from the window frame trim panel -arrow- using the Trim Removal Wedge -3409- or a narrow screwdriver.
Installing
- Press the treble speaker trim on until it engages audibly.
Trim Molding, Removing and Installing
Special tools and workshop equipment required
- Removal Wedge -T40233-
Removing
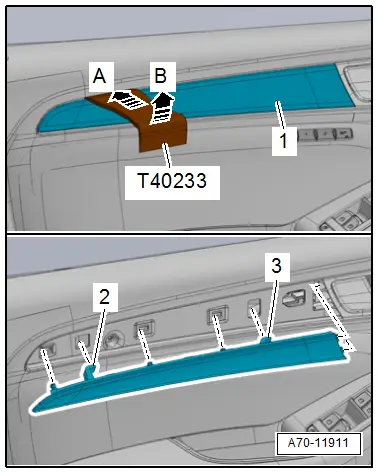
- Carefully insert the Trim Removal Wedge -T40233- from behind the trim panel between the door trim and the trim panel -arrow A-.
- Carefully pry out the trim -1- along the door trim seam -arrow B- using the Removal Wedge -T40233- and remove it.
- Disengage and remove the hooks -2, 3- from the cut-out of the door trim.
Installing
- First engage the decorative trim on the interior door mechanism and press it into the door panel until it clicks into place.
Front Door Trim Panel, Removing and Installing
Special tools and workshop equipment required
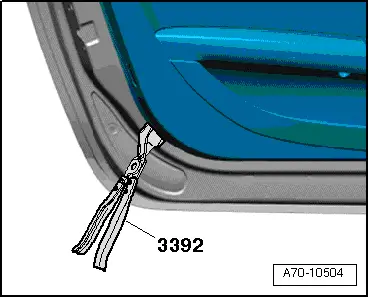
- Door Trim Pliers -3392-
Removing
- Switch the ignition off and remove the ignition key.
- Remove the trim panel. Refer to → Chapter "Trim Molding, Removing and Installing".
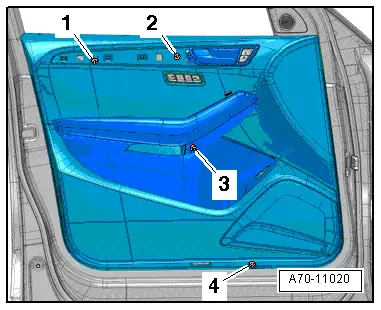
- Remove the bolts -1 to 4-.
- Beginning at the bottom rear curve, unclip the door trim from the door using the Door Trim Pliers -3392- by sliding them between the door trim and the door in the securing clip area.
- Position of the retaining clips -arrows-.

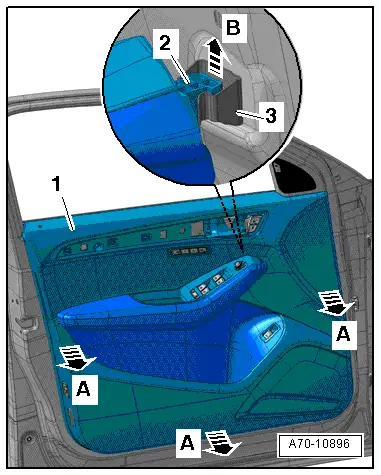
- Pull the door trim panel -1- approximately 15 mm off the door all the way around -arrows A-.
- The clips must not be left in the inside the door.
- Remove the pull handle -2- upward and out of the clamp -3- at the indicated point on the door trim panel -arrow B-.
- Disengage and remove the upper door trim panel from the door on the window recess.
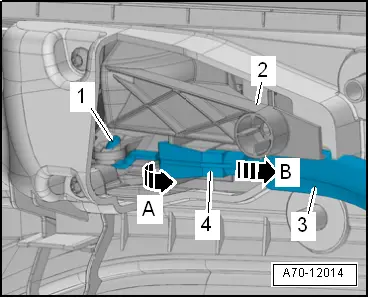
- Unlock the bracket -4- from the cable bracket -2--arrow A-.
- Remove inside door release cable -3- from the control cable bracket in direction of -arrow B-.
- Disengage the ends of the cable -1- from the inside door release mechanism.

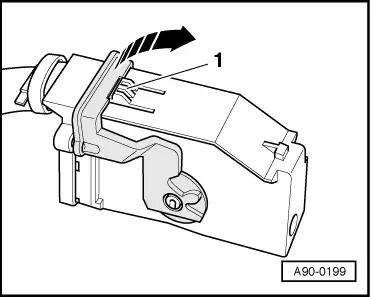
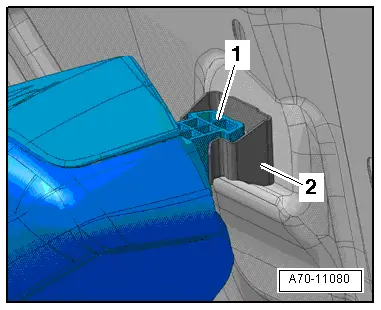
- To disconnect electrical connector, press catch -1-, rotate retaining bracket in direction of -arrow- and remove connector.
- Remove the door trim.
Installing
- Engage the ends of the cable -1- in the inside door release mechanism lever.
- The open side of the eye on the end of the cable must face up.
- Pull the door mechanism release cable -3- in direction of -arrow B- and guide it into the cable bracket -2-.
- Bracket -4- must engage audibly in the control cable bracket.
 WARNING
- For proper crash sensor (pressure sensor) function, ensure door does not leak.
- The door trim clips -arrows- seal the system. Replace the door trim clips if necessary.
- Connect the connectors on the door control module.
- Position the door trim on the window recess and press it down firmly.
- Carefully install the door trim panel clip on the door and then press the door trim panel into the clip so that they audibly engage.
- Install the pull handle -1- into the bracket -2- until it audibly latches into the door.
Install in reverse order of removal.
Front Armrest, Removing and Installing
Special tools and workshop equipment required
- Trim Removal Wedge -3409-
Removing
- Remove the front door trim panel. Refer to → Chapter "Front Door Trim Panel, Removing and Installing".
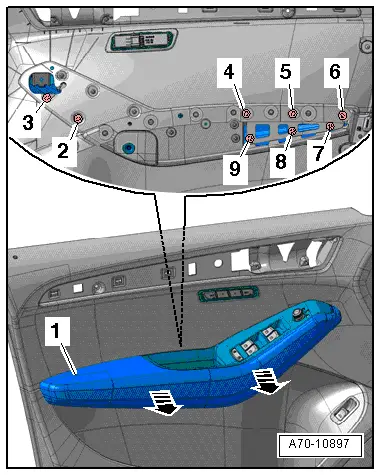
- Remove the bolts -2 to 9- on the rear of the door trim.
- Loosen the armrest -1- from the pull handle -arrows- with the Trim Removal Wedge -3409- and remove.
Installing
Install in reverse order of removal.
Front Pull Handle, Removing and Installing
Removing
- Remove the front door trim panel. Refer to → Chapter "Front Door Trim Panel, Removing and Installing".
- Remove the front armrest. Refer to → Chapter "Front Armrest, Removing and Installing".
- Remove the window regulator control head. Refer to → Electrical Equipment; Rep. Gr.96; Controls; Overview - Front Door Controls.
- Diver door: Remove the driver side mirror adjusting switch. Refer to → Electrical Equipment; Rep. Gr.96; Controls; Overview - Front Door Controls.
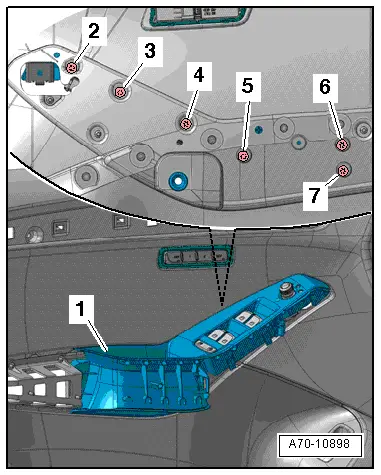
- Remove the bolts -2 through 7- on the rear of the door trim.
- Carefully remove the pull handle -1- with the switch mount from the door trim.
Installing
Install in reverse order of removal.
Interior Door Mechanism, Removing and Installing
Removing
- Remove the front door trim panel. Refer to → Chapter "Front Door Trim Panel, Removing and Installing".
- Disconnect the connector -2- on the interior locking button.
- Versions with lighting: Disconnect the connector.
- Remove the bolts -3 to 6-.
- Remove the interior door mechanism -1- from the door panel.
Installing
Install in reverse order of removal.