Audi Q5: Shock Absorber, Removing and Installing
Shock Absorber, FWD, Removing and Installing
Special tools and workshop equipment required
- Torque Wrench 1331 5-50Nm -VAG1331-
- Torque Wrench 1332 40-200Nm -VAG1332-
- Engine and Gearbox Jack -VAS6931-
- Engine/Gearbox Jack Adapter - Wheel Hub Support -T10149-
Removing
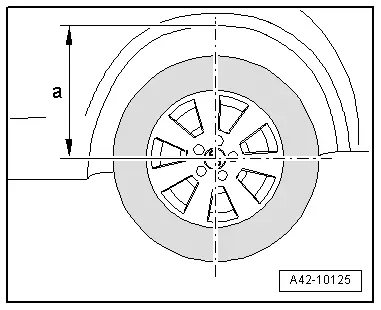
- Determine dimension -a- from the center of the wheel to the lower edge of the wheel housing before starting work while the vehicle is resting on its wheels.
- Place the vehicle on a hoist.
- Remove the wheel.
- Turn the wheel hub up until a wheel bold hole is on top.

- Install Engine/Gearbox Jack Adapter - Wheel Hub Support -T10149- with wheel bolt -arrow-.
- Insert the Engine/Gearbox Jack Adapter - Wheel Hub Support -T10149- into the Engine and Gearbox Jack -VAS6931- and slightly raise the wheel bearing housing.
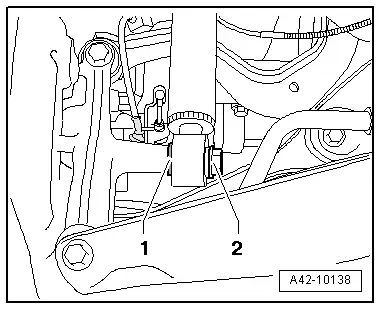
- Remove the bolts -1-.

Applies to a vehicle with electronically controlled damping
- Release and disconnect the connector -2-.
- Remove the fastener -1-.
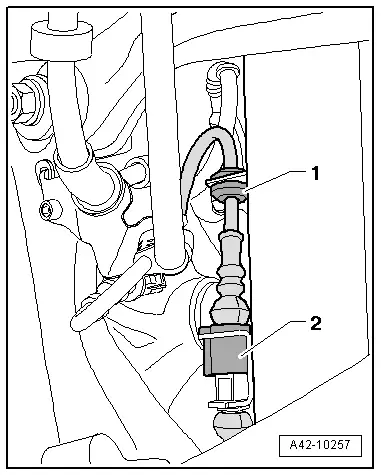
Continuation for All Vehicles
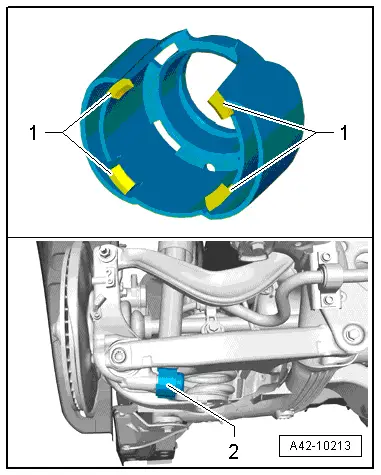
- Release the retaining tabs -1- and remove the stone deflector -2-.
- Remove the bolt -2- and washer -1-.
- Remove the shock absorber downward.
Installing
Install in reverse order of removal. Note the following:
 Note
Note
- Bonded rubber bushings have a limited range of motion. Only tighten suspension screws when vehicle is in curb weight or control position.
- Wheel bearing, lifting to curb weight position on vehicles with coil springs. Refer to → Chapter "Wheel Bearing in Curb Weight, Lifting Vehicles with Coil Spring".
- Tighten the wheel. Refer to → Chapter "Wheel Bolt Tightening Specifications".

Shock Absorber, AWD, Removing and Installing
Special tools and workshop equipment required
- Torque Wrench 1331 5-50Nm -VAG1331-
- Torque Wrench 1332 40-200Nm -VAG1332-
- Engine and Gearbox Jack -VAS6931-
- Engine/Gearbox Jack Adapter - Wheel Hub Support -T10149-
Removing
- Determine dimension -a- from the center of the wheel to the lower edge of the wheel housing before starting work while the vehicle is resting on its wheels.
- Place the vehicle on a hoist.
- Remove the wheel.
- Turn the wheel hub up until a wheel bold hole is on top.
- Install Engine/Gearbox Jack Adapter - Wheel Hub Support -T10149- with wheel bolt -arrow-.
- Insert the Engine/Gearbox Jack Adapter - Wheel Hub Support -T10149- into the Engine and Gearbox Jack -VAS6931- and slightly raise the wheel bearing housing.
- Remove the bolts -1-.

Applies to a vehicle with electronically controlled damping
- Release and disconnect the connector -2-.
- Remove the fastener -1-.

Continuation for All Vehicles
- Release the retaining tabs -1- and remove the stone deflector -2-.

- Remove the bolt -2- and washer -1-.
- Remove the shock absorber downward.
Installing
Install in reverse order of removal. Note the following:
 Note
Note
- Bonded rubber bushings have a limited range of motion. Only tighten suspension screws when vehicle is in curb weight or control position.
- Wheel bearing, lifting to curb weight position on vehicles with coil springs. Refer to → Chapter "Wheel Bearing in Curb Weight, Lifting Vehicles with Coil Spring".