Audi Q5: Lock Carrier
Overview - Lock Carrier
 Caution
On vehicles with distance regulation (ACC), note the following.
If the lock carrier is removed and installed or if changes are made to the "ACC" bracket, the distance regulation must be calibrated. Refer to → Suspension, Wheels, Steering; Rep. Gr.44; Adaptive Cruise Control (ACC); Adaptive Cruise Control (ACC), Calibrating.
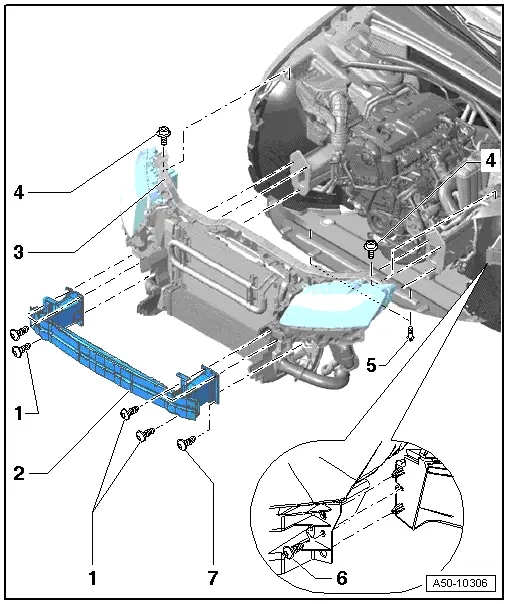
1 - Bolt
- 55 Nm
- 3 pieces per side.
2 - Impact Member
- Secured on the lock carrier with a bolt -7-
- Do not remove with the bracket when removing the lock carrier.
3 - Lock Carrier
 Note
Note
The radiator coolant must be drained before removal. Refer to → Rep. Gr.19; Cooling System/Coolant; Coolant, Draining and Filling.
- Removing.
- Remove the lock carrier cover.
- Remove front bumper. Refer to → Chapter "Bumper Cover, Removing and Installing".
- Disconnect all electrical wires and hoses to the lock carrier at the connection points.
- Disconnect the cable for the hood lock from the the coupling. Refer to → Chapter "Overview - Release Cable".
- Remove bolts -5-.
- Remove the bolts -1- on the longitudinal member (quantity: 3 per side).
 Note
Note
The impact absorbers with the brackets are secured to the lock carrier with one bolt each -1- and must not be removed.
- Remove the bolts -6- on the lower lock carrier.
- Remove the lock carrier with the headlamps forward.
- Install in reverse order of removal.
- Adjust the headlamps after installing.
4 - Bolt
- 5 Nm
5 - Bolt
- 1.5 Nm
6 - Bolt
- 4 Nm
- Secures the impact bar to the lock carrier.
Service Position, Implementing and Resetting
Special tools and workshop equipment required
- Guide Pins -T10093-
 Note
Note
- For the Service position, no lines and/or circuits are disconnected or opened, for example engine cooling system, Air Conditioning (A/C) system, etc.
- When installing the lock carrier, make sure that no lines or cables get pinched or kinked at the connecting points.
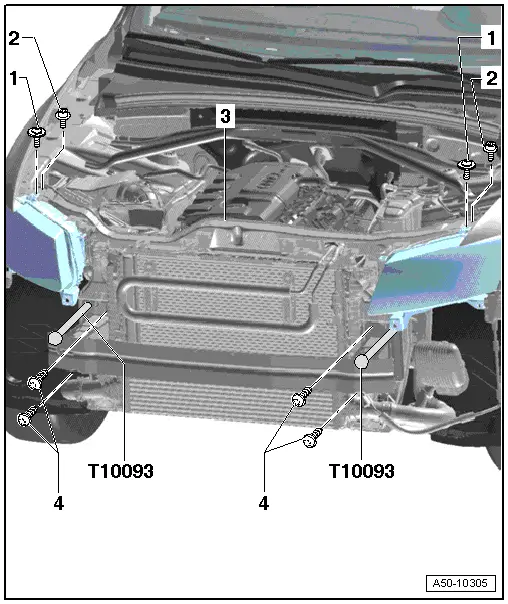
1 - Bolt
- 10 Nm
2 - Bolt
- 10 Nm
3 - Lock Carrier
- Service Position
 Caution
On vehicles with distance regulation (ACC), observe the following.
If the lock carrier is removed and installed or if changes are made to the "ACC" bracket, the distance regulation must be calibrated. Refer to → Suspension, Wheels, Steering; Rep. Gr.44; Adaptive Cruise Control (ACC); Adaptive Cruise Control (ACC), Calibrating.
- Disconnect the battery.
- Remove the front bumper. Refer to → Chapter "Bumper Cover, Removing and Installing".
- Remove the top lock carrier cover.
- Remove the bolts from the lower noise insulation.
- Remove the bolts from the lock carrier brace.
- Disconnect the engine hood cable at the coupling point.
- Remove the coolant reservoir screws.
- Pull the reservoir upward and out of its retainer.
- Disconnect the headlamp connectors.
- On vehicles with charge air cooler, pressure hoses must also be disconnected.
- Remove the lower right and left bolts from the longitudinal member.
- Install the left and right Guide Pins - T10093- into the open threads.
- Remove the remaining bolts.
- Pull the lock carrier and the coolant reservoir forward onto the guide pins, being careful not to bend the lines.
 Caution
When repositioning the lock carrier, the lines must not be pinched or crushed.
- Install in reverse order of removal.
- Check the headlamp adjustment after installing it and make any adjustments, if necessary.
4 - Bolt
- 55 Nm
- Guide Pins -T10093- are installed in free threads at outer left and right.
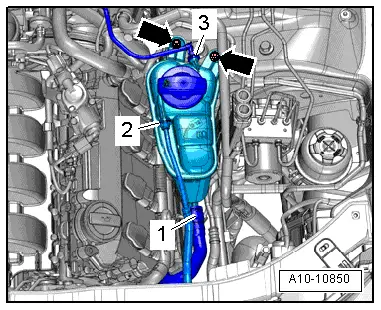
Coolant Reservoir, Loosening
- Before the lock carrier can be pulled forward, remove the lower nuts on the reservoir -arrows- and pull it upward out of the grommet.
- Tighten the bolts to 5 Nm.
Lock Carrier Brace, Removing and Installing
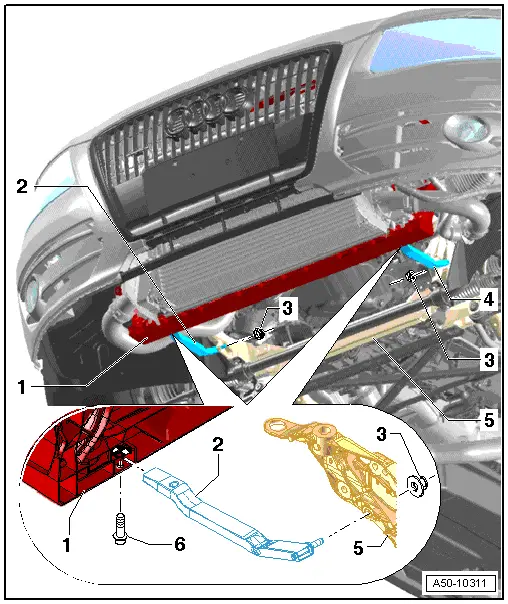
1 - Lock Carrier
2 - Right Lock Carrier Brace
- Attached to the mounting bracket with the nut -6-.
3 - Nut
- 23 Nm
4 - Left Lock Carrier Brace
- Attached to the mounting bracket with the nut -6-.
5 - Subframe
6 - Bolt
- 5 Nm
7 - Spring Nut
- Slide into the lower lock carrier.
Lock Carrier Cover, Removing and Installing
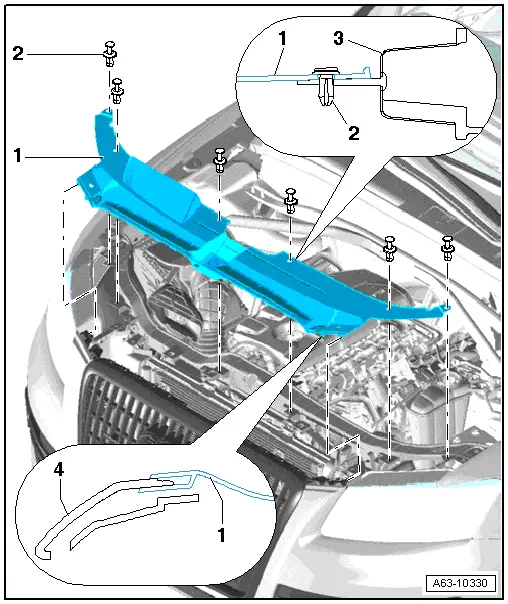
1 - Cover
- To remove, remove the locking pin and release the expanding clip.
- Remove the expanding clip from the cover.
- Remove the cover back from the radiator grille.
- When installing, the tabs on the cover must engage on the radiator grille and on the sides of the bumper cover.
- Insert the expanding clip through the cover into the lock carrier and press the locking pin in.
2 - Expanding Clip
- Remove the clamping pin when removing.
- Only press the clamping pin in when installing.
- Quantity: 4
3 - Lock Carrier
4 - Radiator Grille

