Audi Q5: Driver Side Instrument Panel Cover, Removing and Installing
Special tools and workshop equipment required
- Trim Removal Wedge -3409-
Removing
- Switch off all electrical consumers.
- Remove ignition key.
- Remove the side cover from the instrument panel on the driver side. Refer to → Chapter "Instrument Panel Side Cover, Removing and Installing".
- Unclip the instrument cluster gap cover from the instrument panel. Refer to → Chapter "Instrument Cluster Gap Cover, Removing and Installing".
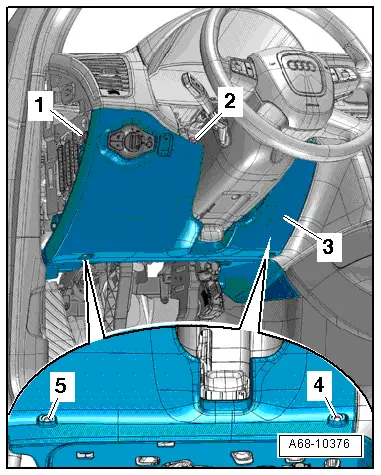
- Remove the upper screws -1 and 2-.
- Remove the lower screws -4 and 5-.
- Unclip the top edge of the driver side instrument panel cover -3- from the instrument panel using a Trim Removal Wedge -3409-.
- Disconnect the connectors on the light switch.
- Equipment level with Headlamp Range Control Adjuster -E102-: Disconnect the connector.
- Unclip the 16-Pin Connector -T16- (Data Link Connector).
- Versions with footwell lighting: Disconnect the connector.
- Disconnect the driver side instrument panel cover.
Installing
Install in reverse order of removal. Note the following:
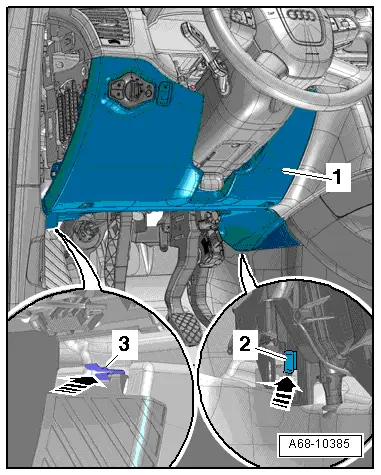
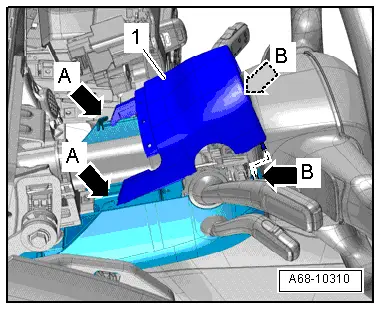
- Install the lower instrument panel cover -1- into the clips -3- on the footrest and into the clips -2- on the A/C unit -arrows-.
- Clip the instrument panel cover at the upper edge into the instrument panel.
Headlamp Range Control Adjuster -E102- Trim, Removing and Installing
Removing
- Remove the instrument panel cover on the driver side. Refer to → Chapter "Driver Side Instrument Panel Cover, Removing and Installing".
- Remove the headlamp range control adjuster. Refer to → Electrical Equipment; Rep. Gr.96; Controls; Headlamp Range Control Adjuster E102, Removing and Installing.
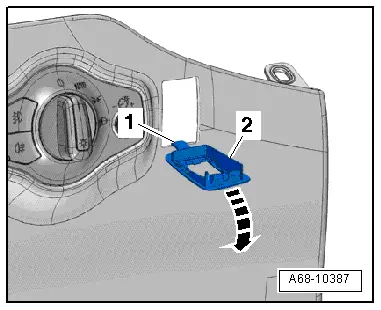
- Unclip the trim -2- at the top and move it forward -arrow-.
- Remove the trim from the cut-out in the instrument panel cover on the driver side.
Installing
Install in reverse order of removal. Note the following:
- Insert the tab -1- into the cut-out in the instrument panel cover on the driver side and push on it until the locks into place.
Headlamp Range Control Adjuster -E102-, Making an Additional Cut-Out in Instrument Panel Cover
 Note
Note
- The instrument panel cover is delivered without a cut-out for the Headlamp Range Control Adjuster -E102- on the driver side.
- If the vehicle has a Headlamp Range Control Adjuster -E102- then it is necessary to make a cut-out into the instrument panel on the driver side as follows.
Procedure
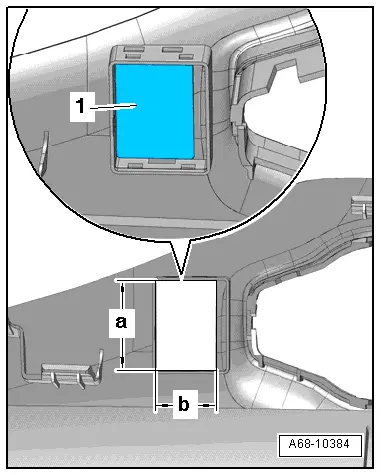
- Cut a hole for the headlamp adjuster on the marked surface -1- into the instrument panel cover on the driver side according to dimensions -a- and -b-, as illustrated.
- Dimension -a- = 35.5 mm.
- Dimension -b- = 23.5 mm.
- Install the headlamp adjuster trim. Refer to → Chapter "Headlamp Range Control Adjuster -E102- Trim, Removing and Installing".
- Install the headlamp range control adjuster. Refer to → Electrical Equipment; Rep. Gr.96; Controls; Headlamp Range Control Adjuster E102, Removing and Installing.
- Install the driver side instrument panel cover. Refer to → Chapter "Driver Side Instrument Panel Cover, Removing and Installing".
Instrument Cluster Gap Cover, Removing and Installing
Special tools and workshop equipment required
- Trim Removal Wedge -3409-
Removing
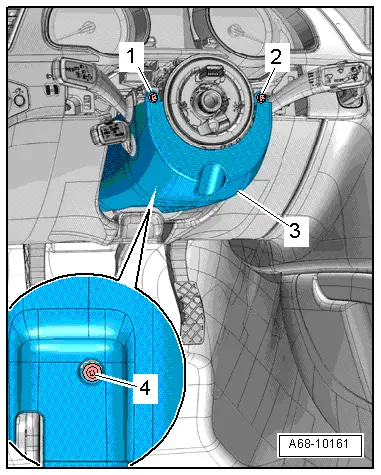
- Move the steering wheel as far down as possible.
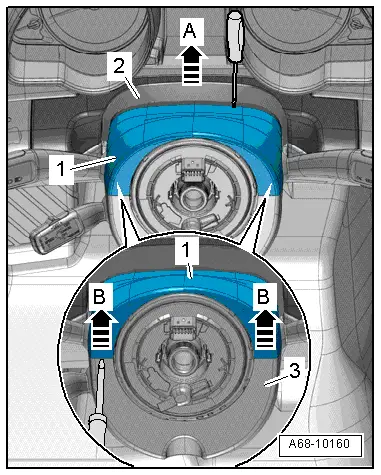
- Unclip the gap cover -1- from the instrument panel using a Trim Removal Wedge -3409--A arrows-.
- Using a small flat-head screwdriver, carefully unclip the gap cover from the upper steering column switch module trim -arrow B-.
Installing
Install in reverse order of removal. Note the following:
- Press the gap cover on until the clips engage completely in the mounting points.

Front Passenger Side Instrument Panel Cover, Removing and Installing
Removing
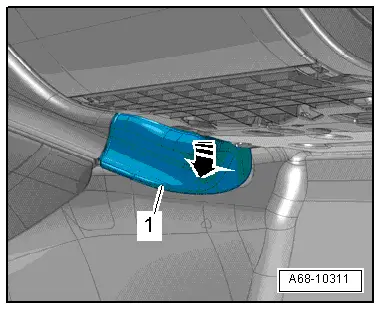
- Unclip instrument panel cover -1- on the passenger side from the glove compartment -arrow- and remove it.
Installing
- Press the passenger side instrument panel cover on until it engages audibly.
Upper Steering Column Trim Panel, Removing and Installing
Removing
- Move the steering wheel as far down as possible.
- Using a flat-head screwdriver, carefully unclip the gap cover -2- from the steering column switch module upper trim -1--arrow A-.
- Rotate the steering wheel 90º out of the straight position.
- Carefully pry the upper steering column switch module trim off of lower trim -3- using a small flat-head screwdriver -B arrows-.
- Disengage the upper steering column switch module trim from the lower trim and remove it.
Installing
Install in reverse order of removal. Note the following:
- Engage the upper trim -1- in the lower trim -A arrows-.
- Ensure the lower trim pins engage in the opening at the upper trim retaining tab -B arrows-.
Lower Steering Column Trim Panel, Removing and Installing
Removing
- Remove the upper steering column switch module trim. Refer to → Chapter "Upper Steering Column Trim Panel, Removing and Installing".
- Rotate the steering wheel 90º out of the straight position.
- Remove the bolts -1- and -2-.
 Note
Note
When the bolts -1- and -2- are not accessible, the steering wheel must be removed for further work. Refer to → Suspension, Wheels, Steering; Rep. Gr.48; Steering Wheel; Steering Wheel, Removing and Installing.
- Remove screw -4- and lower steering column switch module trim -3-.
Installing
Install in reverse order of removal.