Audi Q5: Wheel Bearing in Curb Weight, Lifting Vehicles with Coil Spring
Special tools and workshop equipment required
- Engine and Gearbox Jack -VAS6931-
- Tensioning Strap -T10038-
- Engine/Gearbox Jack Adapter - Wheel Hub Support -T10149-
 Note
Note
All bolts at suspension parts with bonded rubber bushings must always be tightened in curb weight position (unloaded condition).
Bonded rubber bushings have a limited range of motion.
Axle components with bonded rubber bushings must be brought into the position they will be in during driving before tightening (curb weight position).
Otherwise, the bonded rubber bushing will have tension, which will reduce the service life.
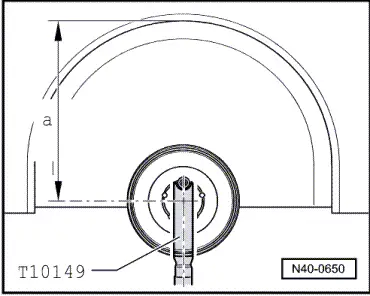
By raising appropriate suspension using Engine and Gearbox Jack -VAS6931- and Engine/Gearbox Jack Adapter - Wheel Hub Support -T10149-, this position can be simulated on the hoist.
- Before starting the work, take measurement -a-, for example, with a tape measure, from the center of the wheel to the lower edge of the wheel housing.
The measurement must be performed in curb weight position (unloaded condition).
- Note the measurement. It will be required for tightening bolts/nuts.
Before appropriate suspension is raised, vehicle must be strapped to lift arms of hoist using Tensioning Strap -T10038-.
The vehicle could fall off the hoist if it is not secured.
- Remove the wheel.
- Turn the wheel hub until one of the holes for the wheel bolts is on top.
- Install the Engine/Gearbox Jack Adapter - Wheel Hub Support -T10149- with wheel bolt on wheel hub.
Tightening of the respective bolts/nuts must only occur if dimension -a-, measured before installation between wheel hub center and lower edge of wheel house, has been attained.
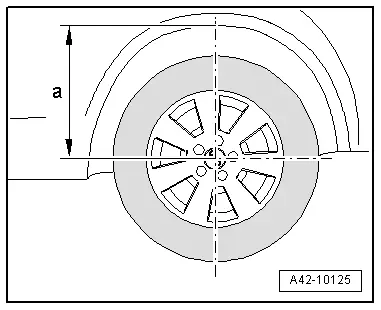
- Lift the wheel bearing housing using the Engine and Gearbox Jack -VAS6931- until dimension -a- is reached.
 WARNING
- Do not lift or lower the vehicle when the Engine and Gearbox Jack is under the vehicle.
- Do not leave the Engine and Gearbox Jack -VAS6931- under the vehicle any longer than necessary.
- Tighten the corresponding bolts and nuts.
- Lower the wheel bearing housing.
- Remove the Engine and Gearbox Jack -VAS6931- from under the vehicle.
- Remove the Engine/Gearbox Jack Adapter - Wheel Hub Support -T10149-
Steering Gear
- Thoroughly clean connecting points and their surrounding areas before loosening.
- Make sure the steering gear fits correctly when installing.
- Place removed parts on a clean surface and cover them so that they do not get dirty. Use foil and paper. Only use lint-free cloths!
- Install only clean parts: remove the replacement parts from their packaging just before installing them.
- Use exclusively lubricants and sealants marked with part numbers.
- Carefully cover or seal opened components if the repair is not performed immediately.
Seals, Sealing Rings
- Always replace the gaskets and seals.
- After removing seals, inspect contact surface on housings and shafts for burrs and damage and repair if necessary.
Bolts and Nuts
- Loosen and tighten the screws and nut from the covers and housings diagonally.
- Components that are extremely sensitive must not be distorted and should be loosened and tightened in stages in a diagonal sequence.
- Tightening specifications for non-lubricated bolts and nuts are given.
- Always replace self-locking nuts and bolts.
- Always replace the bolts and nuts, which are tightened with an additional tightening angle.
Technical Data
Suspension
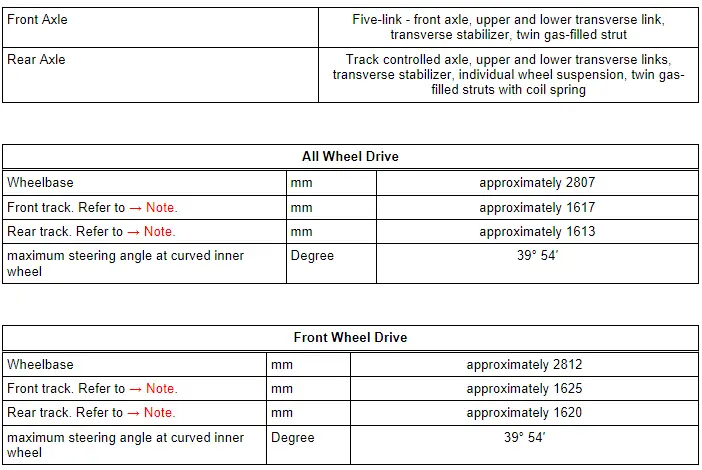
1) Front/rear track width, applies only to 235/65/R17 tires on ET 39 rims.
 Note
Note
- The specified values apply to all engine versions.
- Tracks change with use of wheels with different offset.
Change in track width:
- ET 27 "+ 22 mm"
- ET 33 "+ 12 mm"
- ET 37 "+ 4 mm"
Steering
All vehicles excluding hybrid

Hybrid vehicles only


