Audi Q5: Center Console, Component Locations Overview
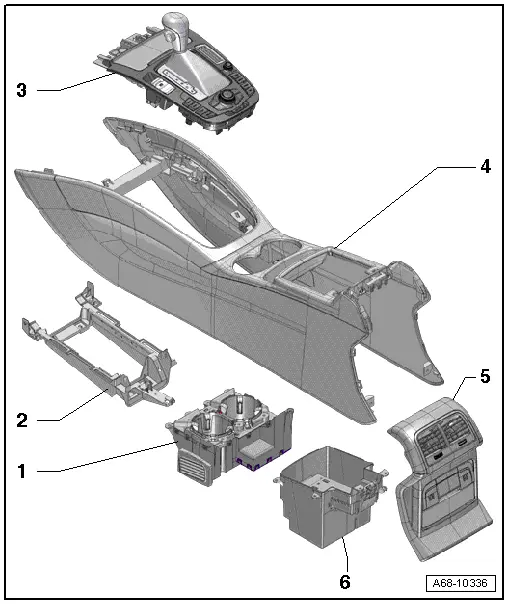
1 - Cupholder
- Overview. Refer to → Chapter "Overview - Center Console, Cupholder".
2 - Bracket
- For the center console
- Overview. Refer to → Chapter "Overview - Center Console".
3 - Insert
- For the center console
- Equipment levels
- Overview. Refer to → Chapter "Overview - Center Console, Center Console Insert".
4 - Center Console
- Equipment levels
- Overview. Refer to → Chapter "Overview - Center Console".
5 - Rear Trim
- For the center console
- Overview. Refer to → Chapter "Overview - Center Console, Center Console Rear Trim".
6 - Storage Compartment
- Equipment levels
- Overview. Refer to → Chapter "Overview - Center Console Storage Compartment".
Overview - Center Console
Overview - Center Console
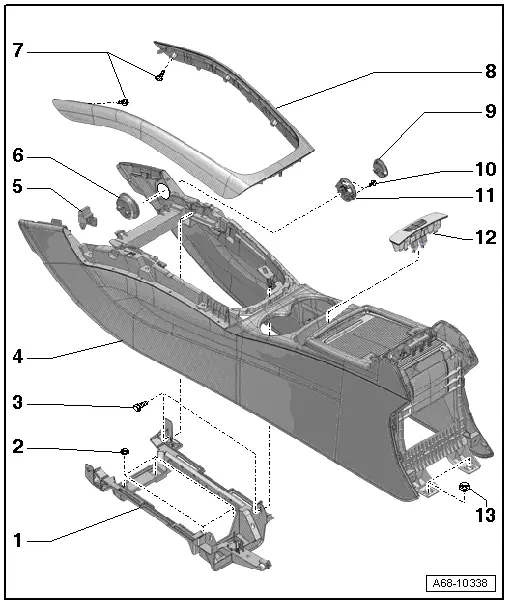
1 - Bracket
- For the center console
- Removing and installing. Refer to → Chapter "Center Console Bracket, Removing and Installing".
2 - Nut
- 8 Nm
- Quantity: 4
3 - Bolt
- 3 Nm
- Quantity: 4
4 - Center Console
- Equipment levels
- Removing and installing. Refer to → Chapter "Center Console, Removing and Installing".
5 - Trim
- Quantity: 2
6 - Counterhold
- For the coat hooks
- Equipment levels
- Removing and installing. Refer to → Chapter "Coat Hooks, Removing and Installing".
7 - Bolt
- 1.4 Nm
- Quantity: 8
- Tightening sequence
8 - Trim Molding
- For the center console
- Equipment levels
- Removing and installing. Refer to → Chapter "Center Console Decorative Trim, Removing and Installing".
9 - Coat Hooks
- Equipment levels
- Removing and installing. Refer to → Chapter "Coat Hooks, Removing and Installing".
10 - Bolt
- 1.4 Nm
- Quantity: 2
11 - Mount
- For the coat hooks
- Equipment levels
- Removing and installing. Refer to → Chapter "Coat Hooks, Removing and Installing".
12 - Switch/Liner Trim
- Equipment levels
- Removing and installing. Refer to → Chapter "Switch Trim, Removing and Installing".
13 - Nut
- 4 Nm
- Quantity: 2
Overview - Center Console, Center Console Insert
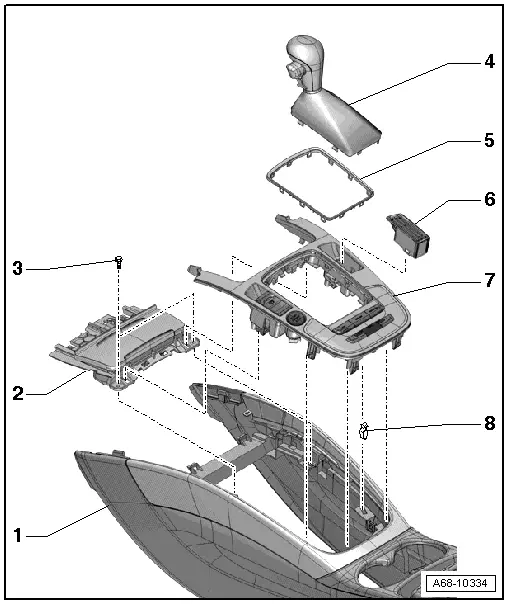
1 - Center Console
- There are different versions. For the correct allocation, refer to the Parts Catalog.
- Removing and installing. Refer to → Chapter "Center Console, Removing and Installing".
3 - Bolt
- Quantity: 2
- 2.5 Nm
4 - Gearshift Lever or Selector Lever
- Selector mechanism overview. Refer to → Automatic Transmission; Rep. Gr.37; Selector Mechanism; Overview - Selector Mechanism.
- Selector lever overview. Refer to → Automatic Transmission; Rep. Gr.37; Selector Mechanism; Overview - Selector Lever Handle.
5 - Decorative Frame
6 - Coin Holder
- Equipment levels
7 - Insert
- For the center console
- Vehicles with a center Console Insert, Removing and Installing. Refer to → Chapter "Center Console Insert, Removing and Installing".
- Multimedia System Control Head -E380- equipment level removing and Installing. Refer to → Communication; Rep. Gr.91; Infotainment System; Multimedia System Control Head E380, Removing and Installing.
8 - Bracket
- Quantity: 6
- Install on the center console insert
Overview - Center Console, Center Console Rear Trim
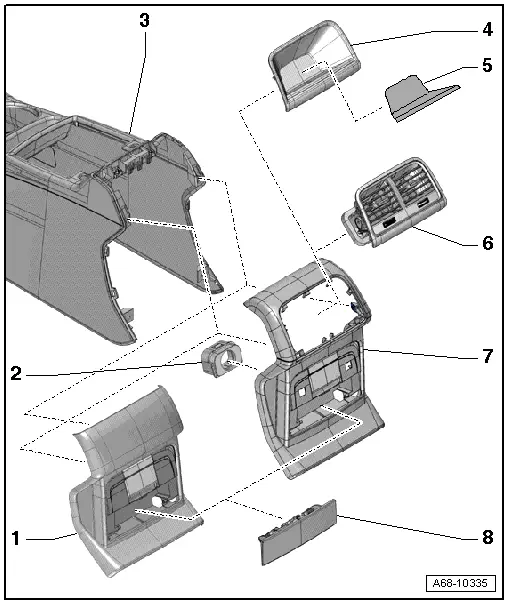
1 - Rear Trim
- For the center console
- Vehicles without a center armrest
- Removing and installing. Refer to → Chapter "Center Console Rear Trim without Center Armrest, Removing and Installing".
2 - Mount
- for the 12V socket
- Vehicles with a 12 V outlet removing and installing. Refer to → Electrical Equipment;
3 - Center Console
- Equipment levels
- Removing and installing. Refer to → Chapter "Center Console, Removing and Installing".
4 - Rear Storage Compartment
- Equipment levels
- Removing and installing. Refer to → Chapter "Center Console Rear Storage Compartment, Removing and Installing".
5 - Liner
6 - Rear Vent
- Equipment levels
- Removing and installing. Refer to → Chapter "Rear Center Console Air Vent, Removing and Installing".
7 - Rear Trim
- For the center console
- Vehicles with a center armrest
- Removing and installing. Refer to → Chapter "Rear Center Console Trim with a Center Armrest, Removing and Installing".
Overview - Center Console, Cupholder
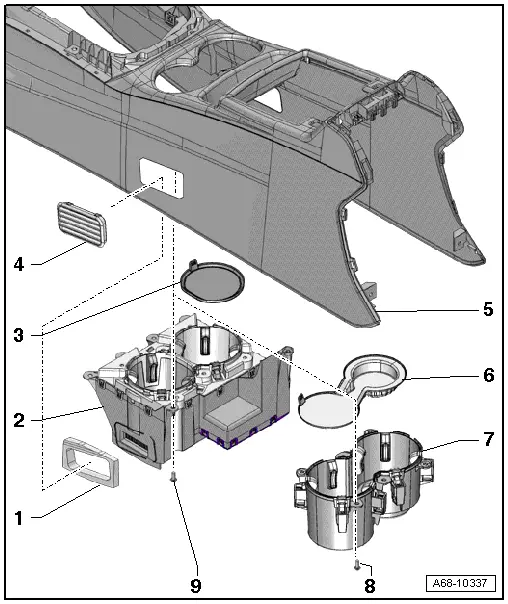
1 - Seal
- Equipment levels
- Quantity: 2
2 - Cupholder with Heating and Cooling Element -Z105-
- Equipment levels
- Removing and installing. Refer to → Chapter "Cupholder with Heating And Cooling Element -Z105-, Removing and Installing".
3 - Liner
4 - Air Vent Grille
- Equipment levels
- Quantity: 2
- Removing and installing. Refer to → Chapter "Air Vent Grille, Removing and Installing".
5 - Center Console
- Equipment levels
- Removing and installing. Refer to → Chapter "Center Console, Removing and Installing".
6 - Liner
7 - Cupholder
- Equipment levels
- Removing and installing. Refer to → Chapter "Cupholder, Removing and Installing".
8 - Bolt
- 1.4 Nm
- Quantity: 6
9 - Bolt
- 1.4 Nm
- Quantity: 12
Overview - Center Console Storage Compartment
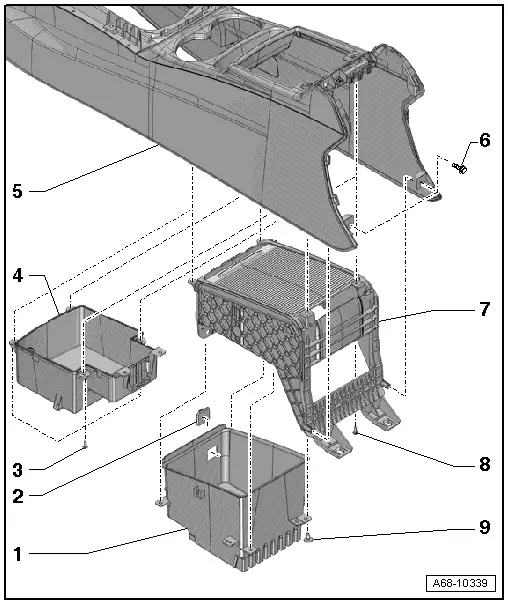
1 - Storage Compartment
- Vehicles without a center armrest
- Removing and installing. Refer to → Chapter "Center Console Masking Panel Compartment, Removing and Installing".
2 - Cover/AUX Connection
3 - Bolt
- 1.4 Nm
- Quantity: 4
4 - Storage Compartment
- Vehicles with a center armrest
- Removing and installing. Refer to → Chapter "Front Center Console Storage Compartment, Removing and Installing".
5 - Center Console
- Equipment levels
- Removing and installing. Refer to → Chapter "Center Console, Removing and Installing".
6 - Bolt
- 3 Nm
- Quantity: 2
7 - Masking Panel Compartment
- Vehicles without a center armrest
- Removing and installing. Refer to → Chapter "Center Console Masking Panel Compartment, Removing and Installing".
8 - Bolt
- 1.4 Nm
- Quantity: 4
9 - Bolt
- 1.4 Nm
- Quantity: 4
Center Console Rear Trim, Removing and Installing
Center Console Rear Trim without Center Armrest, Removing and Installing
Special tools and workshop equipment required
- Trim Removal Wedge -3409-
Removing
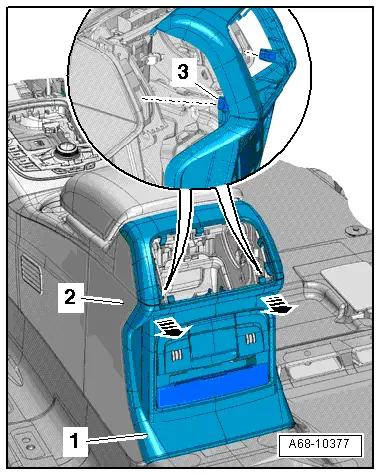
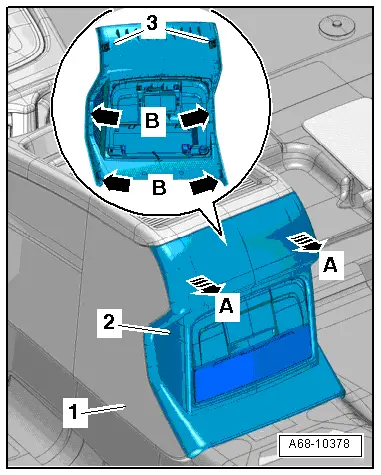
- Carefully unclip the centering pins -3- on the trim -2- from the center console -1--arrows- using the Trim Removal Wedge -3409-.
- Carefully unclip the tabs -B arrows- on the side using the Trim Removal Wedge -3409- and remove the trim.
- Disconnect the electrical connectors, if applicable.
Installing
- Insert the trim at the top, tilt it down and clip it in.
- Press the center console trim onto the center console until it engages audibly.
Rear Center Console Trim with a Center Armrest, Removing and Installing
Special tools and workshop equipment required
- Trim Removal Wedge -3409-
Removing
- Versions with a storage compartment: Remove the rear storage compartment in the center console. Refer to → Chapter "Center Console Rear Storage Compartment, Removing and Installing".
- Versions with a vent: Remove the rear vent. Refer to → Chapter "Rear Center Console Air Vent, Removing and Installing".
- Carefully unclip the centering pins -3- on the trim -1- from the center console -2--arrows- using the Trim Removal Wedge -3409-.
- Carefully unclip the tabs on the side using the Trim Removal Wedge -3409- and remove the trim.
- Disconnect the electrical connectors, if applicable.
Installing
Install in reverse order of removal. Note the following:
- Insert the trim at the bottom, tilt it upward and clip it in.
- Press the center console rear trim onto the center console until it engages audibly.
