Audi Q5: Door Lock, Removing and Installing
 Caution
There is a risk of malfunctions.
The door lock must be removed and installed together with the bracket to prevent overbending the cable when disengaging and engaging it.
The cable must be disconnected from/attached to the lever on the door lock outside of the door.
Removing
- Removing lock cylinder, refer to → Chapter "Overview - Lock Cylinder"
- Remove the door trim panel. Refer to → Body Interior; Rep. Gr.70; Front Door Trim Panels; Front Door Trim Panel, Removing and Installing.
- Remove the door cover, refer to → Chapter "Door Inner Cover, Removing and Installing".
- Remove the lock cylinder guide. Refer to → Chapter "Lock Cylinder Guide, Removing and Installing".
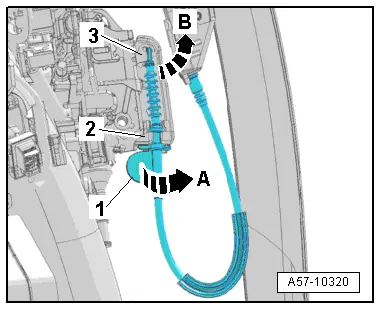
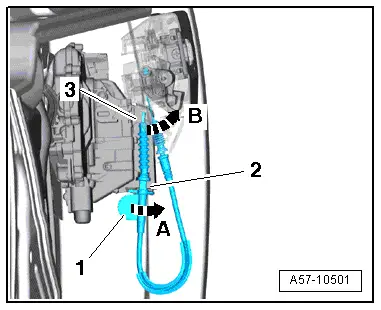
- Turn the actuating link on the lever -1- 90º in the direction of -arrow A- and remove it from the bracket -2-.
- Rotate the cable on the door lock release lever -3- in the direction of -arrow B-.
- The cable must be aligned with the opening on the release lever.
- Disengage the cable from the release lever.
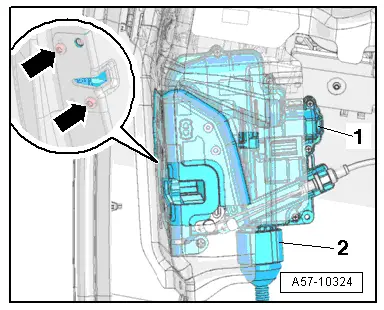
- Remove the bolts -arrows-.
- Remove the door lock -1- and disconnect the electrical connector -2-.
Installing
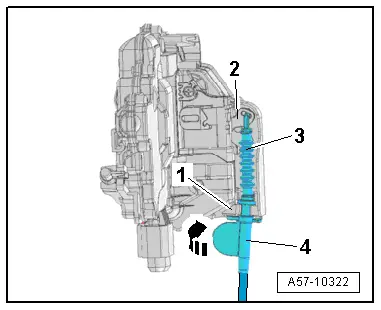
- Engage the actuating link -3- in the door lock operating lever -2-.
- Insert the actuating link in the bracket -1- and rotate the lever -4- 90º -arrow-.
- The lever must engage audibly with the locking tab on the bracket.
- Install the lock cylinder guide. Refer to → Chapter "Lock Cylinder Guide, Removing and Installing".
- Install the door cover, refer to → Chapter "Door Inner Cover, Removing and Installing".
- Install the door trim panel. Refer to → Body Interior; Rep. Gr.70; Front Door Trim Panels; Front Door Trim Panel, Removing and Installing.
- Install the lock cylinder. Refer to → Chapter "Overview - Lock Cylinder".
Bracket, Removing and Installing
 Caution
There is a risk of malfunctions.
The door lock must be removed and installed together with the bracket to prevent overbending the cable when disengaging and engaging it.
The cable must be disconnected from/attached to the lever on the door lock outside of the door.
Special tools and workshop equipment required
- Pry Lever -80 - 200-
Removing
- Remove the door trim panel. Refer to → Body Interior; Rep. Gr.70; Front Door Trim Panels; Front Door Trim Panel, Removing and Installing.
- Remove the inner door panel cover. Refer to → Chapter "Door Inner Cover, Removing and Installing".
- Remove the outside door handle. Refer to → Chapter "Door Handle, Removing and Installing".
- Remove the door lock cover.
- Disengage the electric wire on the mounting bracket -arrow- if applicable.
- Free up the electric wire spiral clip -1- using the Pry Lever -80 - 200-.
 Note
Note
Use a soapy solution if necessary make removal easier.
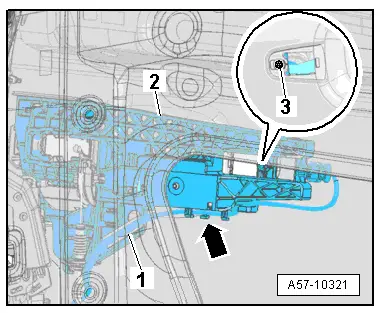
- Remove the bolt -3- and the mounting bracket -2-.
- Turn the actuating link on the lever -1- 90º in the direction of -arrow A- and remove it from the bracket -2-.
- Rotate the actuating link on the door lock operating lever -3- in the direction of -arrow B-.
- The cable must be aligned with the opening on the release lever.
- Disengage the cable from the release lever.
Installing
- Engage the actuating link -3- in the door lock operating lever -2-.
- Insert the actuating link in the bracket -1- and rotate the lever -4- 90º -arrow-.
- The lever must engage audibly with the locking tab on the bracket.
- Install the door lock cover, refer to → Chapter "Lock Cylinder Guide, Removing and Installing".
- Install the door cover, refer to → Chapter "Door Inner Cover, Removing and Installing".
- Install the door trim panel. Refer to → Body Interior; Rep. Gr.70; Front Door Trim Panels; Front Door Trim Panel, Removing and Installing.
- Install the exterior door handle. Refer to → Chapter "Door Handle, Removing and Installing".


