Audi Q5: Door Arrester, Removing and Installing
Removing
- Move the door window into the "closed" position.
- Remove the door trim panel. Refer to → Body Interior; Rep. Gr.70; Rear Door Trim Panels; Rear Door Trim Panel, Removing and Installing.
- Remove the lower speaker. Refer to → Communication; Rep. Gr.91; Sound System; Rear Midrange Speaker, Removing and Installing.
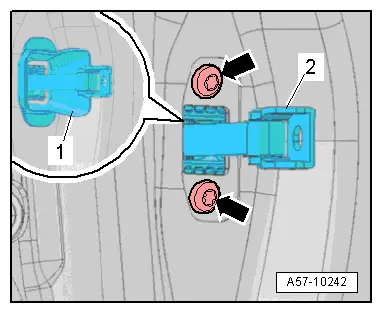
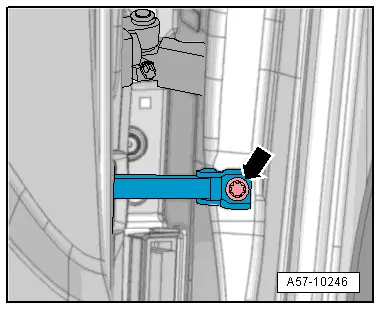
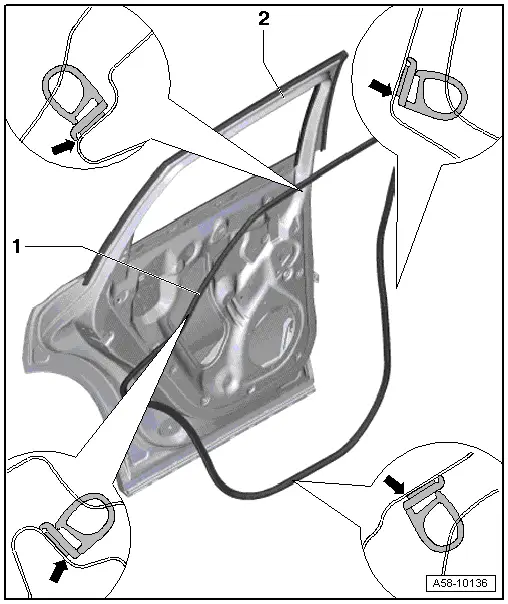
- Remove the door arrester bolt -arrow-.

- Remove the door arrester seal -1- on the door opening.
- Remove the bolt -arrows- and remove the door arrester -2- inward.
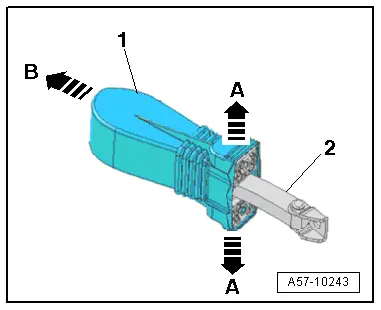
- Pull the rubber grommet -1- on the door arrester to the side slightly -A arrows-.
- Remove the rubber grommet from the door arrester -2--arrow B-.
Installing
- Tightening specification. Refer to -item 3-.
Install in reverse order of removal.
Inner Door Seal, Removing and Installing
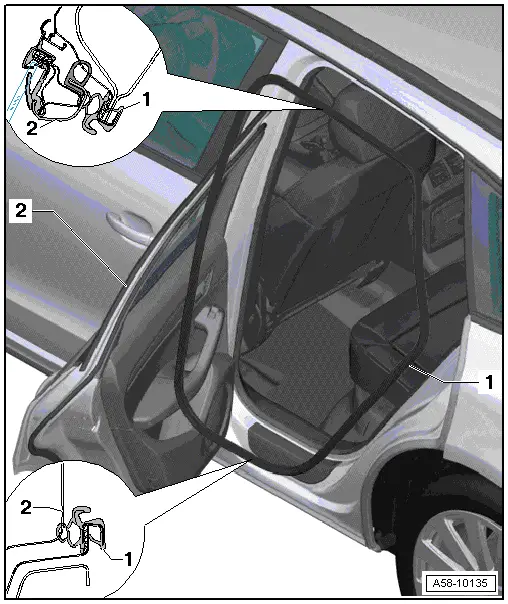
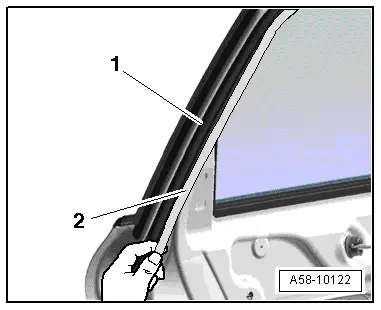
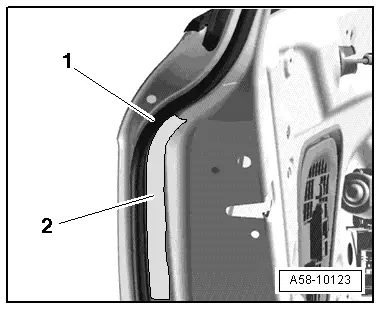
1 - Inner Door Seal
- Remove the upper and lower B-pillar trim panel and C-pillar trim panel. Refer to → Body Interior; Rep. Gr.70; Passenger Compartment Trim; Component Location Overview - Passenger Compartment Trim.
- Remove the rear roof grab handle. Refer to → Body Interior; Rep. Gr.68; Equipment; Roof Grab Handle, Removing and Installing.
- Remove the C-pillar trim panel. Refer to → Body Interior; Rep. Gr.70; Passenger Compartment Trim; C-Pillar Trim Panel, Removing and Installing.
- Connected all around on body flange
- To remove, remove from body flange.
- When installing, align the seal with the center of the vulcanized joint on the lower hinge and press it by hand onto the body flange.
2 - Door
Outer Door Seal, Removing and Installing
Special tools and workshop equipment required
- Roller -3356-
- Adhesive Strip Remover -VAS6349-
- Gauge - Gap Adjustment -3371-
- Front and Rear Door Template -T40038/8-
Outer Door Seal, Replacing
 Note
Note
- The vehicle and the outer door seal must be at room temperature.
- The door outer seal is completely bonded and can only be replaced.
- The adhesive surfaces must free of dust and grease. Clean with Cleaning Solution -D 009 401 04-.
- Apply Bonding Agent -D 355 205 A2- to the surface using the Applicator -D 009 500 25- and let it dry for 10 minutes.
- The water drain hole is found on the underside of the door if it was installed correctly.
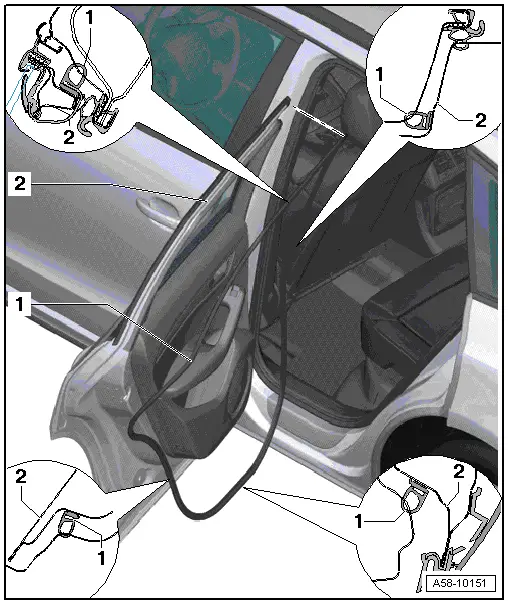
1 - Outer Door Seal
 Note
Note
- Before removing, mark the position on the door with tape.
- Make sure there is no adhesive left on the door, first pull the seal lengthwise and then pull it off the door.
- Removing
- Remove the window frame trim panel. Refer to → Body Interior; Rep. Gr.70; Rear Door Trim Panels; Overview - Rear Door Trim Panel.
- Slightly lift the seal at the top of the window frame and cut it with commercially available scissors.
- First pull the seal lengthwise, then remove it.
- Installing
- Clean the adhesive surface with Cleaning Solution - D 009 401 04- and remove adhesive residue with adhesive Strip Remover - VAS6349-, if necessary.
- Apply the Adhesive -D 355 205 A2- with Applicator -D 009 500 25-in the adhesion area and let it dry for 10 minutes.
- Loosen the door arrester on the body.
- Pull the door outer seal behind the door arrester.
- Secure the door arrester again.
- Secure the door outer seal to the top of the window frame on the left and on the right correctly with tape, refer to -2-.
- The water drain (2x) is in the correct position when it is found in the lower outer door seal on the underside of the door.
 Note
Note
It is necessary to press the door outer seal starting in the center and the working outward left and right in steps.
- Remove off the peel-off backing near the bottom of the door.
- Press the door outer seal starting in the center and working outward left and right.
- Continue to remove the peel-off backing little by little and press the door outer seal onto the door.
- Press the door outer seal upward along the A-pillar and B-pillar.
- Press the door outer seal along the window frame.
 Caution
- Do not stretch or crush the seal when installing it.
- The seal will come off wherever it is stretched or crushed along the bottom or on the A- or B-pillar.
- The door outer seal can be bent or crushed only in the are around the top of the window frame because window frame cover will hold it place.
- Press the end of the outer door seal on firmly, refer to -item 2- with a Roller - 3356-.
 Caution
Do not close the door for at least 2 hours to prevent loosening or moving the door outer seal. The vehicle must be at room temperature.
2 - Door
Door Arrester, Loosening
- Remove the door arrester bolt -arrow-.
- Pull the seal behind the door arrester and tighten the screw to the tightening specification, refer to -item 6-.
Mark the position of the door seal.
- Mark the location of the door outer seal and adhesive strips on the window frame...
- ... and to the door lock as illustrated.

Outer Door Seal, Removing
 Note
Note
Pulling the seal laterally will loosen the adhesive and then it is possible to remove the door outer seal from the window frame without any left over adhesive on it.
- Bend and remove the door outer seal laterally as illustrated -arrow-.
- Proceed the same way all around and remove the door outer seal completely.
- Remove any left over adhesive on the window frame with Adhesive Strip Remover -VAS6349-.
Mark the position of the door seal.

- Mark the position of the seal on the window frame with adhesive tape and ...

- ...around the door lock
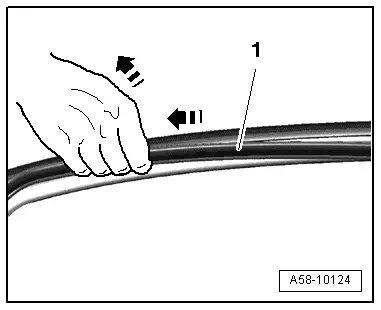
Seal, Removing
- Bend the seal -1- and then remove it from the door.
 Note
Note
By bending the seal, the adhesive will be loosened and then the seal can be removed free of any adhesive.
Door outer seal on a new door
 Note
Note
- The seal must be pressed over the complete radius (inner and outer) as illustrated -arrows-.
- To make it easier to install, mark these positions and then press the seal on.
- Adhesive surfaces on the inner and outer radius.
1 - Outer Door Seal
- Install as described earlier after making the marking the specified distances.
- Starting from the lower rear edge of the door toward the front lower door edge, mount the outer door seal with the rear edge on the inner radius run-out, as illustrated.
- The front edge of the seal must be placed on the run-out of the outer radius at the bottom of the door up to the imprint.
- Press the entire seal on firmly with a Roller - 3356-, refer to -item 2-.
2 - Door
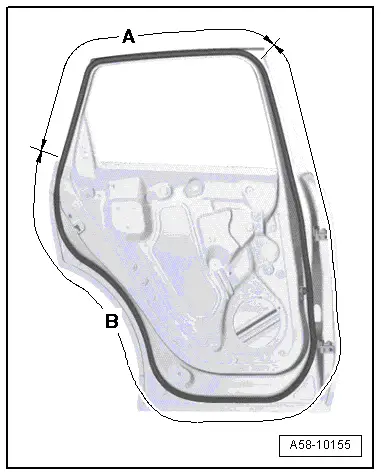
Adhesion Area on the Outer Door Seal
- The front edge of the seal must be placed on the run-out of the outer radius in area -A- starting from approximately the window shaft strip over the window frame and up to the "B-pillar", as illustrated.
- The rear edge of the seal must be mounted and pressed onto the run-out of the inner radius in area -B-.
Outer Door Seal, Installing
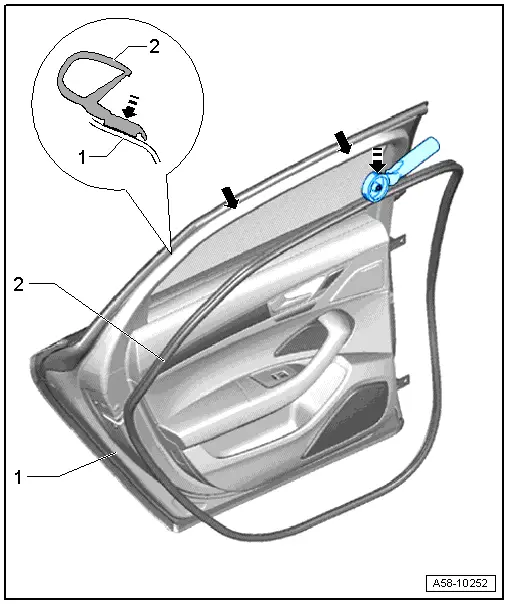
1 - Rear Door
2 - Outer Door Seal
- Tape the door outer seal to the top of the window frame first -arrows-.
 Caution
Use only a Roller - 3356- to press the seal firmly at the seal base.
- Fold up the door outer seal as illustrated and then press it on firmly at the seal base all the way around with a Roller -3356-.

