Audi Q5: Front Center Armrest
Overview - Front Center Armrest
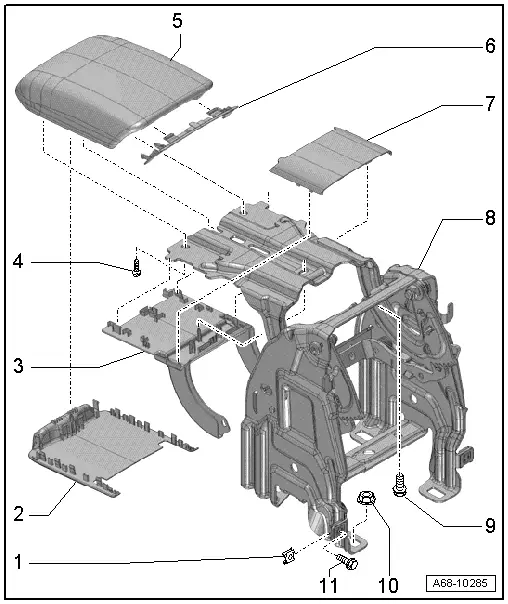
1 - Spring Nut
- Quantity: 2
2 - Cover
- Clipped with -item 5-
3 - Lower Trim
- For the hinge arm
- Clipped with -item 7- and -item 8-
- Removing and installing. Refer to → Chapter "Hinge Arm Trim, Removing and Installing".
4 - Bolt
- 2.2 Nm
- Quantity: 2
5 - Padding
- For the center armrest
- Removing and installing. Refer to → Chapter "Center Armrest Upper Section, Removing and Installing".
6 - Trim
7 - Upper Trim
- For the hinge arm
- Clipped with -item 3-
- Removing and installing. Refer to → Chapter "Hinge Arm Trim, Removing and Installing".
8 - Support Base
- Removing and installing. Refer to → Chapter "Front Center Armrest, Removing and Installing".
9 - Bolt
- 3 Nm
- Quantity: 2
10 - Nut
- 20 Nm
- Quantity: 4
11 - Bolt
- 3 Nm
- Quantity: 2
Front Center Armrest, Removing and Installing
Removing
- Rear the trim from the rear center console. Refer to → Chapter "Rear Center Console Trim with a Center Armrest, Removing and Installing".
- Versions with a vent: Remove the air guide for the rear vent. Refer to → Heating, Ventilation and Air Conditioning; Rep. Gr.87; Air Guide; Overview - Air Routing and Air Distribution in Passenger Compartment.
- Vehicles with AUX connection: disconnect the AUX connection connector on the bracket.
- Versions with a telephone/cellular phone: Free up the electrical connectors on the bracket.
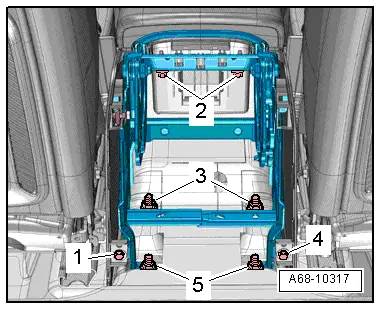
- Remove the bolts -1, 2 and 4-.
- Remove the nuts -3- and -5-.
- Disengage the top of the center console on the armrest support base by lifting the center console.
- Pull the armrest support base upward, guide it over the threaded pins and remove it toward the back.
Installing
Install in reverse order of removal.
Center Armrest Upper Section, Removing and Installing
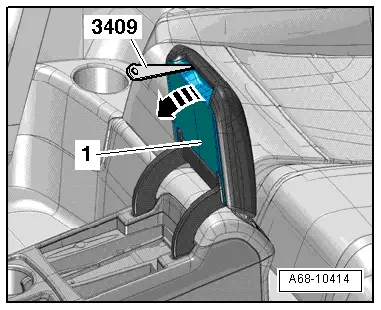
Special tools and workshop equipment required
- Trim Removal Wedge -3409-
Removing
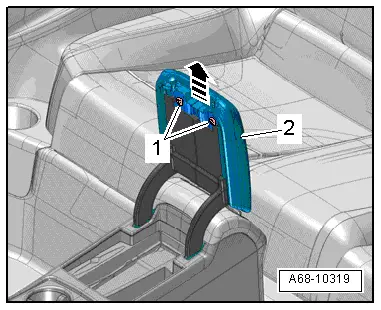
- Carefully unclip the cover -1- from the upholstery -arrow- using the Trim Removal Wedge -3409-.
- Remove the bolts -1- and the upholstery -2- upward from the hinge arm -arrow-.
Installing
Install in reverse order of removal. Note the following:
- Engage the upholstery on the hinge arm and tighten the bolts.
- Press the cover on until it engages audibly.
Hinge Arm Trim, Removing and Installing
Removing
- Remove the front center armrest upholstery. Refer to → Chapter "Center Armrest Upper Section, Removing and Installing".
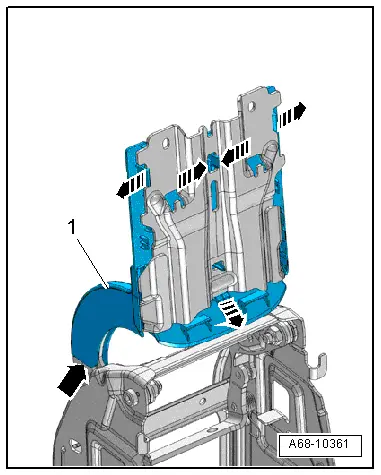
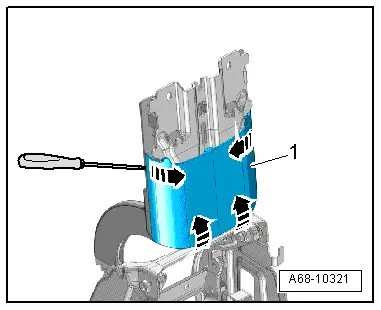
- Carefully unclip the upper trim -1- from the hinge arm and from the lower trim -arrows- using a small screwdriver.
- Rear the trim from the rear center console. Refer to → Chapter "Rear Center Console Trim with a Center Armrest, Removing and Installing".
- Fold of the front center armrest.
 Note
Note
The illustration shows the front center armrest removed.
- Unclip the lower trim -1- from the front center armrest hinge arm -arrows- using a screwdriver.
Installing
Install in reverse order of removal. Note the following:
- Press the covers on until they engage audibly.