Audi Q5: Bench Seat/Single Seats, Component Locations Overview
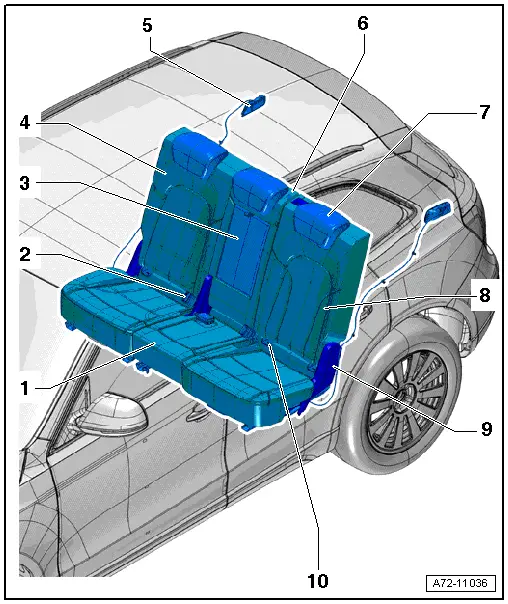
1 - Bench Seat
- Overview. Refer to → Chapter "Overview - Seat Bench/Single Seat".
Vehicles with:
- Seat heating
2 - Rear Seat Belt Latch
- Overview. Refer to → Chapter "Overview - Rear Seat Belt Latch".
3 - Pass-Through Door
- Equipment levels
- Overview. Refer to → Chapter "Overview - Center Armrest".
4 - Rear Seat, One Third, Right
- Rear Seat Assembly Overview. Refer to → Chapter "Overview - Seat Bench/Single Seat"
- Rear Seat Backrest Assembly Overview. Refer to → Chapter "Overview - Rear Seat Backrest"
Vehicles with:
- Seat forward/back adjuster
- Seat and backrest heating
- LATCH child seat anchorage
5 - Backrest Release
- Overview. Refer to → Chapter "Overview - Retainer".
6 - Rear Center Armrest
- Overview. Refer to → Chapter "Overview - Center Armrest".
7 - Headrest
- Overview. Refer to → Chapter "Headrest and Headrest Guide Assembly Overview".
8 - Left 2/3 Rear Seat
- Rear Seat Assembly Overview. Refer to → Chapter "Overview - Seat Bench/Single Seat"
- Rear Seat Backrest Assembly Overview. Refer to → Chapter "Overview - Rear Seat Backrest"
Vehicles with:
- Seat forward/back adjuster
- Pass-through door
- Seat and backrest heating
- LATCH child seat anchorage
9 - Cover
- For the rear seat backrest
- Overview. Refer to → Chapter "Overview - Rear Seat Backrest".
10 - LATCH Child Seat Anchorage
- Overview. Refer to → Chapter "Overview - Rear Child Seat Anchors".
- Welded to the seat frame For replacing the child seat anchor, removing and installing the seat frame
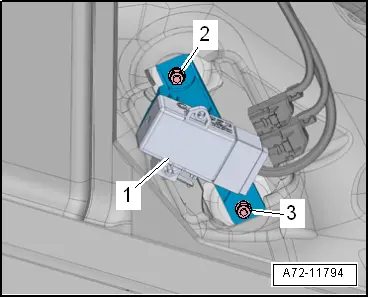
Seat Heating Control Module -J882-
- Installation location: inside the luggage compartment on the right side behind the luggage compartment side trim panel.
- Tighten the nuts -2 and 3- to 3 Nm.
Overview - Seat Bench/Single Seat
 Note
Note
In the illustration is 2/3 left rear seat is shown.
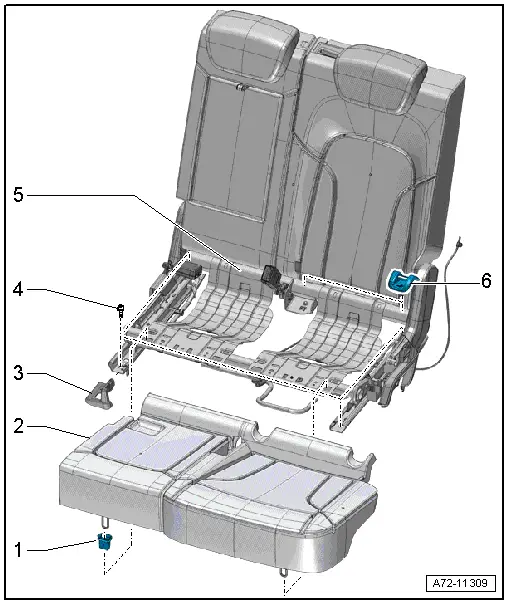
1 - Mounting Grommet
- Quantity: 2
- For securing bench seat
- Clipped into the seat frame
 Caution
The mounting grommets must be replaced each time the bench seat is removed.
- Removing and installing.
2 - Bench Seat
- Removing and installing. Refer to → Chapter "Seat Bench/Single Seat, Removing and Installing".
3 - Cover
- For the seat rail
- Vehicle equipment level or depending on the version
- Removing with the seat removed, refer to → Fig. "Seat Rail Cover"
4 - Bolt
- 50 Nm
- Quantity: 4
- Tightening sequence
5 - Rear Seat
- Removing and installing. Refer to → Chapter "Rear Seat, Removing and Installing".
6 - Cover
- For the LATCH child seat anchorage
- Equipment levels
- Quantity: 2
- Clipped to the LATCH child seat anchorage brackets that are welded to the seat frame
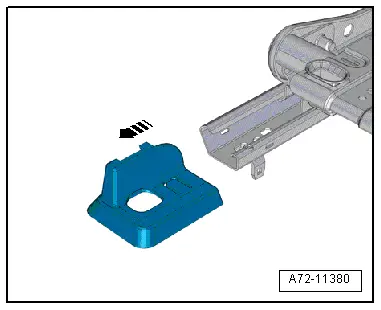
Seat Rail Cover
- Remove the seat rail cover -arrow-.
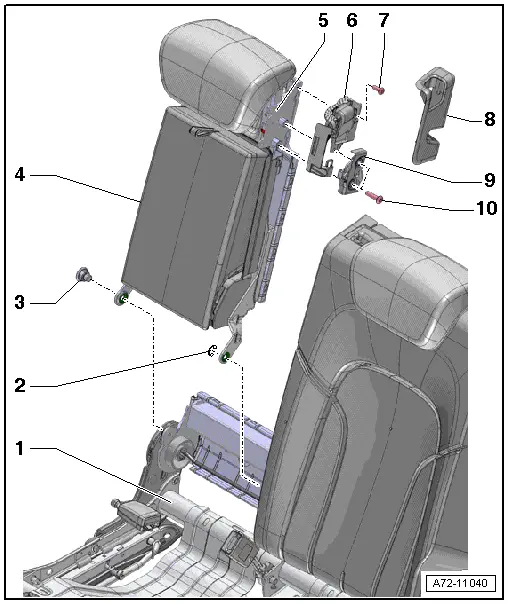
Overview - Retainer
 Note
Note
In the illustration is 2/3 left rear seat is shown.
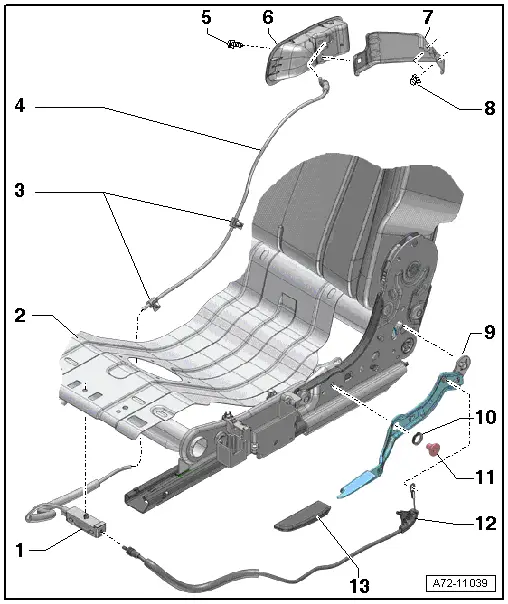
1 - Connector Station
- For the upper and lower cable
- Clipped to the seat frame
2 - Rear Seat
3 - Bracket
- For the upper cable
- Quantity: 4
4 - Upper Cable
- For the backrest release
- Removing and installing. Refer to → Chapter "Upper Cable, Removing and Installing".
5 - Bolt
- 1.5 Nm
6 - Actuator
- For the backrest release
- Removing and installing. Refer to → Chapter "Backrest lock Adjustment Actuator, Removing and Installing".
7 - Bracket
- For the actuator
- Removing and installing. Refer to → Chapter "Actuator Bracket, Removing and Installing".
8 - Nut
- 3 Nm
- Quantity: 2
9 - Release Handle
- Removing and installing. Refer to → Chapter "Locking Lever, Removing and Installing".
10 - Washer
11 - Bolt
- 18 Nm
- Install with locking compound. For the correct locking compound, refer to the Parts Catalog.
12 - Lower Cable
- For the backrest release
- Removing and installing. Refer to → Chapter "Lower Cable, Removing and Installing".
13 - Backrest Release Handle
- Removing and installing. Refer to → Chapter "Locking Handel, Removing and Installing".
Headrest and Headrest Guide Assembly Overview
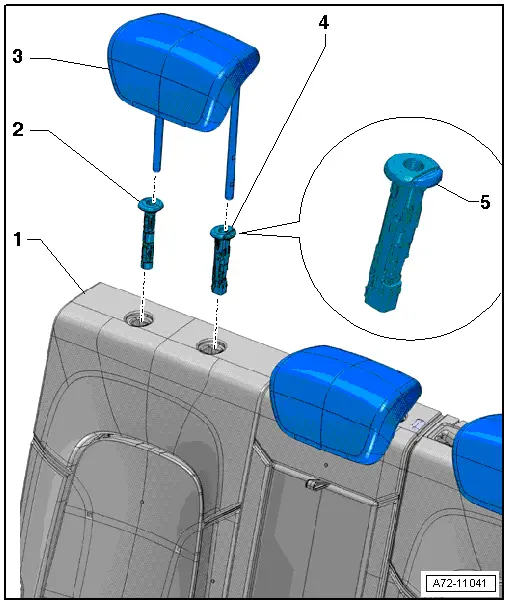
1 - Rear Seat Backrest
2 - Headrest Guide
- Always installed on the right
- Cannot be removed without damaging it
- Removing and installing. Refer to → Chapter "Headrest Guide, Removing and Installing".
3 - Headrest
- Removing and installing. Refer to → Chapter "Headrest, Removing and Installing".
4 - Headrest Guide
- With the headrest height adjustment button -5-
- Always installed on the left
- Cannot be removed without damaging it
- Removing and installing. Refer to → Chapter "Headrest Guide, Removing and Installing".
5 - Button
- For the headrest height adjustment
Overview - Rear Seat Backrest
 Note
Note
In the illustration is 2/3 left rear seat is shown.
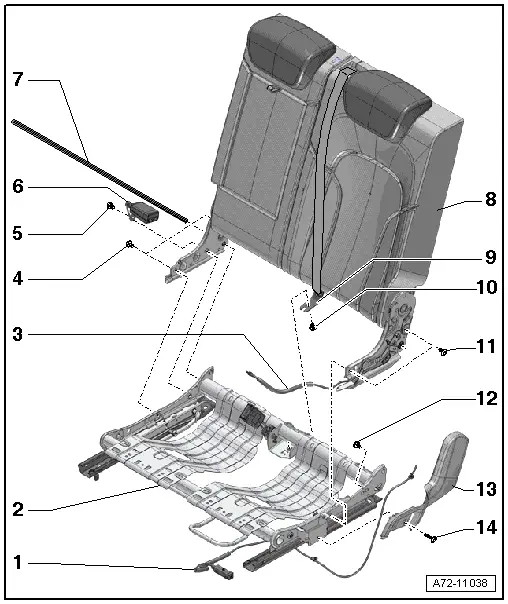
1 - Upper Cable
- For the backrest release
- Removing and installing. Refer to → Chapter "Upper Cable, Removing and Installing".
2 - Seat Frame
- Removing and installing. Refer to → Chapter "Rear Seat Backrest, Removing and Installing".
3 - Lower Cable
- For the backrest release
- Removing and installing. Refer to → Chapter "Lower Cable, Removing and Installing".
4 - Bolt
- 36 Nm
- Quantity: 2
5 - Bolt
- Tightening specification. Refer to → Chapter "Overview - Rear Seat Belt Latch".
6 - Rear Center Belt Latch
- Removing and installing. Refer to → Chapter "Rear Seat Belt Latch in Center Seating Position, Removing and Installing".
7 - Shaft
- Removing and installing. Refer to → Chapter "Rear Seat Backrest, Removing and Installing".
8 - Rear Seat Backrest
- Removing and installing. Refer to → Chapter "Rear Seat Backrest, Removing and Installing".
9 - Rear Center Belt Anchor
- Removing and installing. Refer to → Chapter "Rear Seat Belt Anchor in Center Seating Position, Removing and Installing".
10 - Bolt
- Tightening specification → Chapter "Overview - Rear Center Three-Point Seat Belt".
11 - Bolt
- 36 Nm
- Quantity: 2
12 - Bolt
- 36 Nm
13 - Cover
- For the rear seat backrest
- Removing and installing. Refer to → Chapter "Outer Cover, Removing and Installing".
14 - Bolt
- 3.8 Nm
Overview - Pass-Through Door
1 - Rear Seat
- Two Thirds, Left
2 - Lock Washer
3 - Bolt
- 18 Nm
- Self-locking
- Always replace if removed
- Clean the threaded hole with a thread tap.
4 - Center Armrest
- Overview. Refer to → Chapter "Overview - Center Armrest".
- Removing and installing. Refer to → Chapter "Center Armrest, Removing and Installing".
5 - Pass-Through Door
- Removing and installing. Refer to → Chapter "Pass-Through Cover, Removing and Installing".
6 - Release
- For the pass-through door
- Removing and installing. Refer to → Chapter "Pass-Through Door Lock, Removing and Installing".
7 - Bolt
- 3.8 Nm
- Quantity: 4
8 - Trim
- For the lock
- Removing and installing. Refer to → Chapter "Pass-Through Door Lock, Removing and Installing".
9 - Lock
- For the pass-through door
- Removing and installing. Refer to → Chapter "Pass-Through Door Lock, Removing and Installing".
10 - Bolt
- 22 Nm
- Quantity: 2
Overview - Center Armrest
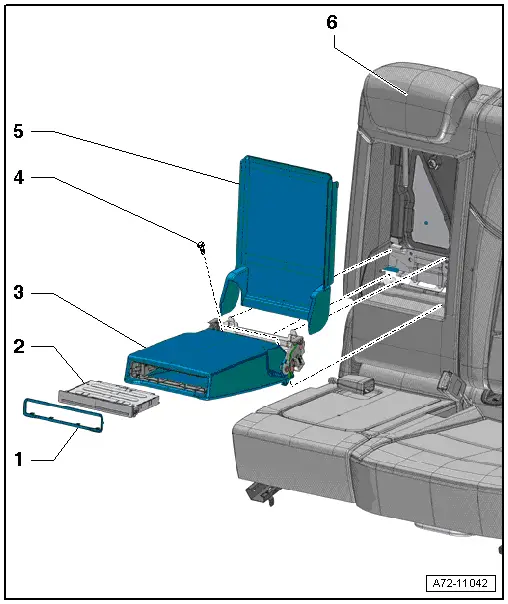
1 - Trim
- For the cupholder
- Removing and installing. Refer to → Chapter "Cupholder Trim, Removing and Installing".
2 - Cupholder
- Removing and installing. Refer to → Chapter "Cupholder, Removing and Installing".
3 - Rear Center Armrest
- Removing and installing. Refer to → Chapter "Center Armrest, Removing and Installing".
4 - Bolt
- 9 Nm
- Quantity: 2
5 - Trim panel
- For the center armrest
- Removing and installing. Refer to → Chapter "Center Armrest Trim, Removing and Installing".
6 - Center Armrest/Pass-Through Door

