Audi Q5: Seat Bench/Single Seat, Removing and Installing
Removing
- Remove the covers on the LATCH child seat anchorages. Refer to → Chapter "Rear Child Seat Anchor, Removing and Installing, LATCH".
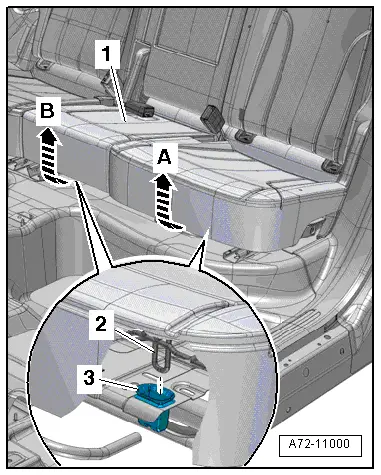
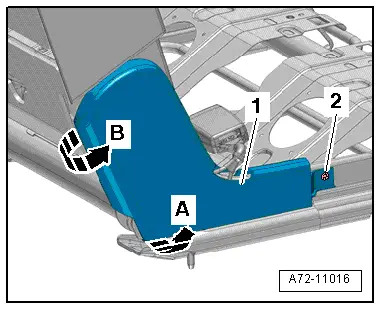
- Reach under the seat frame with both hands on one side of the seat bench.
- Pull the bench seat -1- up forcefully with both hands -arrow A- so the wire hooks -2- on the bench seat disengage from the mounting grommet -3-.
- Repeat the procedure on the opposite side -arrow B-.
- Versions with heated seats: Disconnect the seat heating electrical connector.
- Remove the bench seat from vehicle.
Installing
 Caution
Replace the mounting grommets each time the bench seat is removed.
- Remove the mountings -5- from the seat frame.
- Check the seat frame near the mounting plates for any deformation, and align it, if necessary.
- Press the mounting plates onto the seat frame until you hear them click into place.
Install in reverse order of removal. Note the following:
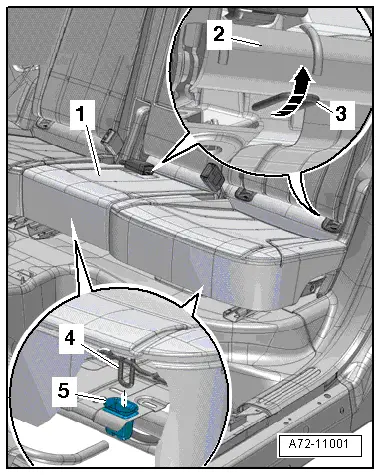
- Install the seat bench while installing the rear wire hook -3- under the seat frame -2--arrow-.
- Press the front wire hook -4- into the mounting -5- on the seat frame until it audibly engages.
 Note
Note
Make sure the seat heating electrical collections slide on and engage audibly.
Rear Seat, Removing and Installing
Removing
- Remove the bench seat. Refer to → Chapter "Seat Bench/Single Seat, Removing and Installing".
- Vehicles with seat forward/back adjustment: move the rear seat all the way to the rear.
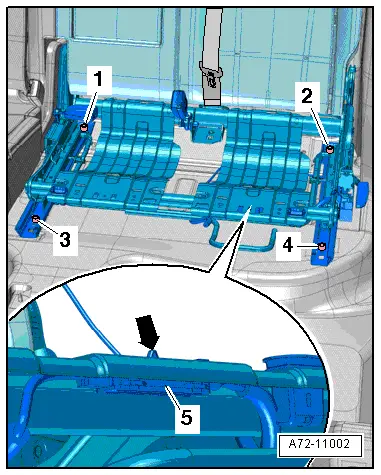
Left 2/3 Rear Seat:
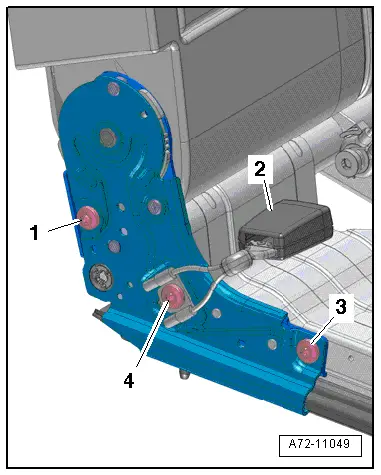
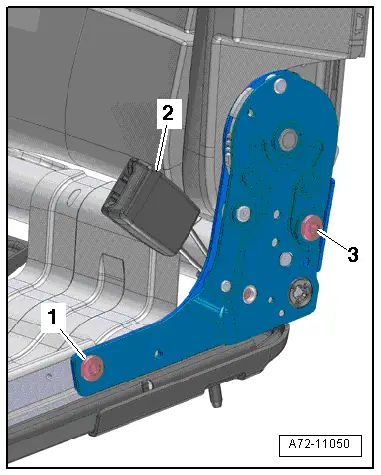
- Remove bolts -1, 2, 3 and 4-.
- Unclip the cable coupling station -5- on the seat frame -arrow-, open the cover and disconnect the cable.
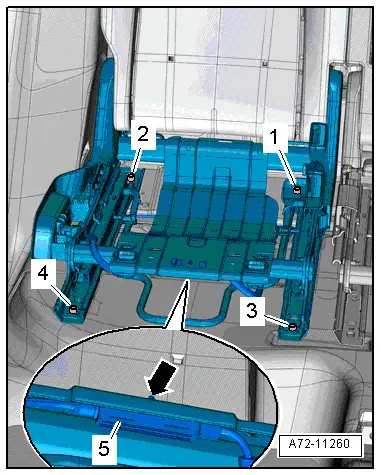
Right 1/3 Rear Seat:
- Remove bolts -1, 2, 3 and 4-.
- Unclip the cable coupling station -5- on the seat frame -arrow-, open the cover and disconnect the cable.

Continued for both sides:
- Versions with heated seats: Free up the connector on the seat frame for the seat heating.
- Fold the rear seat backrest forward and, with a second technician, lift the rear seat out of the vehicle.
Installing
Install in reverse order of removal. Note the following:
Left 2/3 Rear Seat:
- Tighten the bolts in the following sequence -1, 2, 3 and 4-.

Right 1/3 Rear Seat:
- Tighten the bolts in the following sequence -1, 2, 3 and 4-.
Continued for both sides:
- Attach the cable and clip the coupling station to the seat frame.
Headrest, Removing and Installing
 Note
Note
- There are two different versions for the headrest release on the outside rear headrests. These two different versions are what makes removing the headrests different. Check to make sure which version you are working in and proceed accordingly.
- The Gauge - Gap Adjustment -3371- is required for version 2 only.
- The center headrest is always removed according to Version 1.
Special tools and workshop equipment required
- Gauge - Gap Adjustment -3371-
Version 1, Removing
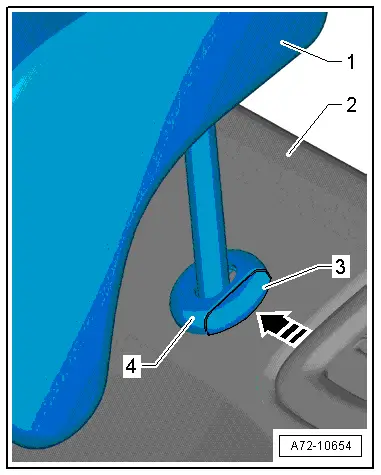
- Press the button -3- for the headrest height adjustment -4- in direction of -arrow- and pull it -1- upward and out of the backrest -2-.

Removing version 2
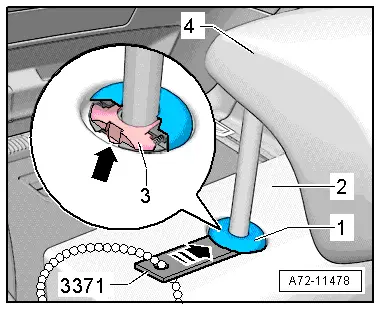
- Press the button -3- for the head restraint height adjustment -2- in direction of -arrow- and pull the head restraint -1- out of the backrest -2- until it stops.
 Note
Note
The release -3- is always positioned in the direction of travel. and on the right headrest guides on the right-hand side.
- Insert the Gauge - Gap Adjustment -3371- that has a 2 mm thickness between the headrest guide -1- and the cover -2-; then press the release -3- in direction of -arrow-. At the same time, pull the headrests -4- upward and out of the rear seat backrest.
Installing both versions
- Slide the headrest into the backrest as far as the bottom position.
- Check if the headrest locks correctly.
- It must not be possible to pull the headrest back out of the backrest.
Headrest Guide, Removing and Installing
Special tools and workshop equipment required
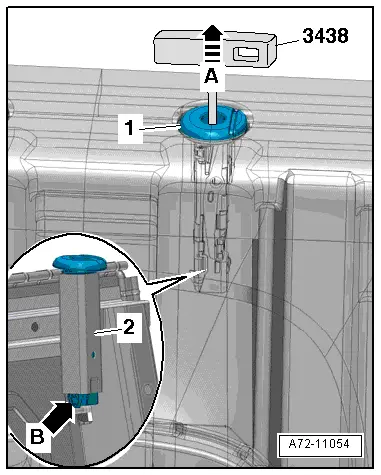
- T-Handle Hook -3438-
Removing
- Remove the headrests. Refer to → Chapter "Headrest, Removing and Installing".
- Insert the T-Handle Hook -3438- into the headrest guide -1- and engage the hook on the tab -arrow B-.
- The hook must point to the right.
- Pull the headrest guide upward and out of the mount -2--arrow A-.
Installing
- The headrest guide can only be inserted in one position.
- Install headrest guide with button at left.
- Make sure the headrest guide is installed correctly.
Outer Cover, Removing and Installing
Removing
- Remove the rear seat. Refer to → Chapter "Rear Seat, Removing and Installing".
- Release the rear seat backrest and tilt it forward slightly (do not fold it all the way down).
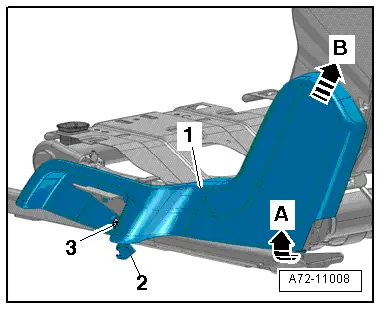
- Remove the screw on the cover -3-.
- Open the lower latch -2- on the cover.
- Open the hooks on the lower cover with a screwdriver and disengage them from the rear seat backrest -arrow A-.
- Remove the cover -1- from the backrest in direction of -arrow B-.
Installing
Install in reverse order of removal.
Inner Cover, Removing and Installing
Removing
- Remove the rear seat. Refer to → Chapter "Rear Seat, Removing and Installing".
- Remove the bolt -2-.
- Open the hooks on the lower cover with a screwdriver and disengage them from the rear seat backrest -arrow A-.
- Disengage the upper cover -1- from the backrest and remove in direction of -arrow B-.
Installing
Install in reverse order of removal.
Rear Seat Backrest, Removing and Installing
Removing
- Remove the rear seat. Refer to → Chapter "Rear Seat, Removing and Installing".
- Remove the outer cover on the rear seat backrest. Refer to → Chapter "Outer Cover, Removing and Installing".
- Remove the inner cover on the rear seat backrest. Refer to → Chapter "Inner Cover, Removing and Installing".
- Remove the center rear belt end fitting. Refer to → Chapter "Rear Seat Belt Anchor in Center Seating Position, Removing and Installing".
- Versions with backrest heating: Disconnect the backrest heating electrical connector.
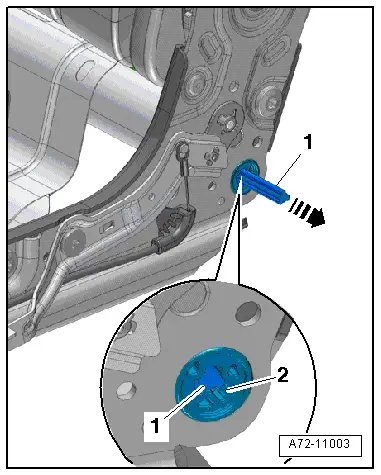
- Remove the shaft -1- by opening the tab -2- pushing the shaft on the other side with a screwdriver -arrow-.
- Remove the backrest screws -1, 2 and 3- on the outside of the rear seat.
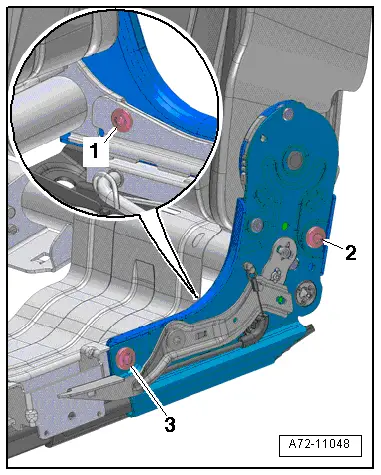
- Remove the screw on the inside of the rear seat -4- and remove the rear center belt latch -2-.
- Remove the rear seat backrest screws -1 and 3-.
Rear seat backrest, one third, right:
- Remove the rear outer belt latch on the inside of the rear seat -2-. Refer to → Chapter "Outer Rear Belt Latch, Removing and Installing".
- Remove the rear seat backrest screws -1 and 3-.
Continued for both sides:
- Disengage the lower cable on the seat frame and remove the backrest.
Installing
Install in reverse order of removal. Note the following:
- Install the rear center belt latch. Refer to → Chapter "Rear Seat Belt Latch in Center Seating Position, Removing and Installing".
- Install the rear outer belt latch. Refer to → Chapter "Outer Rear Belt Latch, Removing and Installing".

