Audi Q5: Backrest Cover and Cushion, Removing and Installing
Backrest Cover and Upholstery, Removing and Installing, Standard, Comfort, Sport Seat
Special tools and workshop equipment required
- Pry Lever -80 - 200-
- Backrest Panel Tool -3370-
- Drill for vehicles equipped with a DVD player
- Eye protection for vehicles equipped with a DVD player
- 12 mm drill diameter for vehicles equipped with a DVD player
Removing
 WARNING
- Follow all Safety Precautions when working with pyrotechnic components. Refer to → Chapter "Pyrotechnic Components Safety Precautions".
- Before handling pyrotechnic components (for example, disconnecting the connector), the person handling it must "discharge static electricity". This can be done by touching the door striker, for example.
- Remove the front seat. Refer to → Chapter "Front Seat, Removing and Installing".
- Attach the front seat to the Engine/Transmission Holder - Seat Repair Fixture -VAS6136-. Refer to → Chapter "Front Seat, Mounting on Fixture for Seat Repair".
Vehicles equipped with a mount for a DVD player:
- DVD player removed.
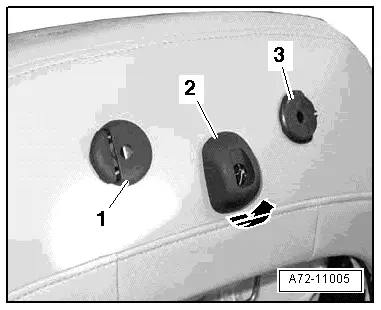
- Unclip the trim -2- for the connector -arrow-.
 WARNING
Danger of eye injury.
Wear protective eyewear.
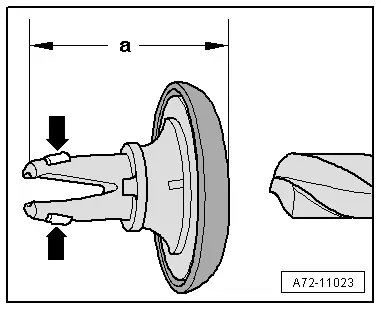
- Drill out the guides -1- and -3- for the DVD player using a 12 mm diameter drill.

 Caution
Danger of destroying the backrest cover and cushion.
- The guides are held in the backrest frame by the retaining tabs -arrows-.
- When removing, drill out only up to dimension -a- = 35 mm.
Continuation for all vehicles:
- Remove the backrest cover. Refer to → Chapter "Backrest Cover, Removing and Installing".
- Remove the headrests. Refer to → Chapter "Headrest, Removing and Installing".
- Remove the front seat backrest. Refer to → Chapter "Front Backrest, Removing And Installing, Standard Seat/Comfort Seat/Sport Seat".
- Vehicles with Comfort seat: disconnect the fan connectors.
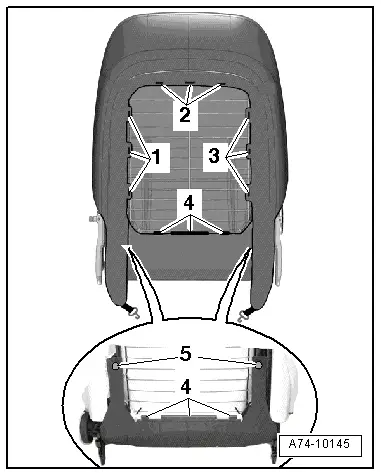
- Disengage the rear fastening strips -1, 2, 3 and 4- on the backrest frame using the Backrest Panel Tool -3370-.
- Unclip the clips -5- from the backrest frame using the Pry Lever -80 - 200-.
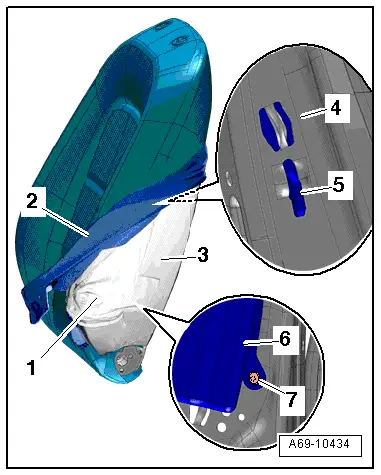
- Remove the padding from the front backrest until the side airbag bolt -7- is accessible ; to do this carefully pull off the cover -2- and the padding -3- in the area around the side airbag.
- Remove the bolt -7-.
- Release the side airbag -6- and the hook -5- from the backrest frame -4- and leave it in the pocket sewn into the cover -1-.
- Remove the cover and cushion from the backrest frame while guiding the side airbag wiring harness.

Installing
 WARNING
- Follow all Safety Precautions when working with pyrotechnic components. Refer to → Chapter "Pyrotechnic Components Safety Precautions".
- Before handling pyrotechnic components (for example, connecting the connector), the person handling it must "discharge static electricity". This can be done by touching the door striker, for example.
Install in reverse order of removal. Note the following:
- Install the side airbag. Refer to → Chapter "Front Side Airbag with Igniter, Removing and Installing".
- Make sure the retaining strips engage correctly and the cover is not wrinkled.
Vehicles equipped with a mount for a DVD player:
- The guide mounts -1- and -3- on the backrest must free of contaminants.
- Align the backrest cover and install the guides into the mounts.
- The guides -1- and -3- can be installed in only one position.
- The release buttons must face outside.
- Install the trim -2-.
- The trim can be installed in only one position.

 Note
Note
Ignore -arrow-.
Continuation for all vehicles:
 Note
Note
Make sure the connectors are installed correctly and are secure.
 WARNING
Ignition must be on when connecting battery. If pyrotechnic components (for example, airbag, belt tensioner) are not repaired correctly, they may deploy unintentionally after connecting battery. There must not be anyone inside the vehicle when connecting the battery.
 DANGER!
When working on vehicles with the ignition already switched on or that are ready to drive there is a danger of the engine starting unexpectedly and of being poisoned by gas in enclosed areas. Risk of body parts and/or clothing being clamped or pulled.
Perform the following before switching on the ignition:
- Move the selector lever into P.
- Activate the parking brake
- Turn off the ignition.
- Open the hood
- Connect Battery Charger -VAS5095A- to the battery jump start terminal.
- Turn on the ignition.
- Connect the battery ground cable with the ignition turned on. Refer to → Electrical Equipment; Rep. Gr.27; Battery; Battery, Disconnecting and Connecting.
 Note
Note
If the Airbag Indicator Lamp -K75- indicates a fault, check the DTC memory, erase it and check it again. Refer to Vehicle Diagnostic Tester .
Backrest Cover and Cushion, Removing and Installing, Folding Seat
Special tools and workshop equipment required
- Drill for vehicles equipped with a DVD player
- Eye protection for vehicles equipped with a DVD player
- 12 mm drill diameter for vehicles equipped with a DVD player
Removing
 WARNING
- Follow all Safety Precautions when working with pyrotechnic components. Refer to → Chapter "Pyrotechnic Components Safety Precautions".
- Before handling pyrotechnic components (for example, disconnecting the connector), the person handling it must "discharge static electricity". This can be done by touching the door striker, for example.
- Remove the passenger folding seat. Refer to → Chapter "Front Seat, Removing and Installing, Manual".
- Attach front folding seat to the Engine/Transmission Holder - Seat Repair Fixture -VAS6136-. Refer to → Chapter "Front Seat, Mounting on Fixture for Seat Repair".
Vehicles equipped with a mount for a DVD player:
- DVD player removed.
- Unclip the trim -2- for the connector -arrow-.
 WARNING
Danger of eye injury.
Wear protective eyewear.
- Drill out the guides -1- and -3- for the DVD player using a 12 mm diameter drill.

 Caution
Danger of destroying the backrest cover and cushion.
- The guides are held in the backrest frame by the retaining tabs -arrows-.
- When removing, drill out only up to dimension -a- = 35 mm.

Continuation for all vehicles:
- Remove the backrest cover. Refer to → Chapter "Backrest Cover, Removing and Installing".
- Remove the headrests. Refer to → Chapter "Headrest, Removing and Installing".
- Remove the Seat side trim on the tunnel side. Refer to → Chapter "Trim, Removing and Installing, Tunnel-Side".
- Remove the seat side sill panel trim. Refer to → Chapter "Sill-Side Trim, Removing and Installing, Front Passenger Side Folding Seat".
- Fold the backrest forward.
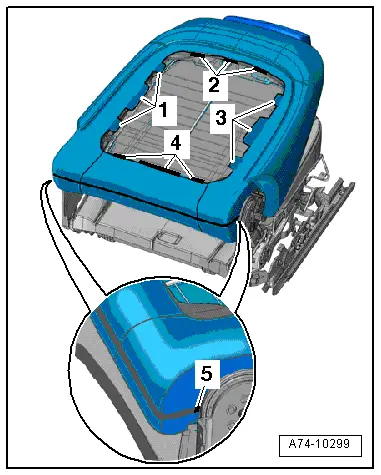
- Disengage the rear retaining strips -1, 2, 3 and 4- on the backrest frame.
- Remove the left and right clips -5- and open the zipper.
- Fold the backrest back up and remove the cover and lower cushion on the backrest frame.
- Remove the padding from the front backrest until the side airbag bolt -7- is accessible ; to do this carefully pull off the cover -2- and the padding -3- in the area around the side airbag.
- Remove the bolt -7-.
- Release the side airbag -6- and the hook -5- from the backrest frame -4- and leave it in the pocket sewn into the cover -1-.
- Remove the cover and cushion from the backrest frame while guiding the side airbag wiring harness.
Installing
 WARNING
- Follow all Safety Precautions when working with pyrotechnic components. Refer to → Chapter "Pyrotechnic Components Safety Precautions".
- Before handling pyrotechnic components (for example, connecting the connector), the person handling it must "discharge static electricity". This can be done by touching the door striker, for example.
Install in reverse order of removal. Note the following:
- Install the side airbag. Refer to → Chapter "Front Side Airbag with Igniter, Removing and Installing".
- Make sure the retaining strips engage correctly and the cover is not wrinkled.
Vehicles equipped with a mount for a DVD player:
- The guide mounts -1- and -3- on the backrest must free of contaminants.
- Align the backrest cover and install the guides into the mounts.
- The guides -1- and -3- can be installed in only one position.
- The release buttons must face outside.
- Install the trim -2-.
- The trim can be installed in only one position.
 Note
Note
Ignore -arrow-.
Continuation for all vehicles:
- Close the lower zipper on the backrest cover. Refer to Parts Catalog.
- Stick the ends of the zipper under the cover.
 Note
Note
Make sure the connectors are installed correctly and are secure.
 WARNING
Ignition must be on when connecting battery. If pyrotechnic components (for example, airbag, belt tensioner) are not repaired correctly, they may deploy unintentionally after connecting battery. There must not be anyone inside the vehicle when connecting the battery.
 DANGER!
When working on vehicles with the ignition already switched on or that are ready to drive there is a danger of the engine starting unexpectedly and of being poisoned by gas in enclosed areas. Risk of body parts and/or clothing being clamped or pulled.
Perform the following before switching on the ignition:
- Move the selector lever into P.
- Activate the parking brake
- Turn off the ignition.
- Open the hood
- Connect Battery Charger -VAS5095A- to the battery jump start terminal.
- Turn on the ignition.
- Connect the battery ground cable with the ignition turned on. Refer to → Electrical Equipment; Rep. Gr.27; Battery; Battery, Disconnecting and Connecting.
 Note
Note
If the Airbag Indicator Lamp -K75- indicates a fault, check the DTC memory, erase it and check it again. Refer to Vehicle Diagnostic Tester.

