Audi Q5: Drive Axle, Disassembling and Assembling
Drive Axle, Disassembling and Assembling, Outer CV Joint with 89 mm or 94 mm Diameter
Special tools and workshop equipment required
- Circlip Pliers (commercially available)
- Copper or Brass Drift
- Sealant. Refer to Parts Catalog
89 mm or 94 mm Outer CV Joint, Removing
- Clamp the drive axle with protective jaws in a vise clamp.
- Open the clamps.
- Slide back protective boot.
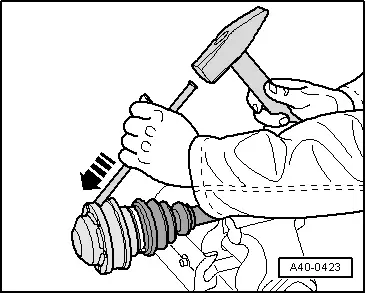
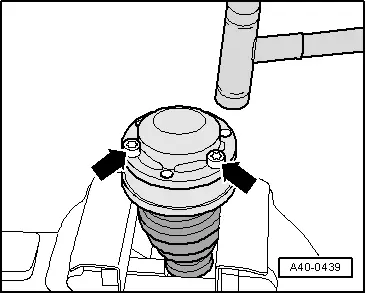
- Drive CV joint from drive axle using a drift -A-.
Drift -A- must be installed exactly on the triple roller star of the CV joint.
- If installed, remove the plate spring -item 4-.

- Remove joint and protective joint boot.
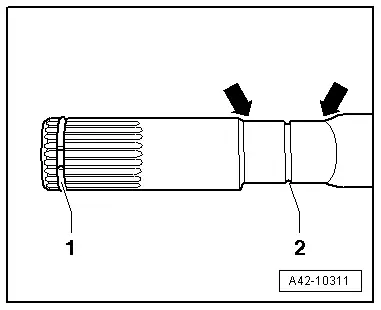
- Remove the circlip -1-.

89 mm or 94 mm Outer CV Joint, Installing
- Push the joint protective boot and a new clamp onto the drive axle.
Joints and protective joint boots must be free of grease.
- Position the joint protective boot between the -arrows- into the groove -2-.
1 - Circlip (snap ring), always replace.
2 - Positioning groove, push the joint protective boot into the groove until it engages.
- Push the dished washer onto the drive axle, where applicable.
Outer CV Joint, 89 mm
- Place 70 grams of drive axle grease evenly into the joint.
Outer CV Joint, 94 mm
- Place 80 grams of drive axle grease evenly into the joint.

Continuation for Both Constant Velocity Joints
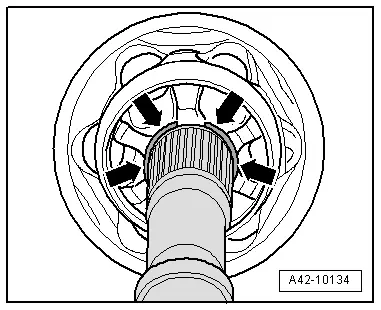
- Before installing joint piece, splines -A- must be lightly coated with grease used in joint.
- Insert sealing ring in groove on shaft.

- Slide on CV joint up to sealing ring.
- Align sealing ring at center with opening upward -arrows-.
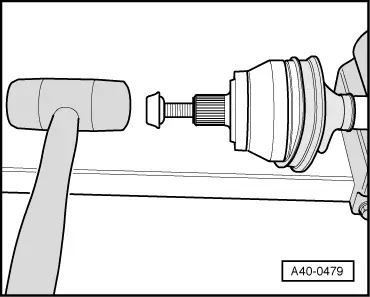
- Install the old drive axle bolt in the joint as shown in the illustration.
- Drive joint onto drive axle with plastic hammer until circlip engages.
- Install the joint protective boot onto the metal cap.
- Bleed protective joint boot.
- Tension clamps on outer joint.
Tightening Hose Clamp on Outer Joint
Applies to the small and large clamps.
Depending on the version of the clamp, use the following tools:
Special tools and workshop equipment required
- Pliers -3340-
- Clamping Pliers -VAG1682A-
- Torque Wrench 1331 5-50Nm -VAG1331-
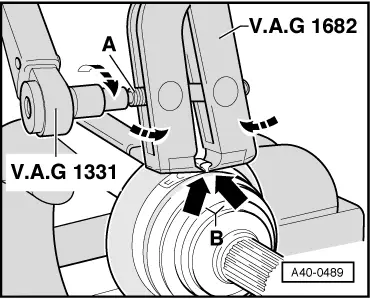
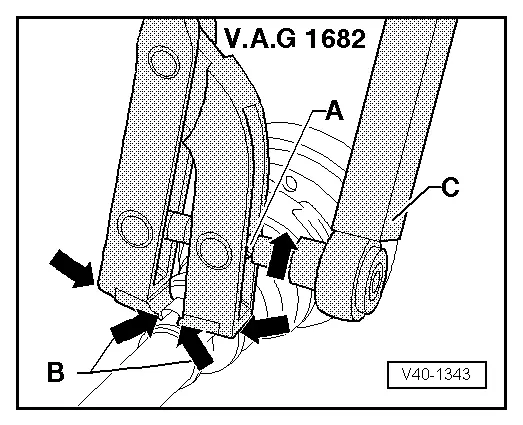
Mount and tension stainless steel clamps using Clamping Pliers -VAG1682A- as illustrated.
- When doing this, make sure that edges of clamping pliers are seated in corners -arrows B- of clamp.
- Tighten the clamp by turning the spindle using a torque wrench (do not tilt the pliers).
- The hard material of the CV boot (compared to rubber) makes it necessary to use a stainless steel hose clamp. It is only possible to tighten the hose clamp with Clamping Pliers -VAG1682A-.
- Tightening specification: 20 Nm.
- Use torque wrench with 5 to 50 Nm range (for example, Torque Wrench 1331 5-50Nm -VAG1331-).
- Make sure the thread on the spindle -A- is easy to move. Lubricate with MoS2 grease if necessary.
- If difficult to tighten, for example because of dirty threads, the proper clamping force of the clamping sleeve will not be reached even when tightened to the specification.
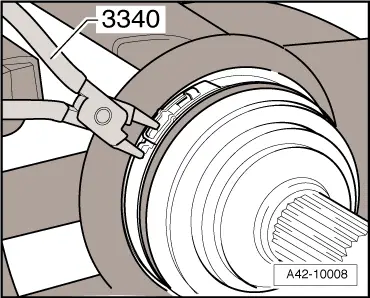
Mount and tension the clamp with the retaining tabs using Pliers -3340- as illustrated.
- Engage the clamp at the first catch by hand.
- Close the clamp using Pliers -3340-.

Drive Axle, Disassembling and Assembling, Inner CV Joint with 100 mm or 107 mm Diameter
Special tools and workshop equipment required
- Press Plate -VW401-
- Press Plate -VW402-
- Press Piece - Rod -VW408A-
- CV Joint Press Sleeve -VW522-
- Circlip Pliers (commercially available)
- Copper or Brass Drift
- Sealant. Refer to Parts Catalog.
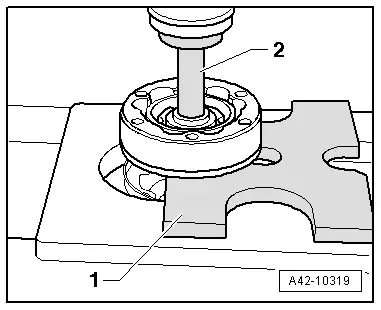
100 mm or 107 mm Inner CV Joint, Removing
- Clamp the drive axle with protective jaws in a vise clamp.
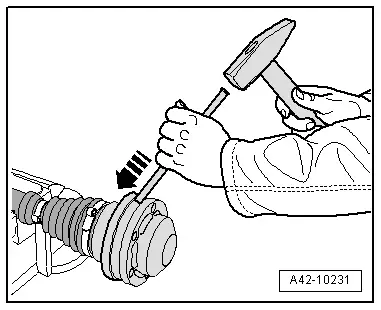
- Drive cover down with copper or brass drift.
- Drive cap down with copper or brass drift.
- Only open and remove the "small" protective boot clamp.
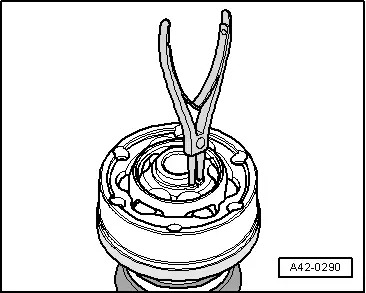
- Remove circlip.
- Press inner CV joint off of drive axle with the tool shown in illustration.
1 - Press Plate -VW 401- or Press Plate - VW 402-
2 - Press Piece - Rod -VW 408 A-
- Remove the plate spring -item 13- from the shaft, where applicable.
- Remove the CV joint boot from the drive axle.
100 mm or 107 mm Inner CV Joint, Installing
- Slide the protective joint boot with the "small" clamp onto the drive axle.
- Push the dished washer onto the drive axle, where applicable.
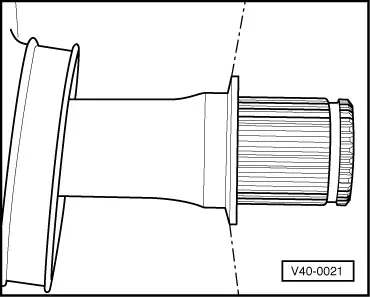
- Before installing joint piece, splines -A- must be lightly coated with grease used in joint.

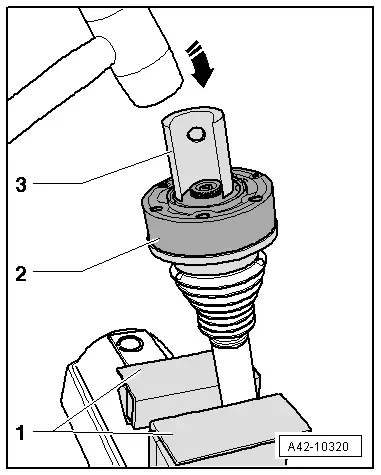
- Clamp the drive axle with protective jaws in a vise clamp.
- Carefully position the joint on the profile shaft using the CV Joint Press Sleeve -VW522- and install it all the way using a hammer.
1 - Protective covers
2 - Inner CV Joint
3 - CV Joint Press Sleeve -VW522-
The chamfer on inner diameter of ball hub (splines) must face and the contact collar on the drive axle.
- Install a new circlip.
- Check circlip for correct seating.
- Add half of the drive axle grease into the joint on the boot side before installing the joint protective boot.
- Lubricate the contact surface on the cover.

Applies to the 100 mm diameter inner CV joint
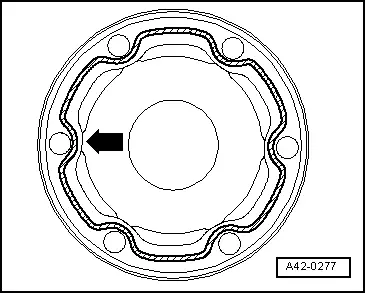
- Apply sealant -hatched surface- to clean surface on inner side of protective joint boot cap.
- Apply 2 - 3 mm diameter unbroken bead of sealant.
- The inner sealant bead runs near the holes -arrow-.
- Use Sealant. Refer to the Parts Catalog.

Continuation for Both Constant Velocity Joints
Protective boot and cap contact surfaces must be free of grease!
- Align cap with bolts -arrows- with bolt holes.
It must be aligned exactly because it cannot be aligned after driving on.
- Drive cover on with a plastic hammer.
- Clear away leaking sealing immediately.
- Apply the rest of the drive axle grease through the ball paths into the CV joint.

Applies to the 100 mm diameter inner CV joint
- Remove any grease on the cover contact surface and on the CV joint.
- Install a new seal -item 15- on the clean adhesive surface on the CV joint -arrow-.

Applies to the 107 mm diameter inner CV joint
- Remove any grease on the cover contact surface and on the CV joint.
- Apply sealant -hatched surface- to the clean surface in the inside of the cover.
- Apply 2 - 3 mm diameter unbroken bead of sealant.
- The inner sealant bead runs near the holes -arrow-.
- Use Sealant. Refer to the Parts Catalog.
Continuation for Both Constant Velocity Joints
- Align cap with bolts -arrows- with bolt holes.
It must be aligned exactly because it cannot be aligned after driving on.
- Drive cover on with a plastic hammer.
- Clear away leaking sealing immediately.
Joints and protective joint boots must be free of grease.
- Position the joint protective boot between the -arrows- into the groove -2-.
1 - ignore
2 - Positioning groove, push the joint protective boot into the groove until it engages.
- Make sure the protective boot is seated on the drive axle correctly.
- Tightening clamps on inner joint
Tightening clamps on inner joint
 Note
Note
When install the large clamps, make sure the seal is between the two holes.
Depending on the version of the clamp, use the following tools:
Special tools and workshop equipment required
- Pliers -3340-
- Clamping Pliers -VAG1682A-
- Torque Wrench 1331 5-50Nm -VAG1331-

Mount and tension stainless steel clamps using Clamping Pliers -VAG1682A- as illustrated.
- Attach the Clamping Pliers -VAG1682A- as illustrated. When doing this, make sure that edges of clamping pliers are seated in corners -arrows B- of clamp.
- Tighten the clamp by turning the spindle using a torque wrench -C- (do not tilt the pliers).
- The hard material of the CV boot (compared to rubber) makes it necessary to use a stainless steel hose clamp. It is only possible to tighten the hose clamp with Clamping Pliers -VAG1682A-.
- Tightening specification: 20 Nm.
- Use torque wrench with 5 to 50 Nm range (for example, Torque Wrench 1331 5-50Nm -VAG1331-).
- Make sure the thread on the spindle -A- is easy to move. Lubricate with MoS2 grease if necessary.
- If difficult to tighten, for example because of dirty threads, the proper clamping force of the clamping sleeve will not be reached even when tightened to the specification.
Mount and tension the clamp with the retaining tabs using Pliers -3340- as illustrated.
- Engage the clamp at the first catch by hand.
- Close the clamp using Pliers -3340-.