Audi Q5: Suspension Strut, Removing and Installing
Special tools and workshop equipment required
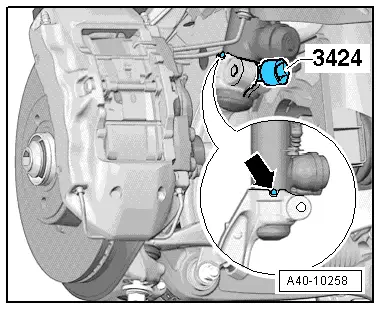
- Spreader Tool -3424-
- Torque Wrench 1331 5-50Nm -VAG1331-
- Torque Wrench 1332 40-200Nm -VAG1332-
- Engine/Gearbox Jack Adapter - Wheel Hub Support -T10149-
- Engine and Gearbox Jack -VAS6931-
Removing
- Remove the wheel.
- Remove the additional reinforcement. Refer to.
- Remove the plenum chamber cover. Refer to → Body Exterior; Rep. Gr.50; Bulkhead; Plenum Chamber Cover, Removing and Installing.
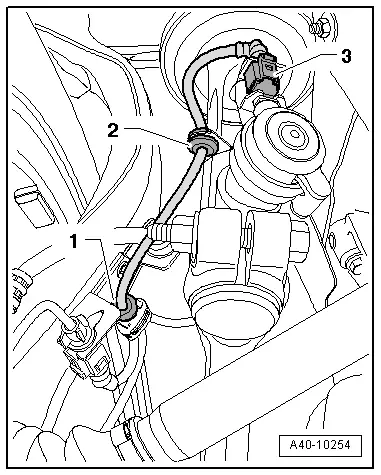
Applies to a vehicle with electronically controlled damping
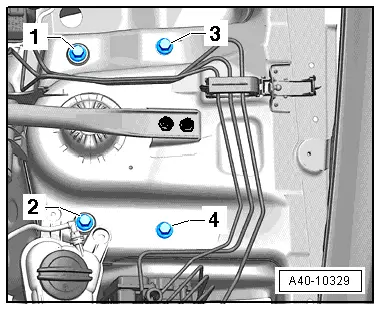
- Disengage and disconnect connector -3-.
- Remove brackets -1- and -2- and expose the wire.
Continuation for all vehicles
- Remove the shock absorber fork. Refer to → Chapter "Shock Absorber Fork, Removing and Installing".
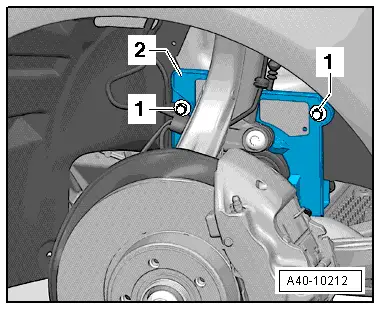
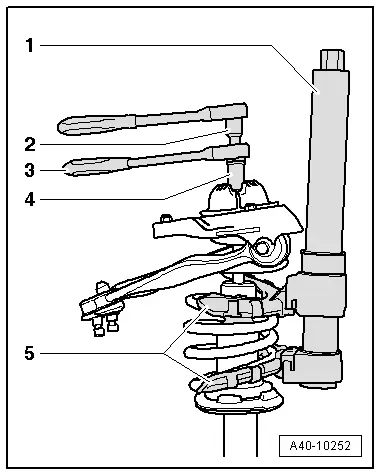
- Remove the nuts -1- and the cover -2-.
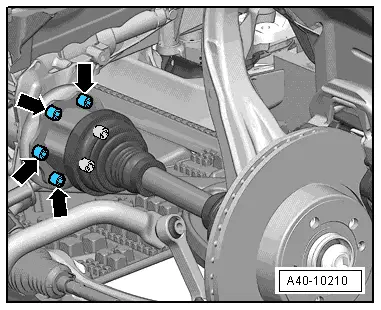
- Remove the bolts -arrows- from the flange shaft/transmission.
- Remove the brake line and wires from the bracket on the wheel bearing housing.
- Turn the wheel hub until one of the holes for the wheel bolts is on top.
- Install the Engine/Gearbox Jack Adapter - Wheel Hub Support -T10149--1- with wheel bolt on wheel hub.
- Support the wheel bearing housing over the Engine/Gearbox Jack Adapter - Wheel Hub Support -T10149--1- using the Engine and Gearbox Jack -VAS6931-.
 WARNING
- Do not lift or lower vehicle with the engine and gearbox jack still under the vehicle.
- Do not leave the Engine and Gearbox Jack -VAS6931- under the vehicle any longer than necessary.
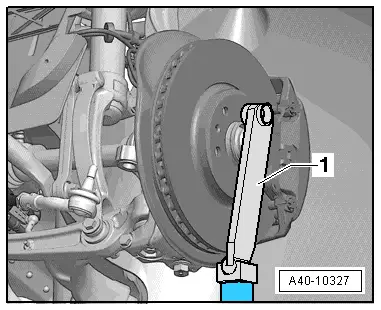
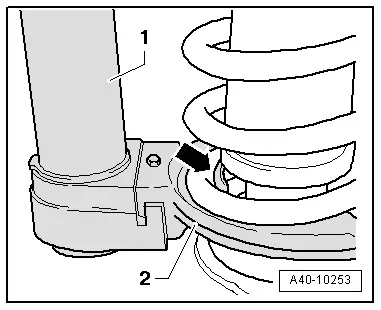
- Disconnect the threaded connection -1-.
The slits in the wheel bearing housing must not be widened using a chisel or similar tool!
- Remove booth joint pins in the upper control arm -2- from the wheel bearing housing.
 Note
Note
Do not lower wheel bearing housing more than necessary.
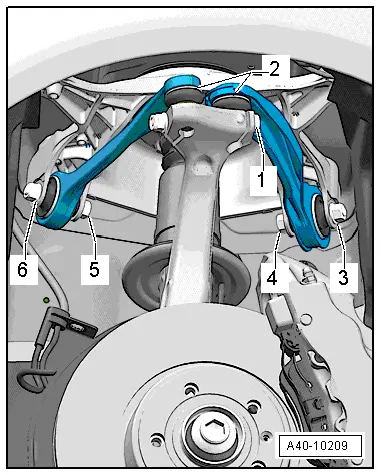
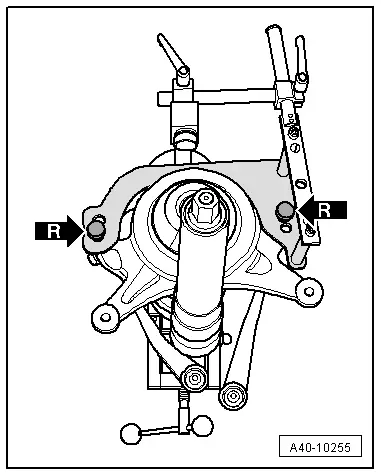
- Remove the bolts -1 through 4- and remove the suspension strut with mounting bracket.
Installing
Install in reverse order of removal. Note the following:
 Note
Note
Always observe the tightening sequence for the mounting bracket threaded connection with the suspension strut to the suspension strut tower.
- Install and tighten the bolts one after the other in the sequence -1, 2, 3- and -4-.
 Note
Note
Push the upper control arms down as far as possible while tightening the bolts!

- Tighten the bolting -1-.

 Note
Note
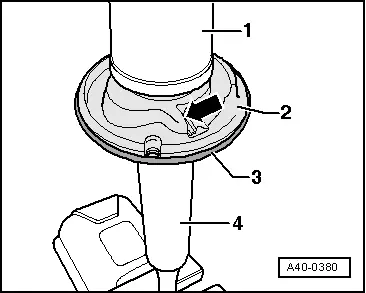
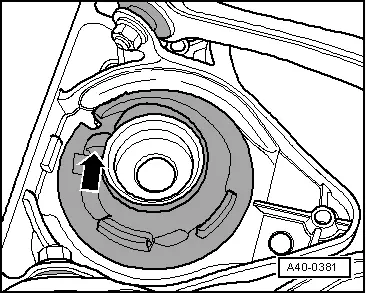
On vehicles with electronically controlled damping, make sure the T-pin -arrow- fits into the groove in the shock absorber fork when being installed.
 Note
Note
Bonded rubber bushings have a limited range of motion. Only tighten suspension screws when vehicle is in curb weight or control position.
- Wheel bearing, lifting to curb weight position on vehicles with coil springs. Refer to → Chapter "Wheel Bearing in Curb Weight, Lifting Vehicles with Coil Spring".
- On vehicles with automatic head lamp range control, perform headlamp basic setting. Refer to → Electrical Equipment; Rep. Gr.94; Headlamps; Headlamp, Adjusting.
- If the vehicle level sensor was removed and installed on a vehicle with electronically controlled damping or if the linkage was loosened, the control position must be programmed again. Refer to → Chapter "Control Position, Programming" Vehicle Diagnostic Tester.
- If the control position was reprogrammed on vehicles with lane assist, the Directional Stabilization Assistance Control Module -J759- must be calibrated again. Refer to → Chapter "Lane Assist, Calibrating".
- Tighten the wheel. Refer to → Chapter "Wheel Bolt Tightening Specifications".
- An axle alignment may be required. Refer to → Chapter "Evaluating Need for Axle Alignment".
Suspension Strut, Servicing
Special tools and workshop equipment required
- Spring Compressor Kit - Spring Tensioner -VAG1752/1-
- Spring Compressor Kit - Strut Holder -VAG1752/2-
- Spring Compressor Kit - Spring Retainer w/Inserts -VAG1752/7-
- Spring Compressor Kit - Supplementary Set -VAG1752/18-
- Spring Compressor Kit - Supplementary Set - Slider -VAG1752/18-3-
- Spring Compressor Kit - Supplementary Set - Clamp Plate -VAG1752/19-1-
- Spring Compressor Kit - Supplementary Set -VAG1752/19-
- Shock Absorber Set - Socket -T10001/3-
- Shock Absorber Set - Socket -T10001/4-
- Shock Absorber Set - Extension SW6 -T10001/7-
- Shock Absorber Set - Reversible Ratchet -T10001/11-
Overview
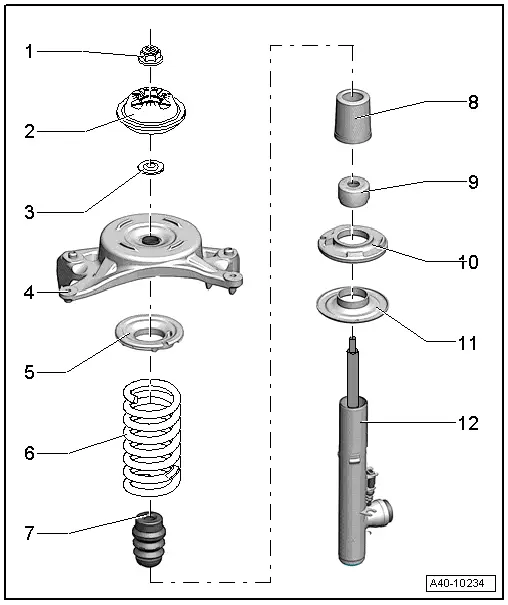
1 - Nut
- 50 Nm
- Always replace if removed
2 - Shock absorber mount
3 - Washer
4 - Mounting bracket
5 - Upper Spring Support
6 - Coil Spring
- There are different versions of the suspension. Refer to → Chapter "Explanations of Production Control Numbers (PR Number)".
- Allocation. Refer to the Parts Catalog.
7 - Spring
8 - Protective Sleeve
9 - Protective cap
10 - Lower Spring Support
11 - Lower spring plate
12 - Shock Absorber
- Replacing. Refer to → Fig. "Replacing the Shock Absorber".
- There are different versions of the suspension. Refer to → Chapter "Explanations of Production Control Numbers (PR Number)".
- Always release gas and drain malfunctioning shock absorbers before disposal.
- Allocation. Refer to the Parts Catalog.
Production Control Number (PR number) explanation. Refer to → Chapter "Explanations of Production Control Numbers (PR Number)"
The shock absorber combination installed in the vehicle is indicated by the corresponding PR number on the vehicle data plate.
Coil Spring, Removing
1 - Spring Compressor Kit - Spring Tensioner -VAG1752/1-
2 - Shock Absorber Set - Extension SW6 -T10001/7-
3 - Shock Absorber Set - Reversible Ratchet -T10001/11-
4 - Shock Absorber Set - Socket -T10001/3-
5 - Spring Compressor Kit - Spring Retainer w/Inserts -VAG1752/7-
- Clamp the suspension strut in the vise with the shock absorber fork installed.
- Mark the installation location of the mounting bracket to the T-pin on the shock absorber tube. (felt-tip pen)
- Preload the coil spring with the Spring Compressor Kit - Spring Tensioner -VAG1752/1- and Spring Compressor Kit - Spring Retainer w/Inserts -VAG1752/7- until upper suspension strut is free.

- Make sure the coil spring is seated in the spring holder -2- correctly.
1 - Spring Compressor Kit - Spring Tensioner -VAG1752/1-
2 - Spring Compressor Kit - Spring Retainer w/Inserts -VAG1752/7-
- Remove the nut from the piston rod using the tools -2-, -3- and -4-.
1 - Spring Compressor Kit - Spring Tensioner -VAG1752/1-
2 - Shock Absorber Set - Extension SW6 -T10001/7-
3 - Shock Absorber Set - Reversible Ratchet -T10001/11-
4 - Shock Absorber Set - Socket -T10001/3-
5 - Spring Compressor Kit - Spring Retainer w/Inserts -VAG1752/7-
- Remove the individual components of the pre-tensioned suspension strut and coil spring with the Spring Compressor Kit - Spring Tensioner -VAG1752/1-.
Replacing the Shock Absorber
- Remove the cap -1- and the lower spring support -2-.
- Loosen suspension strut -3- using plastic hammer and remove upward.
- Drive the spring plate onto the new shock absorber using a plastic hammer.
Coil Spring, Installing
- Install the lower spring support and the cap.
- Position the pre-tensioned coil spring on the lower spring support. End of spring coil must rest against stop -arrow- (permissible play max. 2 mm).

Install mounting bracket with spring washer onto pre-loaded spring so that spring washer makes contact on end of spring coil -arrow- (permissible play max. 2 mm).
- Position individual suspension strut components.
- Tighten the nut using special tools -item 1-.
- Align the marking on the mounting bracket to the T-pin on the shock absorber tube and release the tension in the spring.
Mounting bracket installation position
- Install the Spring Compressor Kit - Strut Holder -VAG1752/2- as shown in the illustration.
1 - Spring Compressor Kit - Supplementary Set - Slider -VAG1752/18-3-
2 - Spring Compressor Kit - Supplementary Set -VAG1752/19-
3 - Spring Compressor Kit - Strut Holder -VAG1752/2-
4 - Spring Compressor Kit - Supplementary Set - Clamp Plate -VAG1752/19-1-
- Tension the suspension strut with spring compressor vertically in the Spring Compressor Kit - Strut Holder -VAG1752/2-.
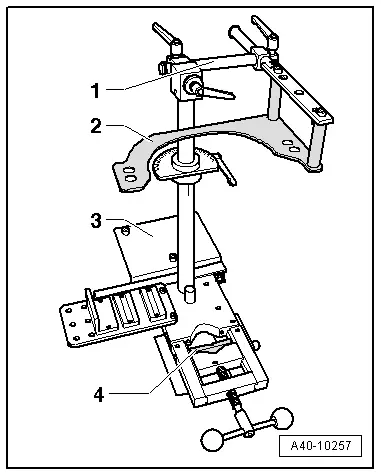
- Tension the suspension strut so that the pin -1- engages in the opening of the Spring Compressor Kit - Supplementary Set - Clamp Plate -VAG1752/19-1--2-.
- When tensioning, make sure the front damping adjustment valve -1- or the wire connection -2- does not sit on the Spring Compressor Kit - Strut Holder -VAG1752/2--3-.

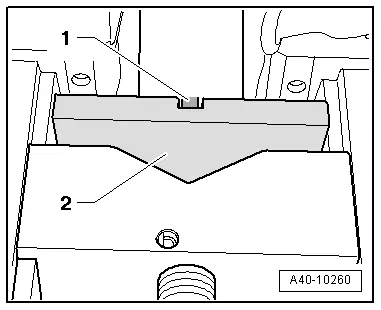
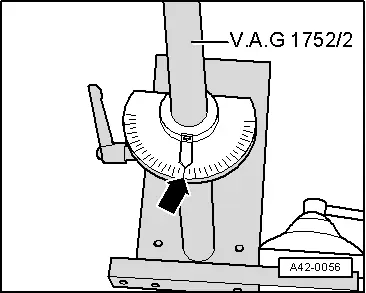
- Disengage the locking lever and set the pointer to the 0º position -arrow-, then tighten the locking lever.
- Adjust the mounting bracket so the Spring Compressor Kit - Supplementary Set -VAG1752/19- for the respective side of the vehicle can be bolted to the mounting bracket.
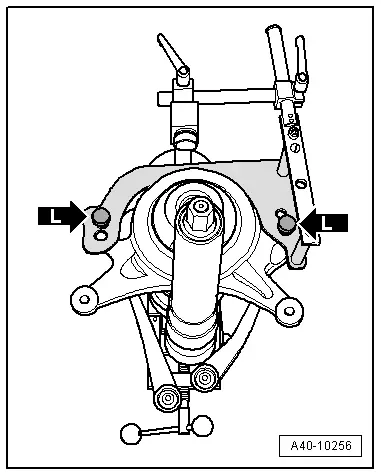
Left side of vehicle
- Bolt the Spring Compressor Kit - Supplementary Set -VAG1752/19- onto the mounting bracket -L arrows-.
Right side of vehicle
- Bolt the Spring Compressor Kit - Supplementary Set -VAG1752/19- onto the mounting bracket -R arrows-.
- Now release tension on the Spring Compressor Kit - Spring Tensioner -VAG1752/1- and remove.
 Note
Note
When releasing the tension, make sure the ends of the spring lie on the spring support stops in the mounting bracket and the lower spring support.
- Check adjustment, repeat procedure if necessary.
Permitted deviation: +-2º